Sweet Potato

Categories
Blog

Mastering Salesforce Pipeline Inspection

Introduction:

Pipeline inspection is a vital practice for sales teams to assess the health and effectiveness of their sales pipelines. By regularly reviewing and analyzing opportunities at each stage, sales professionals can identify potential roadblocks, optimize their sales strategies, and increase the likelihood of closing deals successfully. In this blog post, we will delve into the significance of pipeline inspection and provide a step-by-step guide on setting up a comprehensive inspection process in Salesforce.

1. The importance of Pipeline Inspection:

Pipeline inspection allows sales teams to gain valuable insights into their sales pipelines and make informed decisions to improve performance. It helps in:

  • Identifying bottlenecks or stalled deals that require attention.
  • Improving forecasting accuracy and revenue projections.
  • Assessing the quality of opportunities and ensuring alignment with defined criteria.
  • Facilitating collaboration between sales reps and sales leaders for pipeline optimization.
  • Optimizing resource allocation and prioritizing high-value opportunities.

2. Setting up Pipeline Inspection in Salesforce:

Follow these steps to establish Pipeline Inspection in Salesforce:

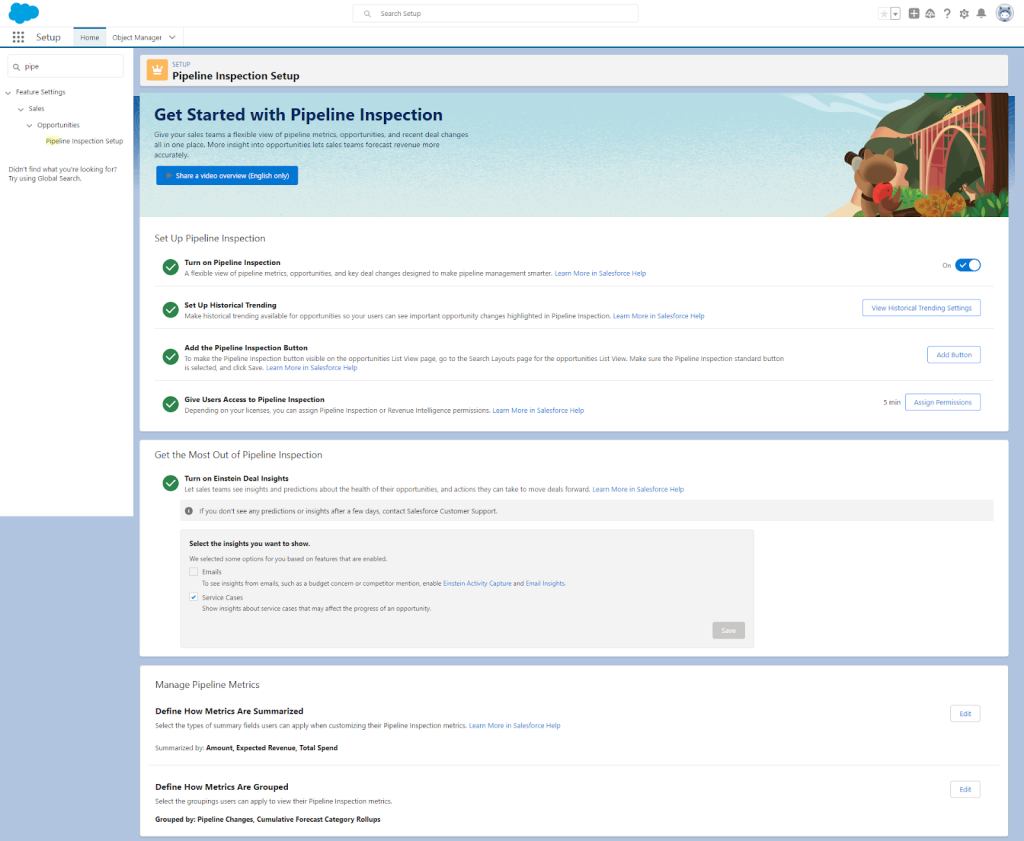
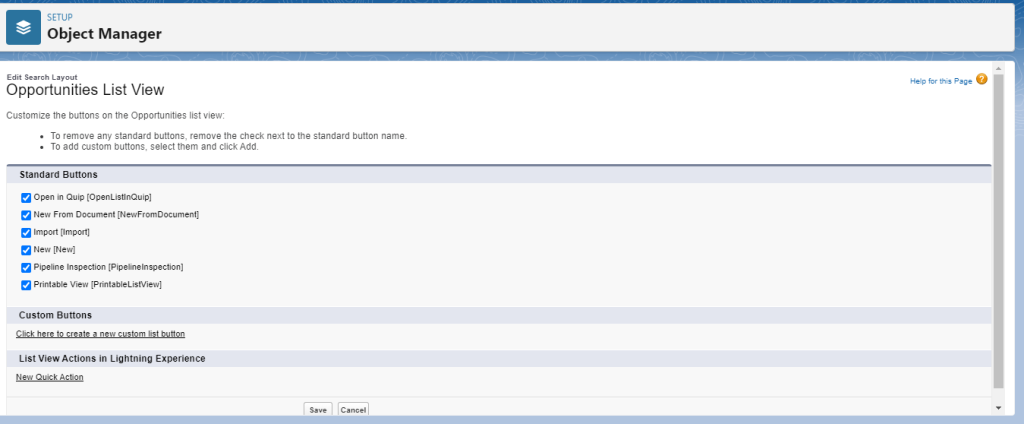
  1. From Setup, in the Quick Find box, enter Pipeline Inspection, and then select Pipeline Inspection Setup.
  2. Turn on Pipeline Inspection.
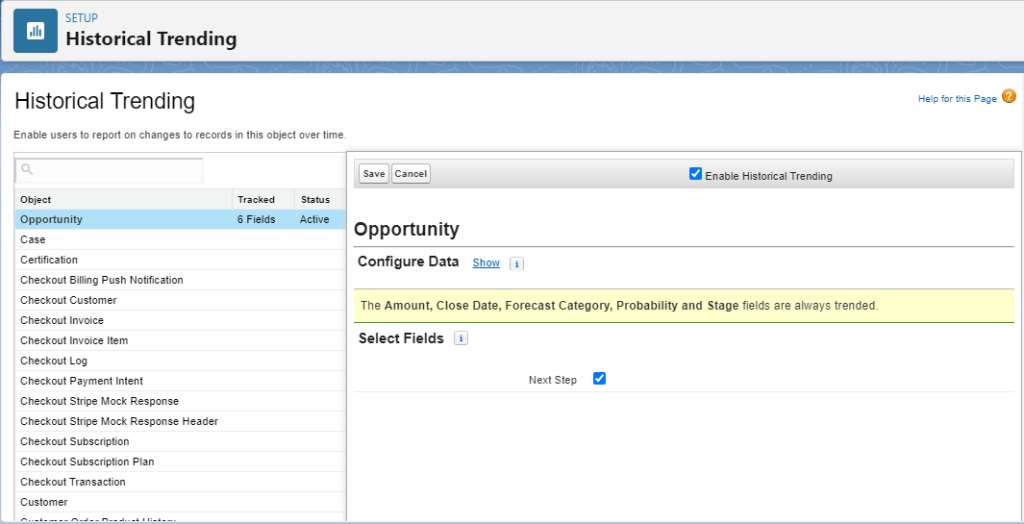
  3. Verify that historical trending is enabled and configured for opportunities. The fields required for Pipeline Inspection features are trended by default, including the Next Step field.
  1. Add the Pipeline Inspection button to the Opportunity tab.
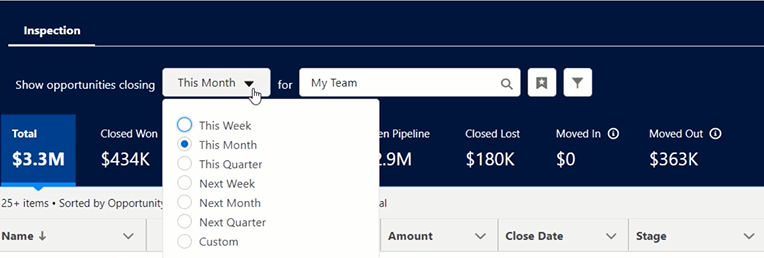
  1. You can see the button in the opportunity page.

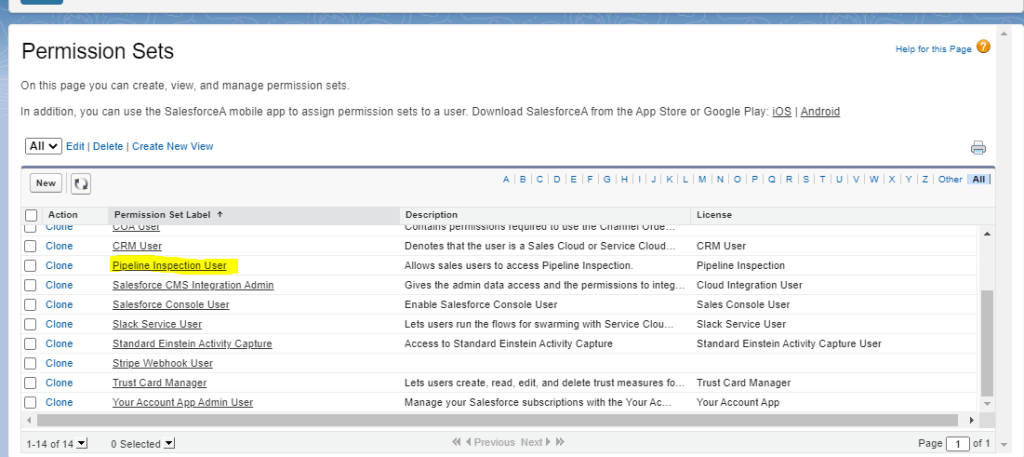
6. Assign the Pipeline Inspection permission access to users.

3. The process of Sales Pipeline Inspection:

a. Define Inspection Criteria:

Collaborate with sales leadership to establish clear and measurable criteria for pipeline inspection. Determine the factors that indicate a healthy opportunity at each stage, such as engagement level, decision-maker involvement, budget alignment, and next steps. Ensure these criteria align with your overall sales strategy and goals.

b. Customize Opportunity Fields:

Tailor the opportunity object in Salesforce to include relevant fields that capture the necessary data for pipeline inspection. Consider adding fields for key metrics such as deal stage, close date, probability, expected revenue, competition, and notes. These fields will assist in evaluating opportunities based on the defined inspection criteria.

c. Implement Validation Rules:

Set up validation rules in Salesforce to enforce data accuracy and consistency. For example, you can establish rules that require specific fields to be completed before progressing to the next stage. This ensures that opportunities are properly qualified and tracked throughout the sales process.

d. Utilize Reports and Dashboards:

Leverage Salesforce’s reporting and dashboard features to create visualizations that provide a comprehensive view of your pipeline. Develop reports that display key metrics like win rates, conversion rates, average deal size, and stage progression. Build interactive dashboards that enable real-time monitoring and facilitate drill-down analysis.

e. Schedule Regular Pipeline Reviews:

Establish a consistent cadence for pipeline reviews, whether on a weekly or bi-weekly basis. Gather sales team members and sales leadership to review opportunities, discuss challenges, and collaborate on strategies to move deals forward. Encourage open dialogue, share best practices, and provide coaching to enhance pipeline management skills.

f. Integrate Sales Tools and Automation:

Integrate additional sales tools and automation with Salesforce to streamline the pipeline inspection process. For instance, implement sales engagement platforms that track prospect interactions, automate follow-ups, and provide engagement analytics. Integrate with AI-powered tools that offer predictive insights to prioritize high-value opportunities.

4. Continuous Refinement and Improvement:

Pipeline inspection is an iterative process that requires continuous refinement and improvement. Regularly assess the effectiveness of your inspection criteria, validation rules, and reporting metrics. Solicit feedback from your sales team and sales leadership to identify areas of enhancement. Stay agile and adapt your process to align with evolving market dynamics and customer needs.

Conclusion:

Setting up a comprehensive pipeline inspection process in Salesforce empowers sales teams to gain insights into their sales pipelines, optimize their strategies, and achieve better sales results. By defining inspection criteria, customizing opportunity fields, implementing validation rules, utilizing reports and dashboards, scheduling regular reviews, and integrating sales tools, you can streamline your pipeline inspection process and drive continuous improvement. Leverage Salesforce’s robust CRM capabilities to establish a proactive approach to pipeline management and elevate your sales performance.

Categories
Blog

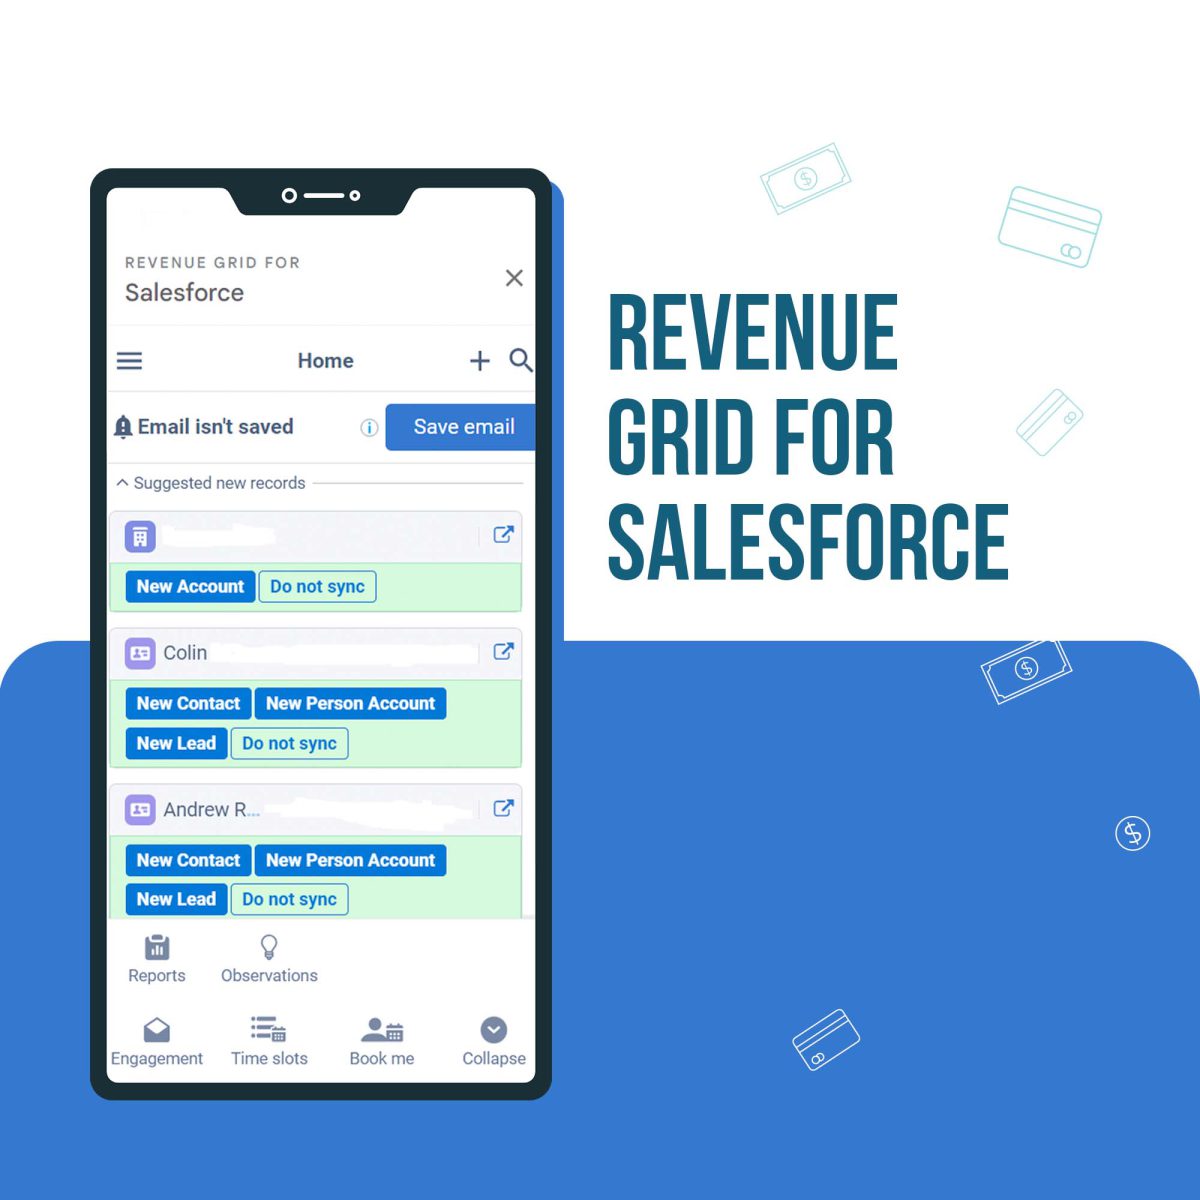
Revenue Grid for Salesforce

Introduction:

As a business, it’s essential to have a clear understanding of your revenue streams. A revenue grid is a useful tool that helps you track your revenue and analyze your business performance. Integrating your revenue grid to Salesforce can help you streamline your revenue management process and get a comprehensive view of your sales pipeline. In this blog, we’ll discuss the benefits of integrating a revenue grid to Salesforce and the steps to do so.

Benefits of integrating a revenue grid to Salesforce using a Gmail plugin:

Easy access to revenue data: Integrating your revenue grid to Salesforce using a Gmail plugin allows you to access your revenue data directly from your Gmail inbox. You can view your revenue data alongside your emails and get a better understanding of your business performance.

Streamlined revenue management process: With a revenue grid integrated to Salesforce using a Gmail plugin, you can automate your revenue management process. You can set up workflows that automatically update your revenue data and create reports based on your revenue metrics.

Improved forecasting: Integrating your revenue grid to Salesforce using a Gmail plugin can help you improve your forecasting accuracy. You can use historical data to predict future revenue and make data-driven decisions.

Comprehensive sales pipeline view: By integrating your revenue grid to Salesforce using a Gmail plugin, you can get a comprehensive view of your sales pipeline. You can view your revenue data alongside your sales data and get a better understanding of your sales performance.

Steps to integrate a revenue grid to Salesforce using a Gmail plugin:

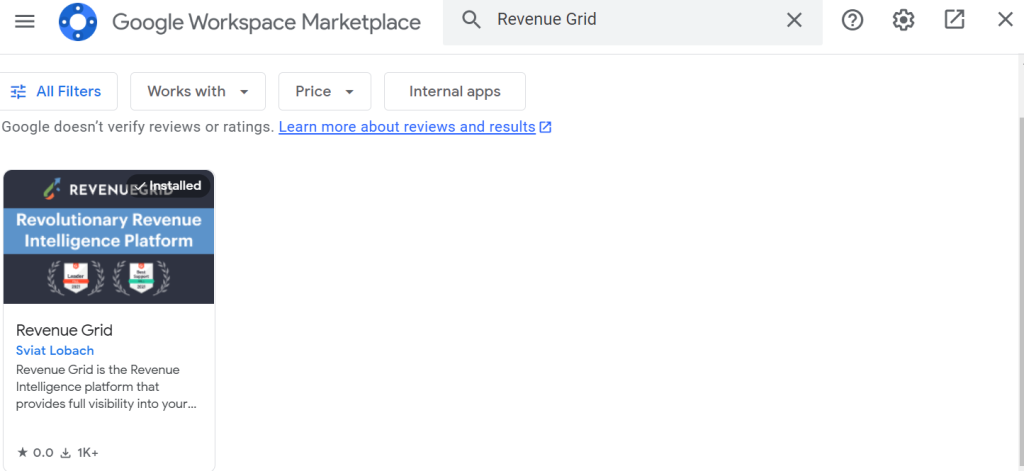
Install the Revenue Grid plugin for Gmail: Go to the Google Workspace Marketplace and search for “Revenue Grid” Click on the “Install” button to add the plugin to your Gmail account.

Connect your Gmail account: After installing the plugin, open an email in Gmail and click on the Revenue Grid icon located on the right side of the email.

Connect your Salesforce account: After connecting the Gamil then need to connect salesforce. In the Revenue Grid sidebar that appears, click on the “Salesforce” tab and select “Connect to Salesforce.” Follow the prompts to log in to your Salesforce account and grant permissions to Revenue Grid.

Enable Salesforce Sync: Once you’ve connected your Salesforce account, you can enable Salesforce Sync to automatically sync your emails and calendar events to Salesforce. To do this, click on the “Settings” tab in the Revenue Grid sidebar, select “Sync,” and toggle on “Salesforce Sync.”

Use the plugin features: With the plugin installed and Salesforce connected, you can now use features such as Email Tracking, Email Templates, and Calendar Sync to streamline your sales workflow and keep track of your interactions with prospects and customers.

By following these steps, you can use the Revenue Grid plugin for Gmail to connect with Salesforce and improve your sales productivity

Conclusion:

Integrating your revenue grid to Salesforce using a Gmail plugin can help you streamline your revenue management process and get a comprehensive view of your sales pipeline. By following the steps outlined in this blog, you can set up an integration that automates your revenue tracking and helps you make data-driven decisions. Choose a revenue grid that has a Gmail plugin available and start integrating your revenue grid to Salesforce today.

Categories
Blog

Xero Integration With Salesforce Using Breadwinner

Introduction:

Small businesses require efficient financial management, but it can be challenging to keep bookkeeping up to date. Fortunately, there are several accounting software solutions available, and Xero is a reliable option which is simple and inexpensive. Founded in Wellington in 2006 by Rod Drury and Hamish Edwards, Xero is a cloud-based accounting software that caters to small businesses. Combining Xero with Salesforce, a customer relationship management (CRM) platform, can enhance accounting and customer management processes. By syncing our financial data and customer information between these two platforms, we can save time, reduce errors, and gain insight into our business operations.

Xero allows you to manage your finances, including invoicing, expenses, and inventory, from anywhere and at any time. Salesforce helps you manage your sales, marketing, and customer service activities. By integrating Xero with Salesforce, we can bring these two systems together to complement our business operations.

Integrating Xero with Salesforce offers several benefits, including streamlining accounting processes by automating invoicing, payment recording, and account reconciliation. This eliminates the need for manual data entry, reducing the risk of errors. We can also gain insights into our financial data in Salesforce, making it easier to track revenue, expenses, and cash flow.

Here are some steps to get started:

Assess our integration needs

Before we begin integrating Xero with Salesforce, we should evaluate our integration needs and goals. This will help us determine which integration method is best for our business.

Choose an integration method

There are several third-party integration tools available that can help you integrate Xero with Salesforce, such as Zapier, Workato, and Breadwinner. You can also build a custom integration using Xero and Salesforce APIs.

Set up the integration

Once we have chosen an integration method, we will need to set up the integration. This may involve configuring the integration tool, mapping fields between Xero and Salesforce, and setting up any custom workflows or triggers.

Test and refine the integration

After we have set up the integration, we should test it thoroughly to ensure that it is working as expected. We may need to refine the integration based on our testing results and feedback from our team.

How we integrate Xero with Salesforce:

Despite all the integration options, our preferred partner is “Breadwinner”. It provides a comprehensive solution for managing financial data and accounting processes within Salesforce.

The first step to integrating Xero with Salesforce using Breadwinner is to install the Breadwinner app in your Salesforce org. You can find Breadwinner on the Salesforce AppExchange and follow the installation instructions provided.

Once you’ve installed Breadwinner, the next step is to connect your accounting system to Salesforce. Breadwinner currently supports QuickBooks, Xero, and NetSuite. After selecting your accounting system, you’ll need to enter your login credentials and authorize the connection.

Breadwinner can be installed and configured in minutes, with no mapping required! We have dedicated objects in Salesforce that perfectly represents a corresponding Xero object. 

Then you’ll need to configure your sync preferences. This will allow you to choose which data to sync between Salesforce and your accounting system. You can do this by navigating to the Breadwinner tab in Salesforce and selecting “Sync Settings”.

Once you’ve configured your sync preferences, you can start syncing data between Salesforce and your accounting system. This can be done manually or set up on a schedule. Breadwinner provides real-time financial insights and streamlined accounting processes, helping you to make data-driven decisions and save time on manual tasks.

Finally, we have integrated Xero and Salesforce using Breadwinner.

Here are some benefits of integrating Xero with Salesforce:

Streamline our accounting processes

We can automatically create invoices, record payments, and reconcile accounts in Xero based on data from Salesforce. This eliminates the need for manual data entry and reduces the risk of errors. We can also view our financial data in Salesforce, making it easier to track our revenue, expenses, and cash flow.

Improve our customer management

Integrating Xero with Salesforce allows us to keep our customer data up to date and accurate in both systems. We can create new customers in Salesforce and have them automatically added to Xero. We can also view a customer’s financial history in Salesforce, such as their outstanding balances and payment history, which can help us provide better customer service.

Gain valuable insight

We can gain insights into our business operations that would be difficult to obtain otherwise. For example, we can analyze our sales data in Salesforce and compare it to our financial data in Xero to identify trends and opportunities. We can also use custom reports and dashboards to track our key performance indicators (KPIs) and make data-driven decisions.

Pricing for Xero:

The pricing of Xero may vary depending on the country and currency. Here are the current pricing plans for Xero:

EditionUK PriceUS PriceAustralia Price
Starter£10 per month$11 per monthAUD $13.50 per month
Standard£24 per month$32 per monthAUD $27 per month
Premium£30 per month$62 per monthAUD $47 per monthPremium 2 – AUD $62 per month

Pricing for Breadwinner:

Breadwinner offers a range of pricing plans for their Salesforce-Xero integration software, depending on the number of users and the features required. Here are the current pricing plans for Breadwinner:

EditionPrice
Starter $99 per month for up to 3 users, with basic sync and automation features
Professional$249 per month for up to 10 users, with additional features such as mapping and customization options
Enterprise$249 per month for up to 10 users, with additional features such as mapping and customization options

It’s important to note that the pricing for Breadwinner and Xero are in addition to the pricing for Salesforce, which are separate platforms with their own pricing plans. Additionally, Breadwinner and Xero offers a free trial period so that you can test out the software and see if it meets your business needs before committing to a paid plan.

In conclusion, integrating Xero with Salesforce is an excellent way to enhance accounting and customer management processes, streamline operations, and gain valuable insights into business operations. By automating tasks and syncing data between these two platforms, you can save time, reduce errors, and improve your overall business performance.

Categories
Blog

Salesforce Health Cloud: The Future of Healthcare

Introduction

Salesforce is a leading provider of cloud-based software solutions that are used by businesses of all sizes and across all industries. Salesforce’s platform provides organizations with a range of tools to manage their customer relationships, automate their sales and marketing processes, and streamline their operations. One of Salesforce’s most exciting offerings is its Health Cloud platform, which is designed specifically for healthcare providers.

Salesforce Health Cloud is a cloud-based platform that enables healthcare providers to have a complete view of the patient, including their medical history, diagnoses, medications, and treatments. By leveraging the power of Salesforce, Health Cloud helps providers deliver personalized care that is both proactive and preventative.

In this blog, we’ll take a closer look at what Salesforce Health Cloud is, how it works, and what it can do for healthcare providers.

What is Salesforce Health Cloud?

Salesforce Health Cloud is a healthcare-specific version of the Salesforce CRM (Customer Relationship Management) platform. It provides healthcare providers with a single, unified view of the patient, allowing them to better manage patient relationships and deliver personalized care.

Health Cloud is built on the Salesforce Lightning platform, which means it is highly customizable and scalable. It can be easily configured to meet the unique needs of healthcare providers and can be integrated with other healthcare systems, such as Electronic Health Records (EHRs).

How does Salesforce Health Cloud work?

Salesforce Health Cloud works by bringing together data from a variety of sources, including EHRs, medical devices, wearables, and other healthcare systems. This data is then organized into a unified patient profile, which can be accessed by healthcare providers from any device or location.

Health Cloud also includes a number of powerful tools that help healthcare providers deliver personalized care. For example, it includes a care coordination tool that allows providers to collaborate with each other and with patients in real time. It also includes a patient engagement tool that enables providers to communicate with patients through their preferred channels, such as email, text, or social media.

What can Salesforce Health Cloud do for healthcare providers?

Salesforce Health Cloud can help healthcare providers in a number of ways, including:

Improving patient outcomes: By providing a complete view of the patient, Health Cloud enables providers to deliver more personalized care that is tailored to the individual’s unique needs.

Increasing patient engagement: Health Cloud’s patient engagement tool enables providers to communicate with patients through their preferred channels, which can help improve patient satisfaction and loyalty.

Streamlining care coordination: Health Cloud’s care coordination tool allows providers to collaborate with each other and with patients in real time, which can help reduce errors and improve care quality.

Enhancing operational efficiency: Health Cloud’s powerful analytics tools provide healthcare providers with insights into their operations, which can help them identify areas for improvement and optimize their workflows.

Conclusion

Salesforce Health Cloud is a powerful platform that has the potential to transform healthcare delivery. By bringing together data from a variety of sources and providing healthcare providers with a complete view of the patient, it enables them to deliver personalized, proactive, and preventative care that can improve patient outcomes and increase patient engagement.

Whether you are in the healthcare industry or another industry altogether, Salesforce can help you optimize your operations, streamline your workflows, and deliver better customer experiences. Contact us today to learn more about how their solutions can help your organization.

Categories
Blog

Einstein Activity Capture

Salesforce Einstein Activity Capture is a powerful tool that allows you to automatically capture customer interactions, such as emails, meetings, and calls, and store them directly within Salesforce. This functionality enables you to have a 360-degree view of your customers, improving collaboration between teams and enhancing the customer experience.

Einstein Activity Capture uses machine learning algorithms to analyze customer interactions and automatically associates them with the appropriate records in Salesforce. This technology can save your team valuable time and effort, as they no longer have to manually log every interaction with a customer.In this blog, we will explore the key benefits of Salesforce Einstein Activity Capture.

Using Einstein Activity Capture to Boost Your Sales Productivity:

Einstein Activity Capture is a tool that can enhance your sales productivity by capturing and storing data regarding your sales activities in Salesforce.This tool offers valuable insights into how you and your team are utilizing your time, enabling you to recognize areas for improvement and take action to streamline your sales processes.

Here are some ways that you can use Einstein Activity Capture to boost your sales productivity:

Automate Data Entry

One of the major advantages of using Einstein Activity Capture is that it automates the process of data entry into Salesforce.Einstein Activity Capture saves you time and eliminates the need for manual data entry by capturing data from your email, calendar, and other sources.This allows you to concentrate on selling, rather than on administrative tasks.

For Example, Let’s say you work in sales and have a meeting scheduled with a potential customer. You have already added the meeting to your calendar and synced it with Salesforce. With Einstein Activity Capture, when you attend the meeting, the software will automatically capture the meeting details, including the date and time, location, attendees, and any notes you take during the meeting.

Once the meeting is over, Einstein Activity Capture can automatically create a new task or opportunity in Salesforce based on the details of the meeting. For example, if the potential customer expressed interest in a particular product or service, Einstein Activity Capture can create a new opportunity in Salesforce and associate it with the customer’s account.

This automated data entry can save you time and reduce the risk of human error, as you don’t have to manually enter the meeting details or create new tasks or opportunities in Salesforce. Instead, the software does it for you, freeing you up to focus on other tasks and activities.

Track Sales Activities

Einstein Activity Capture empowers you to track a broad range of sales activities, such as emails, meetings, calls, and tasks. By monitoring these activities, you can acquire insights into the amount of time you and your team are devoting to each activity and recognize areas for improvement.For instance, if you discover that your team is allocating excessive time to administrative tasks, you can implement measures to simplify those processes and liberate more time for selling

Analyze Sales Performance

Einstein Activity Capture provides you with powerful analytics tools that enable you to analyze your sales performance in detail. You can access reports and dashboards that display how much time you and your team are dedicating to various activities, the number of meetings and calls you are conducting, and the number of deals you are closing.

Additionally, Einstein Activity Capture can help you identify patterns and trends in your sales data. For example, you can see which salespeople are performing well and which ones may need additional coaching or training. You can also identify which products or services are selling the best and which ones may need to be promoted more effectively.

Collaborate More Effectively

Einstein Activity Capture also allows you to collaborate more efficiently with your team members. By capturing data regarding your sales activities, you can share that information with other team members and collaborate more efficiently.For instance, if one of your team members is handling a deal, you can review their activity data to comprehend their progress better and offer assistance as required.

Conclusion

Einstein Activity Capture is a potent tool that can increase your sales productivity by automating data entry, monitoring sales activities, analyzing sales performance, and collaborating more effectively with your team members. By leveraging this tool, you can acquire valuable insights into your sales processes and take action to simplify your workflows and enhance your sales productivity.

If you want to learn more about Salesforce Einstein Activity Capture and how it can benefit your organization, feel free to contact us. Our team of Salesforce Experts would be happy to answer any questions you may have and provide guidance on how to implement this powerful tool.

Categories
Blog

Bye-bye Salesforce Struggles: How In-App Guidance Can Save the Day!!
Imagine this: You’re a new hire at a company that uses Salesforce to manage its sales and marketing operations. You’re excited to dive in and start contributing to the team, but as you open Salesforce, you’re greeted with a complex, overwhelming interface that you’re not sure how to navigate. You feel lost and frustrated, unsure of where to begin.

This is where In-App Guidance comes in. With In-App Guidance, you can receive personalized, contextual guidance that walks you through each step of your tasks and helps you learn new features, all while you work within Salesforce. No more switching back and forth between training materials and Salesforce. It’s like having a personal guide that shows you the way. In this story, In-App Guidance is the hero that saves the day for our new hire, helping them feel confident and productive from day one.

What is In-App Guidance?

The In-App Guidance feature in Salesforce empowers users to create bespoke prompts, walkthroughs, and tips within the platform’s user interface. These instructional elements take the form of pop-up windows that may include images, links, and textual guidance, providing a structured, step-by-step approach to completing specific tasks or workflows. By leveraging the In-App Guidance feature, users receive comprehensive support, improving their proficiency in navigating new features and executing tasks efficiently.

How to Create In-App Guidance in Salesforce?

Generating In-App Guidance in Salesforce is a user-friendly process that can be quickly completed. Below are the key steps to keep in mind:

Step 1: 

Navigate to the In-App Guidance Setup page in Salesforce. This can be accessed by going to Setup > User Engagement > In-App Guidance.

Step 2: 

To create a new prompt or walkthrough, begin by clicking on the “Add” button. On the subsequent page, choose the type of prompt you wish to create and click the ‘Next’ button.

Step 3:

Choose the prompt type that defines how it should be displayed to users on page load and the application on which it should be active, such as the sales app.

Step 4:

In the “Content” section, you can create your guidance using a combination of text, images, and videos. Design your prompt or walkthrough using the In-App Guidance editor.

Step 5:

After clicking the save button, it will direct to In-App Guidance settings. Fill the Action Button Label and Action Button URL.

Step 6:

Select the desired schedule and frequency for your prompt or walkthrough, such as when a user logs in for the first time or navigates to a specific page.

Step 7:

In the “Target Audience” section, select the profiles or permission sets that should see this guidance. Choose the audience for your prompt or walkthrough.

Step 8: 

Save and activate your prompt or walkthrough. Once you have completed all of the necessary steps, save your prompt or walkthrough and activate it to make it visible to your target audience.

Discover the Magic of In-App Guidance in Salesforce

In-App Guidance can offer a range of benefits to users and organizations using Salesforce, including:

Improved User Productivity – In-App Guidance provides users with step-by-step instructions to complete tasks, making it faster and more efficient for users to navigate and use the Salesforce platform.

Reduced Training Costs – In-App Guidance can be used as a training tool for new users or for users who need additional assistance with specific tasks, reducing the need for formal training programs and associated costs.

Increased User Adoption – In-App Guidance can help users feel more comfortable and confident in using Salesforce, leading to increased adoption rates and better utilization of the platform.

To wrap things up.

 Salesforce’s In-App Guidance feature is a valuable tool that offers tailored prompts, guided walkthroughs, and helpful tips to assist users in completing specific tasks or workflows. By following the instructions provided earlier, you can easily create your own In-App Guidance in Salesforce, resulting in greater user productivity, minimized training expenses, and heightened adoption of the platform.

Categories
Blog

Restrict Users From Switching Lightning To Classic In Salesforce

One of the features that Salesforce offers is the ability for users to switch between the classic and lightning versions of the platform. However, there may be sometimes when you want to restrict users from switching to the classic version for various reasons. In this blog, we will explore why you may want to restrict users from switching salesforce lightning to classic and how you can do it.

Why Restrict Users from Switching to Classic Salesforce?

There are several reasons why you may want to restrict users from switching to classic.

Here are a few of them:

Security Concerns: The classic version of Salesforce is an older version that may not have the latest security features and updates. By restricting users from switching to the classic version, you can ensure that your users are always using the latest and most secure version of the platform.

User Experience: The lightning version of Salesforce offers a more modern and intuitive user interface that can help increase user adoption and productivity. By restricting users from switching to the classic version, you can encourage users to embrace the lightning version and take advantage of its many benefits.

Training Costs: If users are constantly switching between the classic and lightning versions of Salesforce, it can be difficult and costly to provide training on both versions. By restricting users from switching to the classic version, you can simplify your training process and reduce training costs.

How to Restrict Users from Switching to Classic

If you want to restrict users from switching to the classic version of Salesforce, you can do so by following these steps:

  1. Log in to Salesforce as an administrator.
  2. Click on the gear icon in the top right corner of the screen and select “Setup.”

  1. In the left-hand menu, click on “Users” under the “Administer” section.
  1. Click on the name of the user that you want to restrict from switching to the classic version and click their profile name.
  1. Click the “Edit” button and scroll down to “Administrative Permissions” section, check the box next to “Hide Option to Switch to Salesforce Classic”

  1. Click on the “Save” button to save your changes.

By following these steps, you can restrict users from switching to the classic version of Salesforce for individual users. If you want to restrict all users from switching to the classic version, you can do so by creating a permission set that includes the “Hide Option to Switch to Salesforce Classic” permission and then assigning that permission set to all users.

Conclusion:

Restricting users from switching to the classic version of Salesforce can help ensure that your users are always using the latest and most secure version of the platform, improve user adoption and productivity, and reduce training costs. By following the steps outlined above, you can easily restrict users from switching to the classic version of Salesforce for individual users or all users in your organization.

Do you know there is an option to restrict the users from switching at the org level too? This blog covers it at the user level. We need to enable this at the org level to enable certain new features in Salesforce. We will cover this in another blog.

Categories
Blog

Homepage for different profiles

Introduction:

In Salesforce, the home page is what your users see the first time after logging in. This page can be customized to highlight specific information for the user. Easy access to relevant information equals increased efficiency. In this blog, we will discuss creating a homepage for different profiles in Salesforce. Assign home pages to different apps and app-and-profile combinations to give your users access to a Homepage perfect for their role.

Step 1: Determine the Objectives of Each Profile

The first step in creating a homepage for different profiles is to determine the objectives of each profile. Ask yourself, “What are the goals of this profile?” and “What data and functionality does this profile need to achieve those goals?” For example, a sales representative may need access to customer data, sales reports, and marketing materials. In contrast, a marketing specialist may require access to marketing campaigns, analytics, and lead-generation tools.

Step 2: Customize the Home Page Layout

Once you have determined the objectives of each profile, the next step is to customize the home page layout. Salesforce allows you to customize the home page for each profile, including adding and removing components and rearranging the layout. You can access the home page editor by clicking the gear icon in the top right corner of the screen and selecting “Edit Page” from the drop-down menu.

Step 3: Add Components to the Home Page

After accessing the home page editor, you can add components to the home page by clicking the “Add Component” button. Salesforce offers a variety of components to choose from, including charts, reports, dashboards, news, and updates. You can also add custom components created by your organization or third-party vendors.

Step 4: Configure Component Settings

Once you have added components to the home page, you can configure their settings to show the data and functionality specific to each profile.

For example, you can set a chart component to display sales data for a sales representative profile and marketing campaign data for a marketing specialist profile.

Step 5: Save and Publish the Home Page

After you have customized the home page for each profile and configured component settings, you can save and publish the home page. The changes will be visible to users with the corresponding profile permissions.

In conclusion, creating a homepage for different profiles in Salesforce requires an understanding of the objectives of each profile and the customization options available in the home page editor. By tailoring the home page layout, adding components, and configuring settings, you can provide users with the data and functionality they need to perform their job duties effectively.

Categories
Blog

Salesforce Instance Health Check-up

Generally believed that leading a wholesome lifestyle is positively correlated with leading a fruitful life. When we are in good physical and mental health, we are more likely to have the energy, focus, and motivation to pursue our goals and succeed in various aspects of our lives, including work, relationships, and personal growth.

We may also feel more satisfied and fulfilled, leading to greater happiness and well-being. As we age, we must pay more attention to our health, our bodies naturally undergo changes that can increase the risk of specific health problems and any possible issues that may arise.

However, with the proper care and attention, many of these issues can be prevented or managed effectively.

When people have health issues, they need to seek medical attention and consult with a doctor. A doctor can help diagnose the underlying cause of the problem and provide appropriate treatment to relieve symptoms and improve overall health and well-being.

However, if a problem occurs in Salesforce, how can we pinpoint the issues and who can analyse it ???

In this article, we will explore one of the self-service salesforce org health tools.

Yes…That is the Org Doctor !!!.  

The Org Doctor is a tool that helps you identify the changes that are not healthy for your organisation. It enables you to find and fix the problem’s root cause. The tool scans your org for possible issues and provides insights into what could have caused these problems in the first place.

Here are some signs that indicate that salesforce org is unwell.

  1. Surpass Storage Limits
  2. Frequent Record Locking Issues
  3. Operational or Performance issues
  •       Apex CPU time limit exceeded errors
  •       Long-running queries and reports
  •       Inefficient Visualforce pages and controllers
  •       Low code coverage in Apex test classes
  1. Need to increase security configurations.

Another question that comes to mind is:  Who can act as a doctor of the Salesforce Org?

Anyone with administrative rights can serve as a doctor, whether they are a Salesforce admin, developer, consultant, or anyone else. 

Finally, let’s take a look at how you can become an Org Doctor.

1. To begin, visit the following link: https://orgdoctor.herokuapp.com/

2. Check the checkbox that says  ‘I AM A SALESFORCE ADMINISTRATOR.’

3. Select either ‘Check My Production Org’ or ‘Check My Sandbox Org’.

4. After clicking the “Sign in with salesforce button”, Enter the Username and Password of Salesforce org and click the login button.

5. Finally, the health check report will be generated and sent to your email. The report is divided into different sections, with each section containing a percentage highlighted in either ‘Green’, ‘Red’, or ‘Yellow’.