Sweet Potato

Categories
Blog

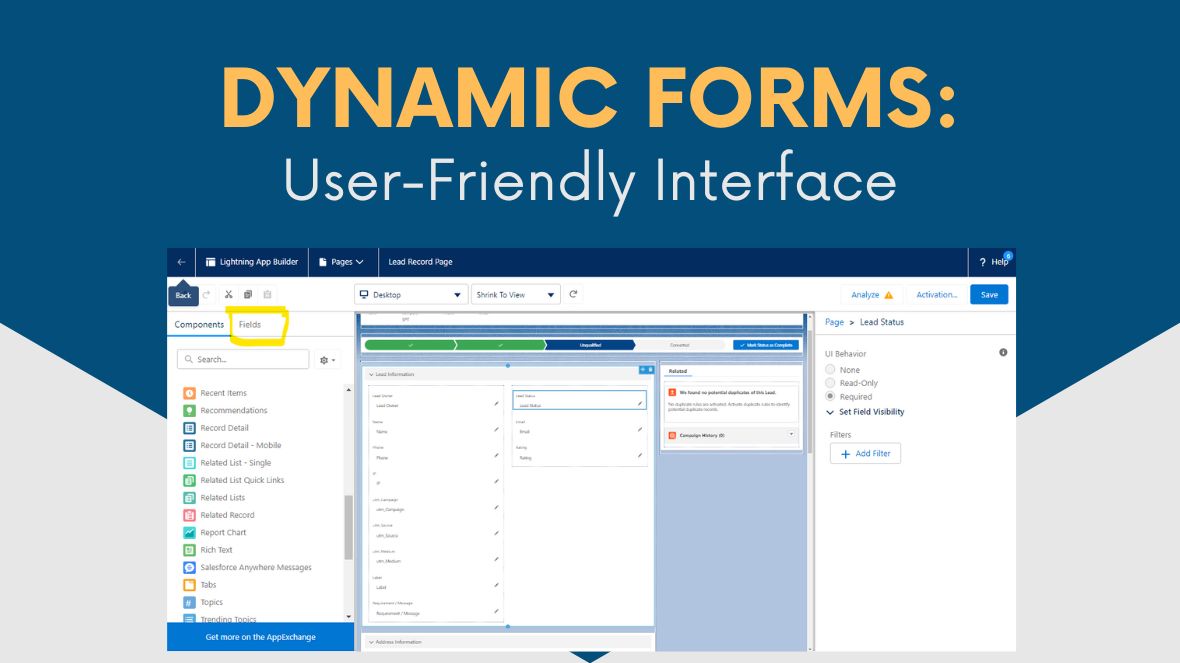
Dynamic Forms: User-Friendly Interface

Introduction:

In today’s fast-paced business world, Salesforce remains the go-to platform for organizations seeking to streamline their operations and strengthen customer relationships. However, as businesses grow and evolve, the need for a more flexible and user-centric approach to data management becomes increasingly vital. Enter dynamic forms, a groundbreaking feature in Salesforce that’s changing the game by revolutionizing how users interact with their CRM systems.

In this blog, we’ll delve into the world of dynamic forms and discover how they’re transforming the Salesforce experience. Dynamic forms aren’t just about data fields and layouts; they’re about empowering users to tailor their CRM interfaces to their unique needs, enhancing productivity, and driving better decision-making. Join us as we explore the key components, benefits, and practical applications of dynamic forms in Salesforce, and learn how this innovative feature is reshaping the way businesses manage their customer data.

What Are Dynamic Pages?

Dynamic pages in Salesforce represent a quantum leap in the customization and adaptability of CRM interfaces. Unlike traditional static page layouts, dynamic pages are user-centric, responding dynamically to individual roles, preferences, and objectives. These pages are highly customizable, allowing administrators and developers to craft responsive interfaces that evolve with the needs of the user.

Why Dynamic Pages Matter:

The traditional one-size-fits-all approach to CRM interfaces no longer suffices.Dynamic Forms empower users to directly adjust the layout of a record’s detail page within the Lightning Page interface.The creation of Dynamic Forms begins within the Lightning App Builder, where you can work with your Record Detail component.Within Dynamic Forms, fields and sections are treated as individual nested components, offering enhanced flexibility for arranging and setting visibility rules.

Salesforce’s adoption of Dynamic Forms represents a strategic shift towards a more intuitive and customizable user experience, leaving behind the constraints of Classic Page Layouts.

Key Components of Dynamic Pages:

Dynamic pages consist of several key components:

Dynamic Layouts: These allow users to display different sections or components of a record based on conditions, ensuring that users only see what’s relevant.

Dynamic Components: These can be added or removed based on user criteria, ensuring that each user sees the most pertinent information.

Visibility Rules: These define when and under what circumstances certain components or fields are displayed, giving users a seamless and tailored experience.

Creating Dynamic Pages:

Creating dynamic pages is a straightforward process in Salesforce

The quickest way to begin the process and to open Lightning App Builder is to navigate to a record within a Custom Object, and click Edit Page from the Setup dropdown menu.

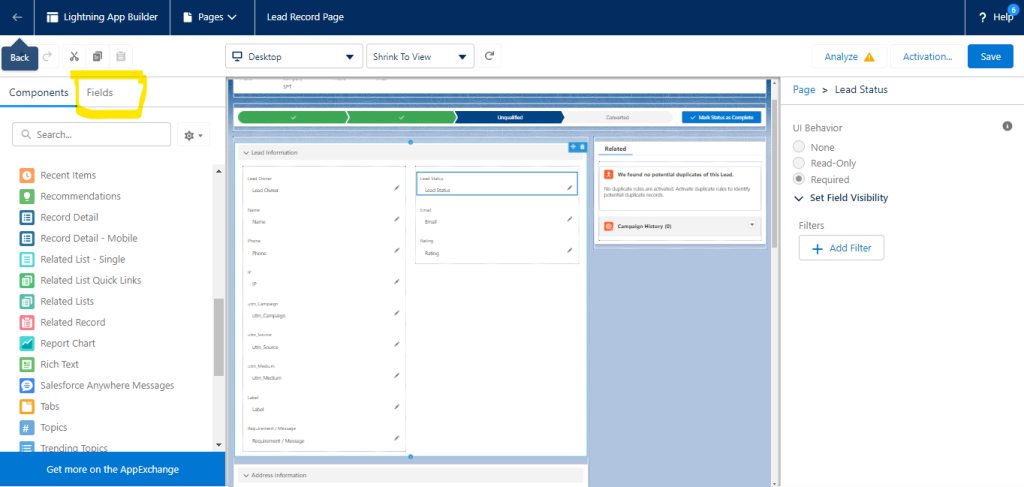
Dynamic Forms adds some new features to the Lightning App Builder. You see a new Fields tab in the left-hand components pane. And, the Fields tab contains the fields associated with your custom object and a Field Section component.  

Once in the Lightning App Builder, select your Record Detail component (the one that currently contains your fields as dictated by the Page Layout), and click Upgrade Now.

You’ll be asked to select the source for your Dynamic Form – ie. the Page Layout that you want to use as the foundation for it. Select the one that makes the most sense, and click Finish.

You’ll now find that all your fields and sections have been migrated into the Lightning Page as individual nested components.

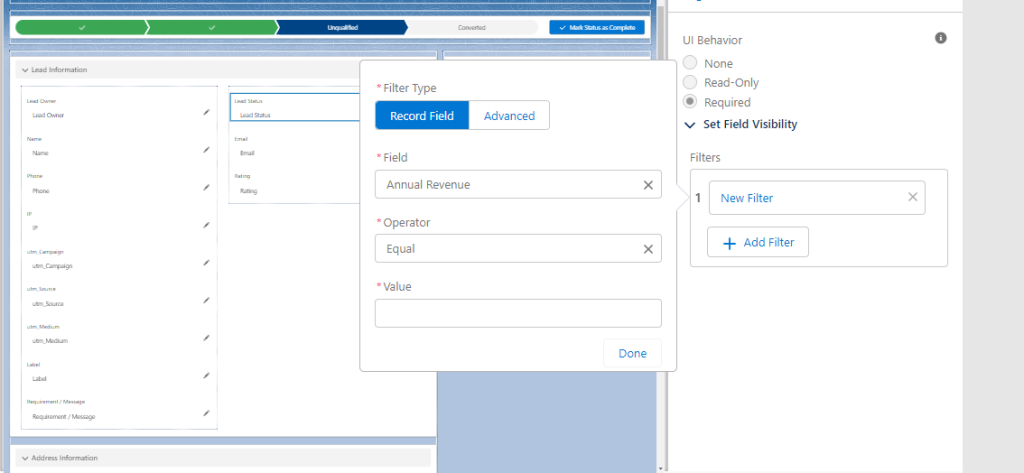
You now have the ability to freely move fields around on the Lightning Page as you would any other component. This means that your Dynamic Form can be split into multiple sections, and moved separately around the page. This is a huge change, and allows a lot more flexibility and freedom than Page Layouts could ever allow. You can also change whether your fields are always displayed or only displayed under certain circumstances using Filter Criteria.

There’s also the ability to manage the visibility of fields and sections, as with other components on the Lightning Page.

We can also create new tabs and add fields and field sections to those tabs to make pages more readable and load faster.

One of the best parts of is the Visibility Rules to show/hide fields and sections based on certain criteria, which sometimes would take custom development to accomplish it.

Now you can also choose to show certain fields to certain profiles by setting up the component visibility.

Benefits of Dynamic Pages:

The advantages of dynamic pages in Salesforce are manifold:

Improved User Adoption: Users are more likely to embrace CRM systems that are tailored to their needs, leading to higher user adoption rates.

Reduced Clutter: Dynamic pages help declutter the interface by only showing relevant information, reducing cognitive overload.

Catering to Diverse Roles: Dynamic pages empower organizations to serve the unique requirements of different user roles, from sales representatives to customer support agents.

Conclusion:

Dynamic pages in Salesforce represent a paradigm shift in CRM customization, allowing businesses to create interfaces that adapt to users’ ever-changing needs. By embracing dynamic pages, organizations can enhance user productivity and ultimately improve customer relationships. Start by experimenting with dynamic layouts, components, and visibility rules to see how they can transform your CRM experience.

Categories
Blog

Salesforce Winter ’24 Admin Features

Introduction:

With each new release, Salesforce continues to empower businesses to connect with their customers, streamline operations, and drive growth.

In this blog post, we’ll take you on a journey through the top 10 most exciting features and updates that Winter ’24 brings to the table. From enhanced customer experiences to productivity-boosting tools, Winter ’24 promises to deliver a range of capabilities that will leave Salesforce users inspired and ready to take their organizations to the next level. Let’s dive in and discover how Salesforce continues to lead the way in transforming how businesses connect, engage, and succeed.

1) Dynamic Forms for Standard Objects

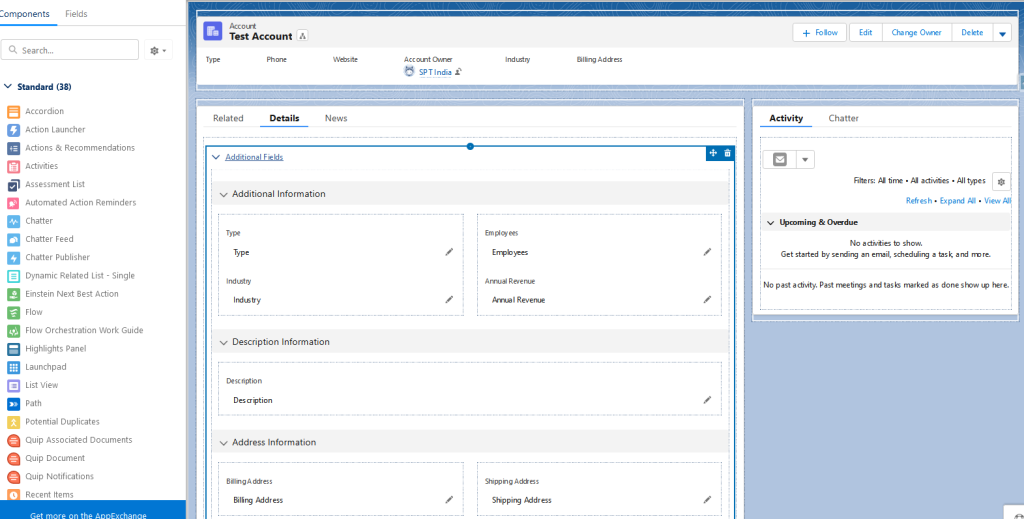
Dynamic Forms are exclusively compatible with objects that are supported by Lightning Web Components. Objects like Campaigns, Tasks, and Products do not support dynamic forms. From Winter ’24 on, Salesforce enabled dynamic forms for standard objects.

Feature 1

2) Preview Summary Formulas in Lightning Reports


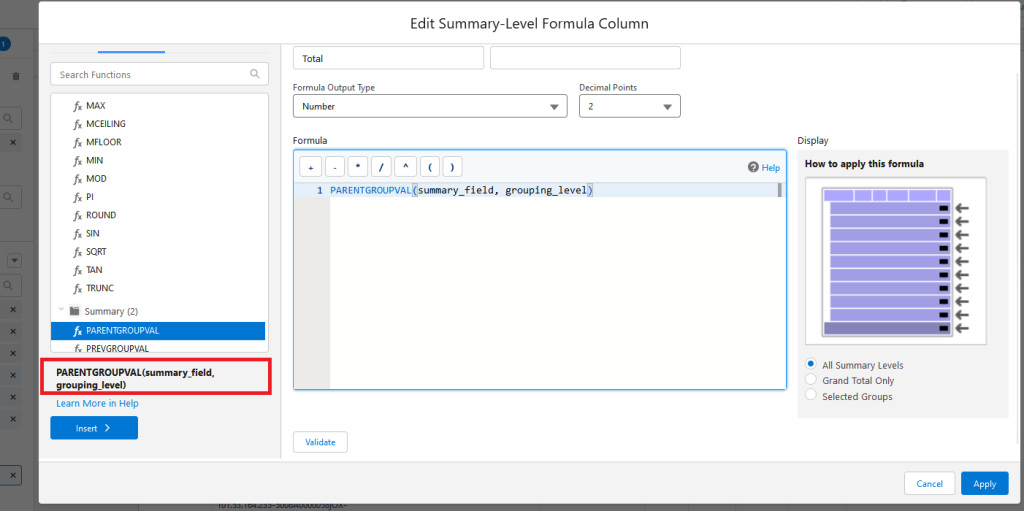
Now you have the ability to preview the formulas when you click on a function rather than clicking in and viewing the formula.

Feature 2

3. Transfer Dashboard Ownership

In Winter ’24, you have the ability to change ownership of a dashboard if someone leaves the company.

Feature 3

4. Sharing Enhancements

Use reports to see who has access to accounts from manual shares and account teams.

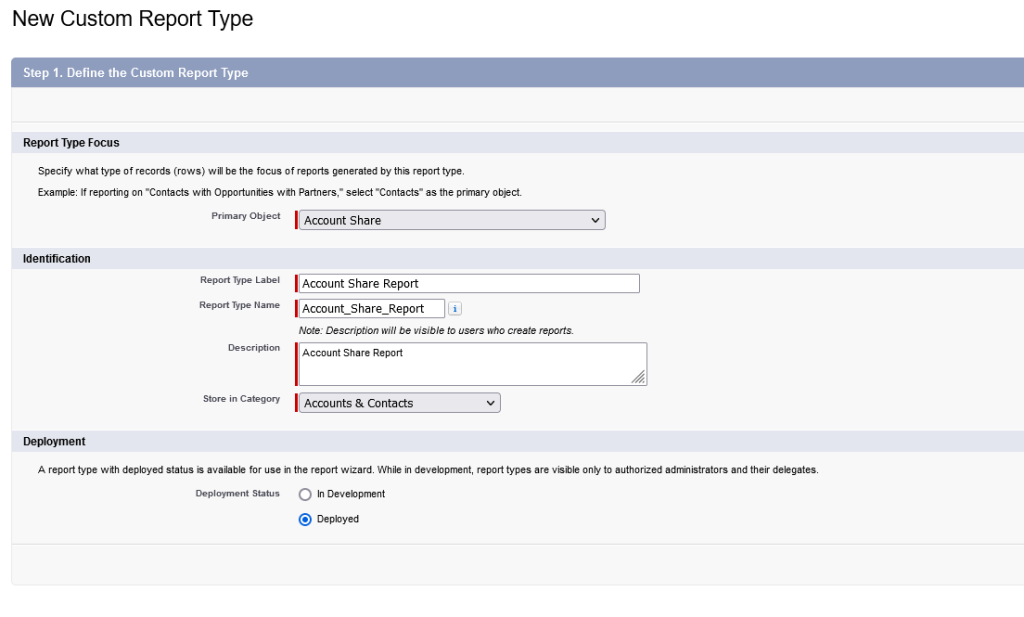
Create a custom report type on the Account Share object and then a report to see which users and groups can access account records that are shared manually or through account teams.

Feature 4

5. Permissions Enhancements

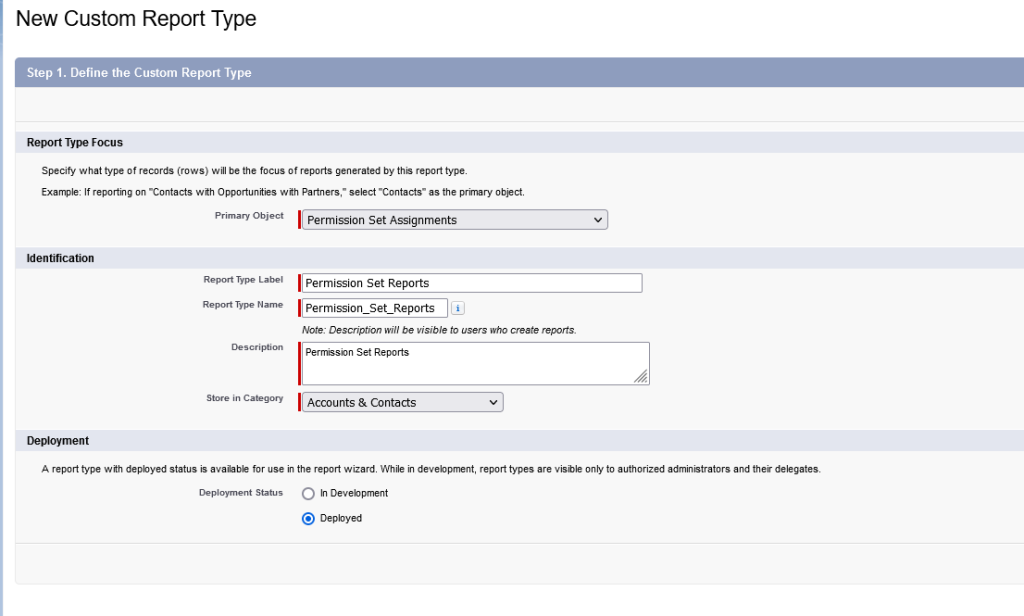
Now, you have the power to generate reports that provide insights into custom permission sets and their assignments to permission set groups. Take advantage of this new capability by establishing a custom report type with “Permission Set Assignment” as the primary object. This enables you to create reports on custom permission set assignments and their inclusion in permission set groups.

Feature 5

6. See What’s Enabled in a Permission Set More Easily (Beta)

Now you can view what permissions are enabled by using the View Summary button on any permission set, which provides you with a holistic view of all permissions.

Feature 6

7. See How Many Permission Set Groups a Permission Set Is Added To

Salesforce has a view of how many permission set groups a permission has been added to.

Feature 7

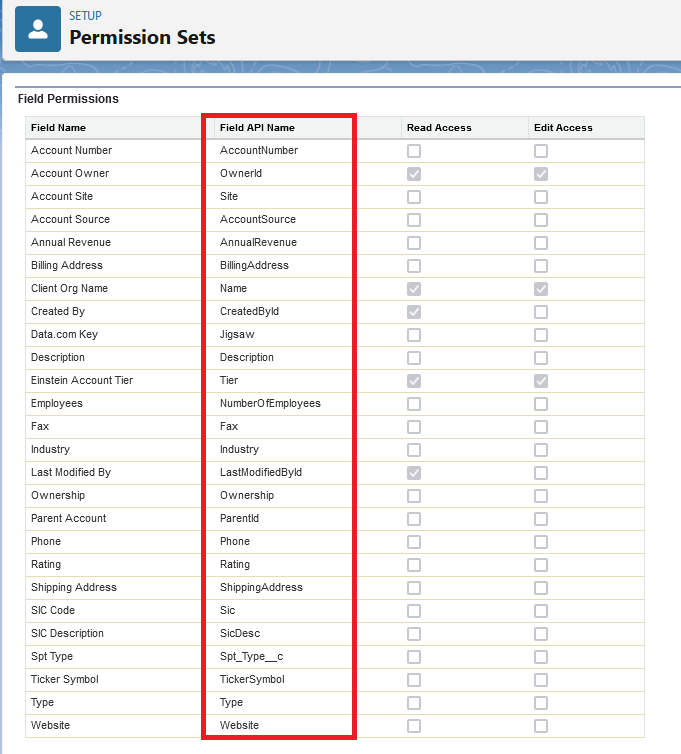
8. See API names for the Object and Field Permissions in Permission Sets

Salesforce makes it easy for admins to view the field API Name within the permission set as a column.

Feature 8

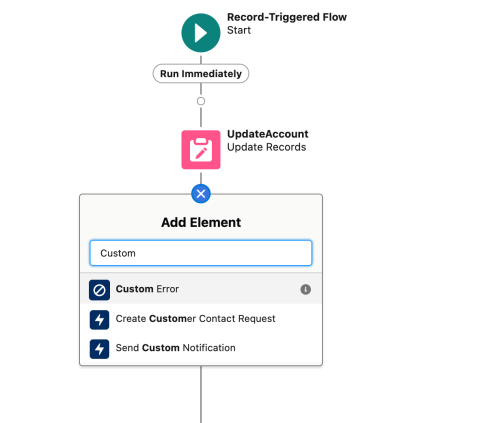
9. Create Custom Error Messages in Record-Triggered Flows

Salesforce introduced the customization of error messages for record-triggered flows.

Custom Error Feature 9

10. Layout User Interface Update

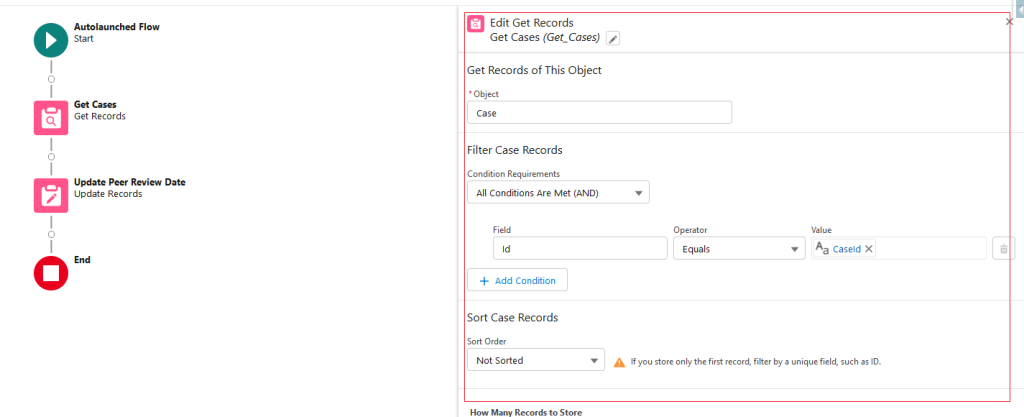
Flow’s user interface has gotten better than expected. Now, when you click on an element, the screen will open up on the side rather than a pop-up.

Feature 10

Conclusion:

As we wrap up our journey through Salesforce Winter ’24, it’s abundantly clear that Salesforce remains committed to pushing the boundaries of CRM innovation. With these new features and enhancements designed to improve customer experiences, boost productivity, and help businesses thrive, this winter release is a testament to Salesforce’s dedication to its users.

So, bundle up, get ready to explore, and let Salesforce Winter ’24 be your guide on this journey of business transformation. The possibilities are endless, and the future is bright with Salesforce by your side.

Categories
Blog

Salesforce Forecasting: A Strategic Tool for Sales Excellence

In the ever-evolving world of business, the ability to predict future sales performance is nothing short of a superpower. Accurate forecasting can be the difference between strategic growth and missed opportunities. Salesforce CRM, a pioneer in customer relationship management solutions, equips businesses with a powerful tool for this purpose: Salesforce Forecasting.

What is Salesforce Forecasting?

Salesforce Forecasting is a feature within the Salesforce CRM ecosystem that empowers organizations to make data-driven predictions about their future sales performance. It’s like peering into a crystal ball, but with the added advantage of historical data, pipeline insights, and advanced analytics.

The Building Blocks of Salesforce Forecasting

1. Forecasting Hierarchy:

In Salesforce, forecasting follows a hierarchical structure, typically consisting of three levels:

User-Level Forecasting: Sales representatives provide forecasts at the individual opportunity level. They estimate the likelihood of closing each deal and assign them to forecast categories.

Managerial-Level Forecasting: Sales managers can adjust and consolidate their team’s forecasts. They have visibility into the forecasts of their direct reports and can make necessary adjustments based on their insights.

Executive-Level Forecasting: At the highest level, executives or sales leaders aggregate forecasts from various teams and regions to create an overall forecast for the organization. This provides a holistic view of the sales pipeline.

2. Forecast Categories and Types:

Salesforce offers multiple forecast categories and types, each serving a specific purpose:

Commit: These are deals that sales reps are highly confident will close. They are typically at the final stages of the sales cycle.

Best Case: These deals have a good chance of closing but may have some uncertainty. They represent a slightly broader view than commit forecasts.

Pipeline: This category includes all opportunities, regardless of their stage. It provides a comprehensive view of the sales pipeline without making specific predictions about closing.

3. Forecast Periods:

Forecasting involves defining specific time periods for which forecasts are made. Common options include monthly and quarterly forecasting. Salesforce allows organizations to customize these periods based on their reporting needs.

4. Collaborative Forecasting:

One of Salesforce’s strengths is its collaborative approach to forecasting. Sales reps, managers, and executives can work together to refine forecasts. This collaboration not only improves forecast accuracy but also fosters better communication and alignment within the sales team.

5. Forecasting Quotas:

Some organizations use forecasting quotas to set revenue targets for specific time periods. Salesforce enables you to define and track quotas for sales teams and individual reps. These quotas can be compared against actual forecasts to gauge performance.

6. Forecasting Reports and Dashboards:

Salesforce offers a range of reporting and dashboard tools tailored to forecasting. You can create custom reports to analyze forecast data, track performance against quotas, and visualize forecasts through dynamic dashboards.

7. Historical Trend Analysis:

To enhance forecasting accuracy, Salesforce leverages historical data. It analyzes past performance, win rates, and changes in opportunity stages to identify trends and patterns. This historical context is crucial for making informed predictions.

8. Forecast Adjustments:

Sales managers often need to make adjustments to forecasts based on their knowledge and insights. Salesforce allows for manual adjustments to individual opportunities or entire forecasts. These adjustments can reflect changes in market conditions, customer behavior, or internal factors.

9. Integration and Automation:

Salesforce can be integrated with other systems and tools, allowing for automated data input and updates. This streamlines the forecasting process by reducing manual data entry and ensuring real-time accuracy.

10. Forecasting Accuracy Metrics:

To evaluate the effectiveness of forecasting, Salesforce provides key metrics such as Forecast Category Accuracy (FCA) and Forecast Category Coverage (FCC). FCA measures the accuracy of forecast categories, while FCC assesses how comprehensively opportunities are categorized.

Effective forecasting in Salesforce requires not only understanding the technical aspects but also having a deep understanding of your sales process, market dynamics, and your team’s abilities. Regularly reviewing and refining your forecasting process is essential for staying competitive and making informed business decisions.

The Benefits of Salesforce Forecasting

The advantages of using Salesforce Forecasting are plentiful:

Improved Accuracy: By relying on data and historical performance, forecasts become more precise, reducing guesswork.

Strategic Resource Allocation: Knowing what’s in the pipeline allows you to allocate resources effectively, whether it’s personnel, marketing budgets, or inventory.

Data-Driven Decision-Making: Say goodbye to gut feelings and hello to informed decisions. Salesforce Forecasting enables you to align your strategy with real-world insights.

Example: How Salesforce Forecasting Transformed ABC Tech Solutions
ABC Tech Solutions, a mid-sized technology company specializing in software solutions, was facing challenges in effectively managing their sales pipeline. They were struggling with:

Challenge 1: Inaccurate Sales Projections

ABC Tech Solutions’ sales team found it challenging to accurately project their quarterly and yearly sales revenue.
Without a clear understanding of their sales pipeline, they often missed opportunities to capitalize on high-potential deals.

Challenge 2: Resource Allocation

Allocating resources efficiently was a significant concern. The company was unsure where to focus their marketing efforts and assign their sales representatives.
There was a risk of over-investing in deals that were unlikely to close and under-investing in promising opportunities.

Challenge 3: Inconsistent Sales Forecasts

The lack of standardized forecasting practices led to inconsistencies in sales forecasts provided by different team members.
Sales managers struggled to compile accurate, unified forecasts, which hindered their ability to make informed decisions.

Implementing Salesforce Forecasting:

Recognizing the need for a solution, ABC Tech Solutions decided to implement Salesforce Forecasting into their sales process. Here’s how it transformed their operations:

1. Accurate Sales Projections:

Salesforce Forecasting allowed ABC Tech Solutions to categorize opportunities into “Commit,” “Best Case,” and “Pipeline.”
Sales representatives started using these categories to provide more accurate sales projections based on the likelihood of closing each deal.

2. Resource Allocation:

With Salesforce Forecasting’s visibility into the sales pipeline, the company gained insights into which deals were most likely to convert into revenue.
This information helped them allocate resources, such as sales teams and marketing budgets, more efficiently.

3. Standardized Forecasting Practices:

Salesforce Forecasting introduced standardized forecasting practices across the organization.
Sales managers and executives had a unified view of forecasts, making it easier to assess the company’s financial health and make strategic decisions.
Results:

The implementation of Salesforce Forecasting brought about significant improvements for ABC Tech Solutions:

Revenue Growth: Within the first year of using Salesforce Forecasting, ABC Tech Solutions saw a remarkable 25% increase in their sales revenue.
Resource Efficiency: The company reduced wasted resources by focusing their efforts on high-potential deals, resulting in cost savings.
Improved Team Morale: Sales representatives felt more confident in their sales predictions, boosting their morale and motivation.
Strategic Decision-Making: Executives had a clearer view of the company’s sales pipeline, facilitating better-informed strategic decisions.

Salesforce Forecasting proved to be a game-changer for ABC Tech Solutions. By leveraging accurate projections, resource optimization, and standardized forecasting practices, they achieved remarkable growth and efficiency. This real-world example illustrates how Salesforce Forecasting can transform the fortunes of sales companies, enabling them to make data-driven decisions and achieve sustainable success.

Challenges and Overcoming Them

No system is without its challenges. Salesforce Forecasting may encounter issues like data quality problems, incomplete information, or shifting market conditions. However, these challenges can be mitigated with best practices, ongoing training, and a commitment to data integrity.

Looking Ahead: Future Trends

The world of sales and CRM is dynamic, and Salesforce is at the forefront of innovation. Keep an eye out for emerging trends like AI-driven forecasting models and advanced analytics capabilities. As technology evolves, Salesforce will continue to lead the way in making sales forecasting more accurate and efficient.

In conclusion, Salesforce Forecasting is a game-changer for businesses seeking to predict and plan their sales performance effectively. By understanding its features, best practices, and the benefits it offers, organizations can harness the power of prediction and chart a course towards sustainable growth and success.

If you’re ready to take your forecasting and Salesforce implementation to the next level, don’t hesitate to contact us. Our team of experts is here to help you make the most of Salesforce CRM and drive your business forward. Reach out today to get started on your journey to better forecasting and sales success.

Categories
Blog

Speeding Through Salesforce Admin Certification: When Learning is a Rollercoaster Ride

Introduction:

My name is Annamalai and I would like to welcome you to my exhilarating journey towards achieving the Salesforce Admin Certification in a record time!

If you’re reading this, you’re probably in a rush to obtain this certification and wondering if it’s even possible. Well, I’m here to tell you that with the right mindset, determination, and a little bit of strategy, you can conquer this challenge and accelerate your career. In this article, I will share my experiences, tips, and the sheer excitement that accompanied my quest to become a certified Salesforce Admin.
My journey began with a burning desire to enhance my career prospect. I knew that obtaining the Salesforce Admin Certification would open doors to exciting opportunities and lead me towards the pinnacle of success in the world of CRM.

1)Setting Clear Goals:

To accomplish anything in life, you need a clear destination. In my case, I set specific, measurable, achievable, relevant, and time-bound (SMART) goals. I outlined my study schedule, the resources I would use, and the date by which I aimed to pass the exam. Having a roadmap allowed me to stay focused and motivated throughout my journey.

2)Finding the Right Resources:

Salesforce offers a plethora of resources to help you prepare for the Admin Certification, including official study guides, documentation, and Trailhead modules.

  • Understanding the Exam Guide:

Salesforce provides a detailed exam guide for each certification. This guide outlines the topics and the weightage of each section. Study this guide religiously; it’s your roadmap to success. Please see the below link,
https://trailhead.salesforce.com/users/strailhead/trailmixes/prepare-for-your-salesforce-administrator-credential

  • Utilize Trailhead:

Trailhead is a fantastic learning platform provided by Salesforce. It offers a structured way to learn, with modules and projects that mirror real-world situations. It’s an excellent way to reinforce your understanding. Please see below the link which has everything related to salesforce administrator,
https://trailhead.salesforce.com/en/credentials/administrator

  • The Power of Practice:

Salesforce is all about hands-on experience. Set up your own Salesforce Developer Edition (it’s free!) and practice everything you learn. Try to apply your knowledge to real-world scenarios. I would like to express my gratitude to my mentor, Nags. He consistently assigned me tasks covering various topics, which greatly facilitated my preparation for the admin certification exam. As an example, he advised me how a permission set can efficiently manage permissions for two different users within the same region.

3) Growth Through Collaborative Learning:

Our workplace was more than just a job; it was a thriving ecosystem of continuous learning and professional development. It was a place where the pursuit of knowledge was celebrated, and where every team member was encouraged to aspire to greatness. What made my journey truly remarkable was the unity within our team. We studied together, sharing knowledge and insights. Complex Salesforce concepts were no longer daunting challenges but exciting puzzles we tackled collectively.
Let me share a company secret we adhere to, encapsulated by the three C’s: Clarity, Confidence, and Curiosity.

#Clarity:

For the sake of absolute clarity, I intend to embrace the wisdom contained in the quote that states, “clarity precedes success.” I am committed to ensuring that I clarify every doubt I have on the topics I learn. By seeking clarification through questions, you’ll become highly knowledgeable in that subject.

#Confidence:

Throughout my day, I consistently reflect upon the quote, “you are enough to conquer the world.” When I initially joined this remarkable company, I must admit that I wasn’t the most confident person. I often grappled with speaking to others. I have cultivated my self-confidence to become a strong and assured individual. Most importantly, I’d like to emphasize the significance of scheduling your exam when you feel confident and well-prepared.

#Curiosity:

Curiosity has always been my driving force. curiosity has been my constant companion on this Salesforce certification journey. Passing the Salesforce exam was a significant milestone, but my curiosity didn’t end there…

4)Stay Positive

A positive mindset is your greatest asset. Celebrate small wins, learn from mistakes, and keep your spirits high throughout your journey. The journey can be challenging but remember why you started. Visualize your success.

Conclusion: Your Journey Awaits!

Completing the Salesforce Admin Certification in a short span of time is a testament to your dedication and determination. Your journey may be short, but the skills you acquire will last a lifetime. So, take that first step, and you’ll be on your way to success in no time!
Remember, with the right support and a can-do attitude, you can achieve anything you set your mind to. So, what are you waiting for? Your Salesforce certification journey awaits!!!!

Categories
Blog

Salesforce’s Fault Path Component: Your Flow’s Unseen Hero!

Imagine you’re a Salesforce admin, seamlessly cruising through the intricate world of flows, designing powerful automation to drive your organization’s success. But suddenly, you hit a roadblock, an error message, or an unexpected outcome, and you’re left wondering, “Where did I go wrong?” Fear not, for the trail to mastery in Salesforce often involves decoding the enigmatic Fault Path Component!

In this adventure, we will embark on a journey to unravel the secrets of the Fault Path Component in Salesforce flows.

The Flow Adventure Begins

Flows are the backbone of automation in Salesforce. They allow us to create dynamic processes without writing code. But like any adventure, working with flows can sometimes lead you into uncharted territories. That’s where the Fault Path Component comes to the rescue!

What is the Fault Path Component?

The Fault Path Component is like your trusty map in this Salesforce adventure. It’s a vital element within a flow that helps you manage exceptions, errors, and unexpected twists in your automation. Think of it as the safety net that ensures your flow keeps running smoothly, even when unexpected errors occur.

When Does It Come into Play?

Imagine you’re creating a flow to update records or send emails. Everything’s going perfectly until an error arises. Perhaps a record doesn’t meet certain criteria, or there’s an issue with sending an email. Instead of your flow crashing, the Fault Path Component helps you gracefully handle these errors.

Tips for Mastering the Fault Path Component

Here are some tips to help you become a pro:

1. Understand Error Types

Familiarize yourself with the different types of errors you might encounter in your flows. This will help you tailor your Fault Path Component’s actions to specific scenarios.

2. Test Thoroughly

Before deploying your flow, rigorously test it to identify potential error scenarios. This way, you can configure the Fault Path Component to handle them effectively.

3. Use Meaningful Messages

When setting up error messages or notifications, ensure they are user-friendly and provide clear guidance on how to resolve the issue. This enhances the user experience and reduces confusion.

Let’s explore the process of incorporating a fault path component, our safety net, into the flow.

Step 1: Build Your Flow

Use Flow Builder to construct your automation. This can involve various elements like Record Updates, Record Creates, Decision elements, and more. For the sake of this example, let’s assume you have a simple flow that updates an account record.

Step 2: Identify Potential Faults

While building your flow, identify points where errors might occur. These could be due to missing data, record not found, or other exceptions.

Step 3: Add a Fault Path Component

To handle errors, click the “Add Fault Path” element. This element represents the path your flow will follow when an error occurs.

Screenshot 1 - Update records
Add Elements
Step 4: Configure the Fault Path Component

Click on the Fault Path element to configure it. You’ll see a section for “Fault Messages” where you can define error messages or explanations that will be shown to users when an error occurs. 

fault path component salesforce
Step 5: Test Your Flow

It’s crucial to thoroughly test your flow, especially the error handling. Trigger your flow with different scenarios to ensure that it gracefully handles errors according to your configurations in the Fault Path Component

Update Account - Salesforce

Using the Fault Path Component in Salesforce Flow allows you to create robust and user-friendly automation that can gracefully handle errors and exceptions, ensuring a smoother experience for both users and administrators. Happy Flowing!!!

Categories
Blog

Google Sheet Integration With Salesforce

Google Sheets, is a cloud-based spreadsheet software that allows users to create and manage spreadsheets online. By integrating Salesforce with Google Sheets, businesses can streamline their data management processes, improve their workflow automation, and enhance their productivity. In this blog, we will explore the Salesforce Connector add-on for Google Sheets and how it can help businesses integrate Salesforce with Google Sheets.

The Salesforce Connector add-on for Google Sheets is a powerful tool that allows you to easily integrate Salesforce with Google Sheets. With this add-on, you can import Salesforce data directly into your Google Sheets, and you can also update and create new Salesforce records from within Google Sheets.

Here are some of the benefits of using the Salesforce Connector add-on:

Easy Data Import: With the Salesforce Connector add-on, you can easily import Salesforce data into your Google Sheets. This makes it easy to analyze and manipulate your Salesforce data in Google Sheets, without having to switch between the two applications.

Real-Time Data Syncing: The Salesforce Connector add-on allows you to sync data between Salesforce and Google Sheets in real-time. This means that any changes made to your Salesforce data will be automatically reflected in your Google Sheets, and vice versa.

Enhanced Data Management: By integrating Salesforce with Google Sheets, you can improve your data management processes. You can use Google Sheets to organize and manipulate your data before syncing it with Salesforce, giving you greater control over your data.

Workflow Automation: The Salesforce Connector add-on allows you to automate workflows and processes between Salesforce and Google Sheets. For example, you can use Google Sheets to automatically create leads or opportunities in Salesforce based on certain criteria.

Here’s how to use the Salesforce Connector add-on for Google Sheets:

Step 1: Open Google Sheets

Open Google Sheets and create a new spreadsheet or open an existing one.

Step 2: Install the Salesforce Connector Add-on

Click on the “Add-ons” tab from the main menu and select “Get add-ons.” Search for the “Salesforce Connector” add-on and install it.

Step 3: Authenticate the Add-on

Once the Salesforce Connector add-on is installed, you will need to authenticate it with your Salesforce account. Follow the on-screen instructions to authenticate the add-on.

Step 4: Import Salesforce Data

Once the add-on is authenticated, you can import Salesforce data into your Google Sheets by clicking on the “Salesforce Connector”
add-on and selecting “Update.” Choose the data you want to insert and configure the settings for the insert.

Step 5: Account Insert

Let’s insert the accounts from Google Sheets into Salesforce. So, please select Account as the object and click the Next button.

Step 6: Map the fields

The next step is to select the mapping on which fields from the spreadsheet need to be imported into which fields on the account object and click the ‘Execute’ button. Please see the screenshot below,

Step 7: Verify the Salesforce result:

The next step is to verify the results in Salesforce by running an account report. Create a report, select the account. Let’s insert the accounts from Google Sheets into Salesforce. So, please select Account as the object and click the Next button.

Conclusion

The Salesforce Connector add-on for Google Sheets is a powerful tool that allows businesses to integrate Salesforce with Google Sheets. With easy data import, real-time data syncing, enhanced data management, and workflow automation, businesses can streamline their data management processes and improve their productivity. To get started with the Salesforce Connector add-on, simply install it from the Google Sheets add-on store, authenticate it with your Salesforce account, and start importing and syncing data between Salesforce and Google Sheets.

Categories
Blog

Sales Path -Salesforce Lightning Experience

Salesforce Sales Path is a feature of the Salesforce Lightning Experience that provides guidance to sales reps as they work through the sales process. With Sales Path, businesses can create a customized sales process that aligns with their unique sales methodology and provides guidance to their sales reps at every stage of the sales process. In this blog, we will explore the Sales Path feature in Salesforce Lightning Experience and how it can help businesses improve their sales performance.

Sales Path is designed to help sales reps focus on the most important tasks at each stage of the sales process, providing them with clear guidance and helping them to stay on track. With Sales Path, businesses can customize the sales process to match their unique requirements, including adding stages, fields, and guidance messages.

Here are some of the benefits of using Sales Path in Salesforce Lightning Experience:

Improved Sales Performance: Sales Path provides sales reps with guidance on the next best action at each stage of the sales process, helping them to close more deals and improve their sales performance.

Customizable Sales Process: With Sales Path, businesses can customize the sales process to match their unique requirements, including adding stages, fields, and guidance messages.

Increased Visibility: Sales Path provides increased visibility into the sales pipeline, helping businesses to identify bottlenecks and take action to improve the sales process.

Enhanced Collaboration: Sales Path enables sales reps to collaborate more effectively with other team members, including managers and other sales reps, by providing a clear view of the sales process and the next best action.

Here’s how to set up Sales Path in Salesforce Lightning Experience:

Step 1: Define the Sales Process

The first step in setting up a Sales Path is to define the sales process. This involves identifying the stages of the sales process and the key actions that should be taken at each stage. Click on the Setup→ Sales Process to create a sales process.

Define the Sales Process

Step 2: Create Sales Path

Once the sales process has been defined, you can create a Sales Path in the Salesforce Lightning Experience. This involves adding stages, fields, and guidance messages to the sales process. To create a sales path Click on the Setup→ Path Settings to create a new sales path.

Create Sales Path

Step 2a : Name Your Path 

The next step is to name your path and select which object the path should be visible. Once you have selected the object, picklist and provided the name please click the ‘Next’ button,

Name Your Path

Step 2b: Select Fields and Text

The next step is to select fields that need to be visible on each stage and the guidance text for salespeople to help them key in the successful sale.

Select Fields and Text

Step 3: Activate Sales Path

The final step is to activate the sales path and encourage the sales users with some celebrations on their successful sale.

Once Sales Path has been created, you can assign it to specific users or groups of users in Salesforce. This ensures that sales reps have access to the guidance and support they need to close deals and improve their sales performance.

Step 3: Activate Sales Path

Step 4: Monitor and Optimize the Sales Process

Finally, it’s important to monitor and optimize the sales process to ensure that it is delivering the desired results. Use Salesforce reporting and analytics tools to track progress and identify areas for improvement.

Step 4: Monitor and Optimize the Sales Process

Conclusion

Sales Path is a powerful feature of Salesforce Lightning Experience that can help businesses to improve their sales performance. By providing guidance to sales reps at every stage of the sales process, Sales Path can help businesses to close more deals and increase revenue. To set up Sales Path in Salesforce Lightning Experience, define the sales process, create Sales Path, assign it to users, and monitor and optimize the sales process over time. With a Sales Path in place, businesses can improve their sales performance and achieve their revenue goals.

Categories
Blog

A Deep Dive into Generative Pre-trained Transformer

Introduction

GPT, or Generative Pre-trained Transformer, is a state-of-the-art model in the field of natural language processing (NLP). It is designed to understand and generate human-like text by leveraging the power of deep learning and neural networks. What makes GPT significant is its ability to learn from massive amounts of text data during a pre-training phase. By exposing itself to diverse language patterns, GPT learns grammar, semantics, and contextual understanding, making it proficient in generating coherent and contextually appropriate responses. Once pre-training is complete, GPT can be fine-tuned on specific tasks or domains, enabling it to excel in various NLP applications. For example, it can be used to improve Chabot’s, making conversations more engaging and lifelike. 

GPT can tell bad jokes and write accidentally hilarious poems about your life, but it can also help you do your job better. The catch: you need to help it do its job better, too.

Understanding the Basics of GPT

The architecture of GPT consists of a stack of identical encoder-decoder Transformer layers. The encoder processes the input text, while the decoder generates the output. However, unlike traditional encoder-decoder models, GPT is solely focused on the decoding process, making it particularly effective for generating text. One of the key components of GPT is the self-attention mechanism. This mechanism allows GPT to analyze the dependencies between different words within a given input sequence. By attending to different parts of the input, GPT can effectively capture the context and relationships between words, leading to more coherent and contextually appropriate text generation. The training process of GPT involves two main steps: pre-training and fine-tuning. During pre-training, GPT is exposed to a vast amount of text data, such as books, articles, or web pages. It learns to predict the next word in a sentence based on the context provided by the preceding words. This unsupervised learning approach helps GPT to grasp grammar, semantics, and even gain a general understanding of the world.

Sales GPT:

Salesforce Sales GPT is designed to help sales teams create more personalized and engaging content. It can be used to generate content that is tailored to specific customers or audiences, and it can also be used to create content that is relevant to the latest trends and news.

Sales GPT offers the following features:

Sales Assistant: The tool summarizes every step of the sales cycle in a side panel, from account research and meeting preparation to drafting contract clauses. It also automatically keeps the CRM up-to-date, so you can be sure that your sales data is always accurate and up-to-date.

Sales Emails: The tool can automatically generate personalized emails for every customer interaction, using data from your CRM system. This means that you can send emails that are tailored to the specific needs and interests of your customers.

Call Summaries: The tool automatically transcribes and summarizes calls, and then sets follow-up actions based on the transcription. This can help to improve seller productivity by freeing up time that would otherwise be spent manually transcribing calls and setting follow-up actions.

Service GPT

Salesforce Service GPT is a generative AI tool that can be used to improve customer service and field service operations. It can help to improve customer satisfaction, reduce costs, increase productivity, and make better decisions.

Service GPT offers the following features:

Service Replies: The tool can automatically generate personalized responses based on real-time data sources, such as your CRM data and other sources. This means that you can send responses that are tailored to the specific needs and interests of your customers.

Work Summaries: Create concise and informative summaries of service cases and customer engagements based on the details of the case and the customer’s history.

Call Summaries: The tool automatically transcribes and summarizes calls, and then sets follow-up actions based on the transcription. This can help to improve seller productivity by freeing up time that would otherwise be spent manually transcribing calls and setting follow-up actions.

Knowledge Articles: The tool can automatically generate and update articles based on the latest real-time data from support interactions. This means that the articles are always up-to-date with the latest information and best practices.

Mobile Work Briefings: The tool summarizes critical information about each appointment before field service teams arrive, helping them to work more efficiently. This information includes the customer’s contact information, the issue that needs to be resolved, and any relevant history.

Engagement: Salesforce Service GPT can be used to generate content that is relevant to the latest trends and news. This can help to keep customers engaged and coming back for more.

Marketing GPT

With Marketing GPT, Salesforce aims to give marketers an AI-connected user interface that augments campaign brief conception, audience/segment discovery, and content creation. 

Marketing GPT offers the following features:

Segment Creation: Marketers are given the ability to create audience segments quickly and improve targeting using natural language prompts to query Data Cloud, Salesforce’s CDP offering.

Email Content Creation: This gives marketers the ability to build email body content, create subject lines, and more, automagically.

Segment Intelligence: Segment Intelligence steps in to help marketers understand campaign performance, relative to an audience segment. 

Slack GPT

Slack is a cloud-based communication platform that helps teams to collaborate more effectively. It provides a centralized space where teams can communicate in real time, share files, and collaborate on projects. Slack can also be integrated with other tools and services, which allows teams to streamline their workflows and work more efficiently.

Tableau GPT

Tableau is a data visualization and business intelligence software that allows users to connect to various data sources, create interactive dashboards, and generate insightful reports. It helps users analyze, understand, and communicate data in a visual and interactive format.

Tableau is a powerful tool that can be used by businesses of all sizes. It is easy to use and does not require any coding knowledge. Tableau can be used to connect to a wide range of data sources, including databases, spreadsheets, and cloud services.

Tableau GPT is a new feature that is being added to Tableau. It uses generative AI to automate many of the tasks involved in data analysis. This makes it easier for users to analyze data and create visualizations.

Tableau GPT is still under development, but it has the potential to revolutionize the way data is analyzed. It could make data analysis more accessible to a wider range of users and help businesses make better decisions based on data.

Apex GPT

Apex GPT is a generative AI tool that helps developers and IT teams to improve software development speed and efficiency. It can be used to generate intelligent Apex or LWC code through natural language prompts, which can help to speed up the development process.

Apex GPT also has the ability to scan for code vulnerabilities and provide inline code suggestions directly from the Salesforce integrated development environment (IDE). This can help to improve the quality of code and reduce the risk of errors.

Overall, Apex GPT is a powerful tool that can help developers to improve their productivity and the quality of their code.

Flow GPT

Flow GPT is a generative AI tool that allows users to create workflows based on a single text prompt. This means that users can simply type a natural language description of what they want the workflow to do, and Flow GPT will generate the code for the workflow.

For example, a user could type “I want to create a workflow that sends a notification to sales representatives when a lead is converted to an opportunity.” Flow GPT would then generate the code for a workflow that does exactly that.

Flow GPT is a powerful tool that can help users to automate their workflows and save time. It is also a great way for users who are not familiar with programming to create workflows.

Pricing

The pricing of Sales GPT & Service GPT were announced a few weeks ago, and will be rolled into the existing Sales & Service Cloud Einstein Licenses, priced at $50/user per month. However, if you have Unlimited Edition licenses, Sales & Service GPT will be included. 

This includes a limited number of Einstein GPT credits (number TBC), which go towards generating outputs from user prompts. Currently, it’s not confirmed what constitutes one credit. Other large language models (LLMs) work on the basis of tokens, which determine the scope of information that the model can analyze when generating outputs. 

Salesforce is releasing Enterprise Expansion Packs to democratize pricing for generative AI. Currently, Salesforce has to absorb the cost of processing data when using their LLM (i.e. Einstein GPT), which can be expensive. To make pricing more fair, Salesforce is offering a pay-as-you-go option for customers who exceed their allotted credits.

Enterprise Expansion Packs for Sales and Service teams provide additional credits for querying large databases. This means that teams can use more generative AI without having to worry about exceeding their allotted credits.

Summary

It’s safe to say that Einstein GPT has some extraordinary expectations to live up to, but Salesforce have already demonstrated how this AI technology endeavors to be safe and secure without limiting its capabilities.It’ll be exciting to see its use cases once we begin using it in full force.

REF: https://www.salesforce.com/news/press-releases/2023/03/07/einstein-generative-ai/

Categories
Blog

Demystifying Exchange Rate Management in Salesforce

Introduction: Managing global sales involves more than just products and leads; it also requires keeping a close eye on currency exchange rates. In Salesforce, understanding and effectively utilizing exchange rates can significantly impact your sales strategies, revenue calculations, and financial planning. This blog will guide you through the essentials of exchange rate management in Salesforce, helping you navigate the complexities of international sales with confidence.

Understanding Exchange Rates: Exchange rates determine the value of one currency relative to another. They fluctuate based on economic factors and impact the conversion of one currency to another during transactions. In Salesforce, exchange rates are crucial when dealing with multi-currency records.

Why Exchange Rates Matter in Salesforce:

  • Accurate Financial Reporting: Exchange rates influence the conversion of foreign currency amounts into your organization’s base currency. This ensures accurate financial reporting, revenue recognition, and forecasting.
  • Sales and Opportunity Management: Deals involving different currencies require conversion for proper revenue calculation. Accurate exchange rates enable your sales team to understand the true value of deals and opportunities.
  • Global Insights: Exchange rates can reveal market trends and the relative performance of products in different regions. This insight aids in making informed decisions about international expansion and targeting.

Exchange Rate Setup: Salesforce provides tools to manage exchange rates effectively:

  • Multi-Currency Activation: Enable multi-currency in your Salesforce org if you haven’t already. This allows you to handle transactions in multiple currencies.
  • Advanced Currency Management: For sophisticated needs, consider activating Advanced Currency Management. This feature helps you maintain historical exchange rates, preventing discrepancies in reporting.

Maintaining Exchange Rates:

  • Automatic Updates: Salesforce can fetch daily exchange rates from external sources like currency exchange rate providers. Set up scheduled jobs to keep your rates up-to-date automatically.
  • Manual Entry: You can manually input exchange rates if needed, especially if you have unique sources or requirements.

Using Exchange Rates:

  • Opportunity Conversion: When creating or updating opportunities involving foreign currencies, Salesforce converts the amounts into your base currency using the relevant exchange rate.
  • Reports and Dashboards: Leverage Salesforce’s reporting capabilities to analyze sales performance across different currencies. Create reports that show revenue in both local and base currencies for a comprehensive view.
  • Currency Fields: Salesforce provides standard and custom fields for currency values. These fields automatically handle currency conversion based on exchange rates.

Best Practices:

  • Regular Updates: Ensure your exchange rates are regularly updated to reflect the current market conditions.
  • Clear Documentation: Maintain clear records of exchange rates used for each transaction. This is essential for transparency and audit purposes.
  • Educate Your Team: Train your sales and finance teams on how exchange rates impact deals and reporting. This ensures accurate data entry and understanding.

Conclusion: In the global business landscape, exchange rates play a pivotal role in accurate financial reporting, sales management, and decision-making. Salesforce’s exchange rate management features empower you to navigate multi-currency transactions effectively. You can effectively manage your international sales operations and gain insightful information about your overall business performance by setting up, maintaining, and using exchange rates in the right way.

Categories
Blog

DevOps Salesforce Guide Beginners

Introduction

       Salesforce is set to offer a new feature called DevOps,designed to streamline project deployments.DevOps Salesforce is a comprehensive approach that combines the principles of Development (Dev) and Operations (Ops) to streamline and enhance the process of software development and deployment within the Salesforce ecosystem. It aims to bridge the gaps between developers, administrators, and operations teams, enabling them to collaborate more effectively, accelerate project deliveries, and ensure a smooth and reliable software release cycle.

Steps

1. Enable DevOps

As always enabling a feature in salesforce is easy. Just click Setup→DevOps Center and Click Enable. Screenshot below,

2. Install the package

Click on the ‘Install Package’ button in the below screenshot to install the app in the salesforce org.

After you install the package, be sure to complete the configuration steps in Salesforce Help.

3. Create Connected App

The connected app provides access to DevOps Center in the App Launcher. The app appears in App Launcher after users are assigned the appropriate DevOps Center permission sets.

  1. From Setup, enter App Manager in the Quick Find box, then select App Manager.
  2. Click New Connected App.
  3. In Basic Information:
    • Connected App Name: DevOps Center
    • API Name: DevOps_Center
    • Contact Email: [email protected]
    • Logo Image URL: https://tinyurl.com/doc-icon
    • Description: Manage your development and release processes
  4. In Web App Settings, enter the Start URL: /sf_devops/DevOpsCenter.app
  5. Click Save.

6. In Manage Connected Apps, click Manage.

7. In the Permissions Sets section, click Manage Permission Sets.

8. Select sf_devops_NamedCredentials, then click Save.

4. Access DevOps

Click on the App Launcher and Select DevOpsCenter which will re-direct you to the DevOpsCenter.

5. Create a Project

Click on the ‘New Project’ button to create a new project.

6. Connect Environment

Click the ‘Add Development Environment’ button to connect the sandbox which should be a sandbox. The Dev Ops do not support Developer Edition so please make sure to create a sandbox and then connect it.

Click on the ‘Connect Environment’ button to connect the production environment. You can have a number of environments like Dev, UAT & QA sandbox and then finally deploy them to production.

7. Create Work Items

Click on the tab Work Items →‘New Work Item’ to create a work item and assign it with a ower. As an example I created an work item called create a checkbox called ‘Paid’.Once you have created the checkbox in the source system you can then pull that metadata into this work item by adding the component manually.

Once the component is added to the Work Item change the Status to In Review and once the Work Item is approved the field is ready to promote.

8. Promote the changes

Click on the Pipeline and then select the Approved Work Item which can be deployed into production and click the ‘Promote Selected’ button to push the changes into production.

9. Complete Overview Work Item

Once the changes are pushed into production we can have a complete overview of the work item by clicking on the work item. Please see the screenshot below,

Conclusion:

In conclusion, embracing DevOps practices within the Salesforce ecosystem is crucial for organizations looking to optimize their software development and deployment processes. DevOps Salesforce offers a comprehensive approach that promotes collaboration, automation, and continuous improvement, enabling teams to deliver high-quality solutions faster and more efficiently.

By implementing DevOps Salesforce, organizations can achieve faster time to market, increased agility, improved software quality, and enhanced customer experiences. The integration of version control systems, automated testing frameworks, and CI/CD pipelines ensures a smooth and reliable process from development to production. Additionally, Salesforce provides tools and APIs that support DevOps practices, enabling organizations to effectively manage complex projects, streamline workflows, and deliver innovative solutions.