
Getting Started with DLRS
1. Install DLRS: Navigate to the Salesforce AppExchange, locate the DLRS package, and install it into your Salesforce org.
2. Configure Rollup Summaries: Access the DLRS configuration page from the Setup menu. Define your rollup summaries by selecting the parent object, child object, relationship criteria, and aggregation type.
3. Monitor and Maintain: Regularly review and test your DLRS configurations to ensure they continue to meet your business requirements as data and processes evolve.
How to Set Up Salesforce DLRS Activity Rollups
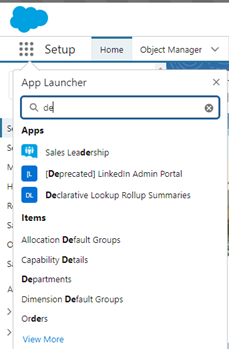
DLRS is accessed via the App Launcher
You’ll find four tabs:
Manage Lookup Rollup Summaries: Create new and update existing roll-ups.
Lookup Rollup Summary Logs: Identify errors that occur when the summaries are executed.
Lookup Rollup Summaries Tools: Use the Optimizer to access recommendations for improving the efficiency of your automation configuration.
Lookup Rollup List View:

Now that everything is really fine, you can go on the Manage Lookup Rollup Summaries tab to create a new Lookup Rollup Summary.
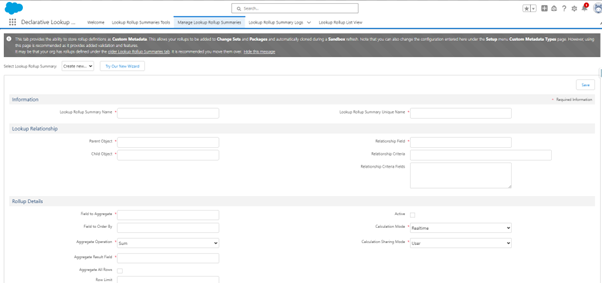
You find below some details on each field in order to help you during the creation.
- Lookup Rollup Summary Name: As the DLRS interface doesn’t group rollups by object, the list can become confusing as it grows. It’s helpful to label each rollup with the object name followed by the rollup field name.
- Lookup Rollup Summary Unique Name: This is the API name for your rollup. It does not auto-populate, so you will need to manually fill it in.
- Parent Object – The API name of the object containing the rollup field.
- Child Object: The API name of the object from which values are being rolled up.
- Relationship Field – The API name of the lookup field on the child object that relates it to the parent object.
- Relationship Criteria – This field is where you enter your criteria using field API names and the conditions that will be used with them. This field uses SOQL formatting so your criteria string must be formatted like that. Here’s an example of how this might look:`(IsDeleted = FALSE AND Type = ‘Call’) OR (IsDeleted = FALSE AND Type = ‘Email’)`In this scenario, the roll-up will count any undeleted Task records where the Type field value is ‘Call’ or ‘Email’.
- Relationship Criteria Fields – Here you only enter the API names for any of the fields used in the Relationship Criteria text box above it. Please list each unique API name on a separate line.
- Field to Aggregate – Specify the field you want to roll up to the parent object. For a Count operation, you can roll up the Id field of the child records.
- Field to Order By – Use this field when the order of child records affects the roll-up data. For example, to roll up the date of the most recent Task record, order the Tasks by Created Date or Activity Date. With the “Last” aggregate operation, the roll-up will identify the most recently created Task based on the chosen date value.
- Aggregate Operation – Select the type of roll-up to be created from the available options
- Sum
- Max
- Min
- Avg
- Count
- Count Distinct
- Concatenate
- Concatenate Distinct
- First
- Last
11. Aggregate All Rows – This option decides whether archived or deleted records will be included in your roll-up. For Tasks or Event records, we typically check this box to ensure archived activities are counted. To avoid counting deleted records, use the “IsDeleted = FALSE” criteria.
12. Row Limit – This sets a limit on the number of child records evaluated for your roll-up.
13. Active – This box indicates whether your roll-up is currently running or inactive. For a new DLRS on a child object, save the inactive version first, then click the “Manage Child Trigger” button to deploy the code. After that, you can save your roll-up as active to run in your org.
14. Calculation Mode – This determines how and when your roll-up should be executed.
- Realtime will run on any creation or update of the child object records.
- Scheduled allows you to set exactly when the rollup should be calculated.
- The developer has enabled the rollup to be invoked from custom triggers.
- Process Builder allows the rollup to be called from a process.
For our rollup, we will use Real Time so that the rollup will update for any new Task records added to the account, with no further configurations needed.
15. Calculation Sharing Mode – This setting determines if Salesforce sharing configurations should be considered during the roll-up calculation. “User” mode will calculate only records visible to the current user who triggered the roll-up. “System” mode will calculate all records, regardless of the current user’s access.
After filling in your DLRS with the necessary values, click the Save button. If this is your first roll-up for the child object, you cannot save the DLRS with the “Active” checkbox checked. Save it with the “Active” box unchecked.