Salesforce Flow keeps evolving, and one of its standout features is the Transform element. This tool simplifies data mapping, reducing manual assignments and making automation more efficient. If you’ve ever struggled with mapping fields, the Transform element is here to help!
What is the Transform Element?
The Transform element in Salesforce Flow allows you to:
Convert collections into different formats
Map fields between objects seamlessly
Minimize manual assignments and errors
Enhance automation efficiency
Why is It Important?
Previously, handling complex data in Flow required multiple assignment elements and loops, making automation cumbersome. The Transform element streamlines this by enabling quick, declarative field mapping in one step, resulting in cleaner and faster Flows.
Key Features
Intuitive Field Mapping – Drag and drop fields easily.
Versatile Data Support – Works with records, collections, and Apex-defined types.
Conditional Mapping – Filter and transform data before assignment.
Simplified Flow Design – Reduces complexity and improves readability.
How to Use It
Add a Transform Element – Drag it into your Flow.
Define Source and Target Data – Set input and output structures.
Map Fields – Use the visual mapping interface.
Use the Transformed Data – Pass it into Flow actions like Create or Update.
Practical Example
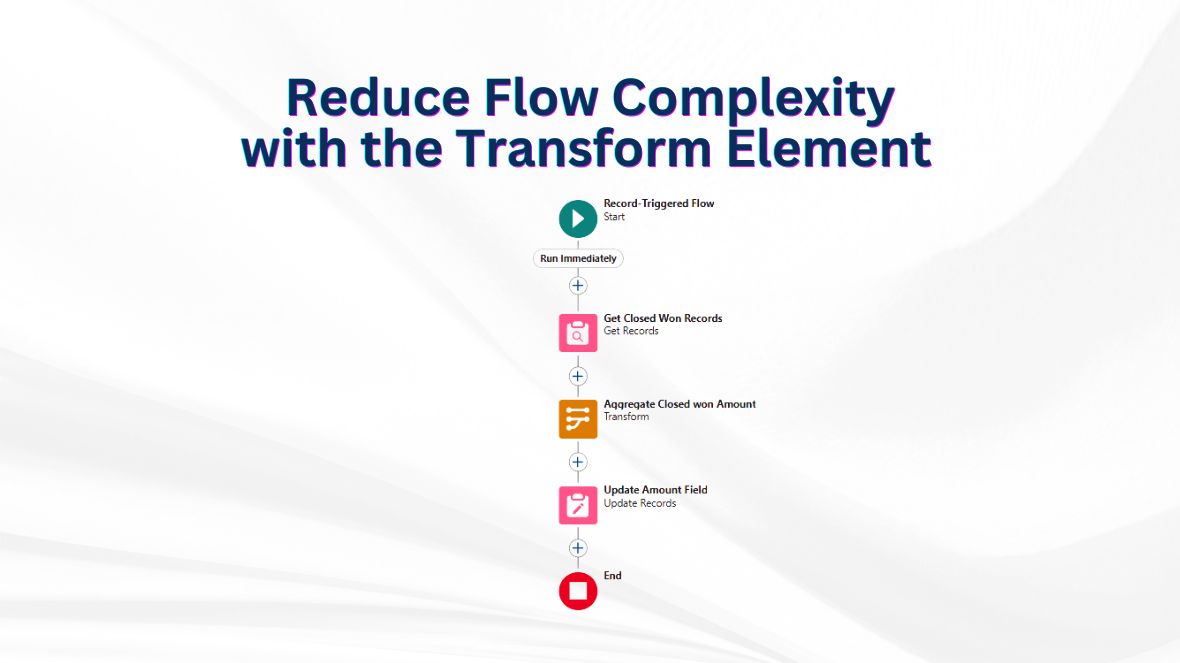
This blog explains how to use the Transform element in Salesforce Flow to summarize Closed Won Opportunity amounts at the Account level—without using a loop.
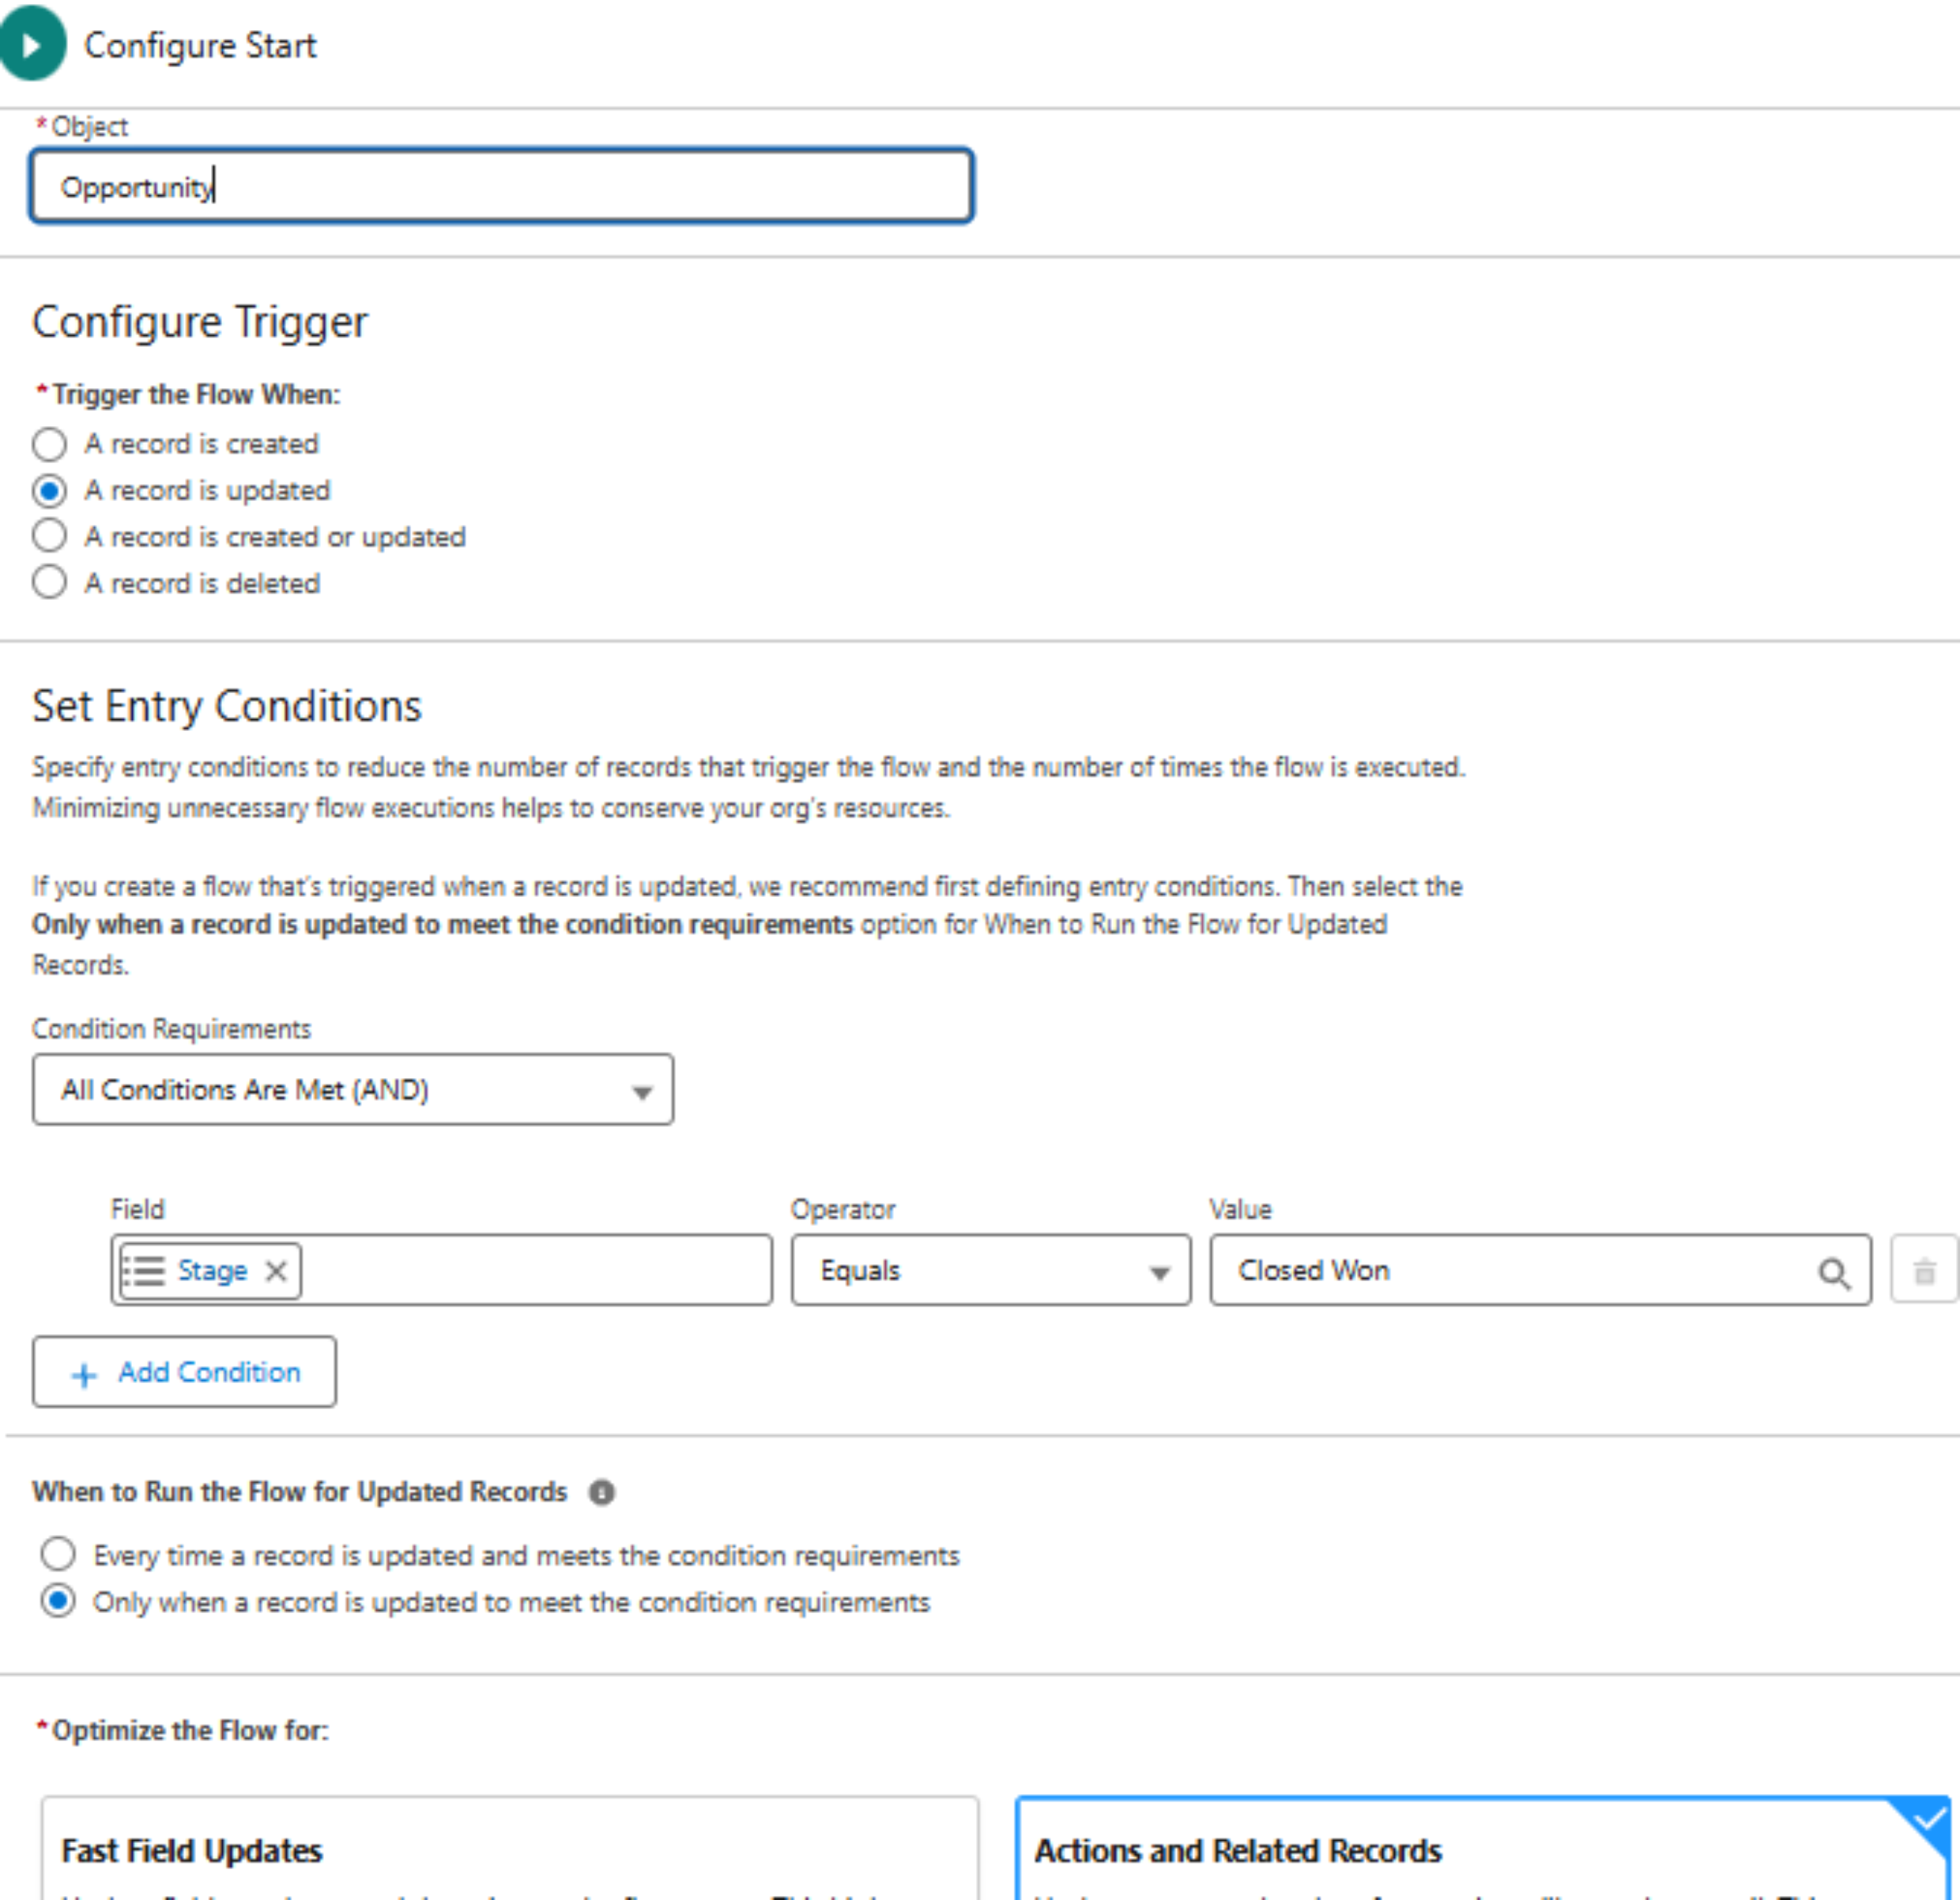
Step 1: Start by creating a Record-Triggered Flow.
Step 2: Set the trigger object to Opportunity, and define the entry condition where Stage equals “Closed Won.”
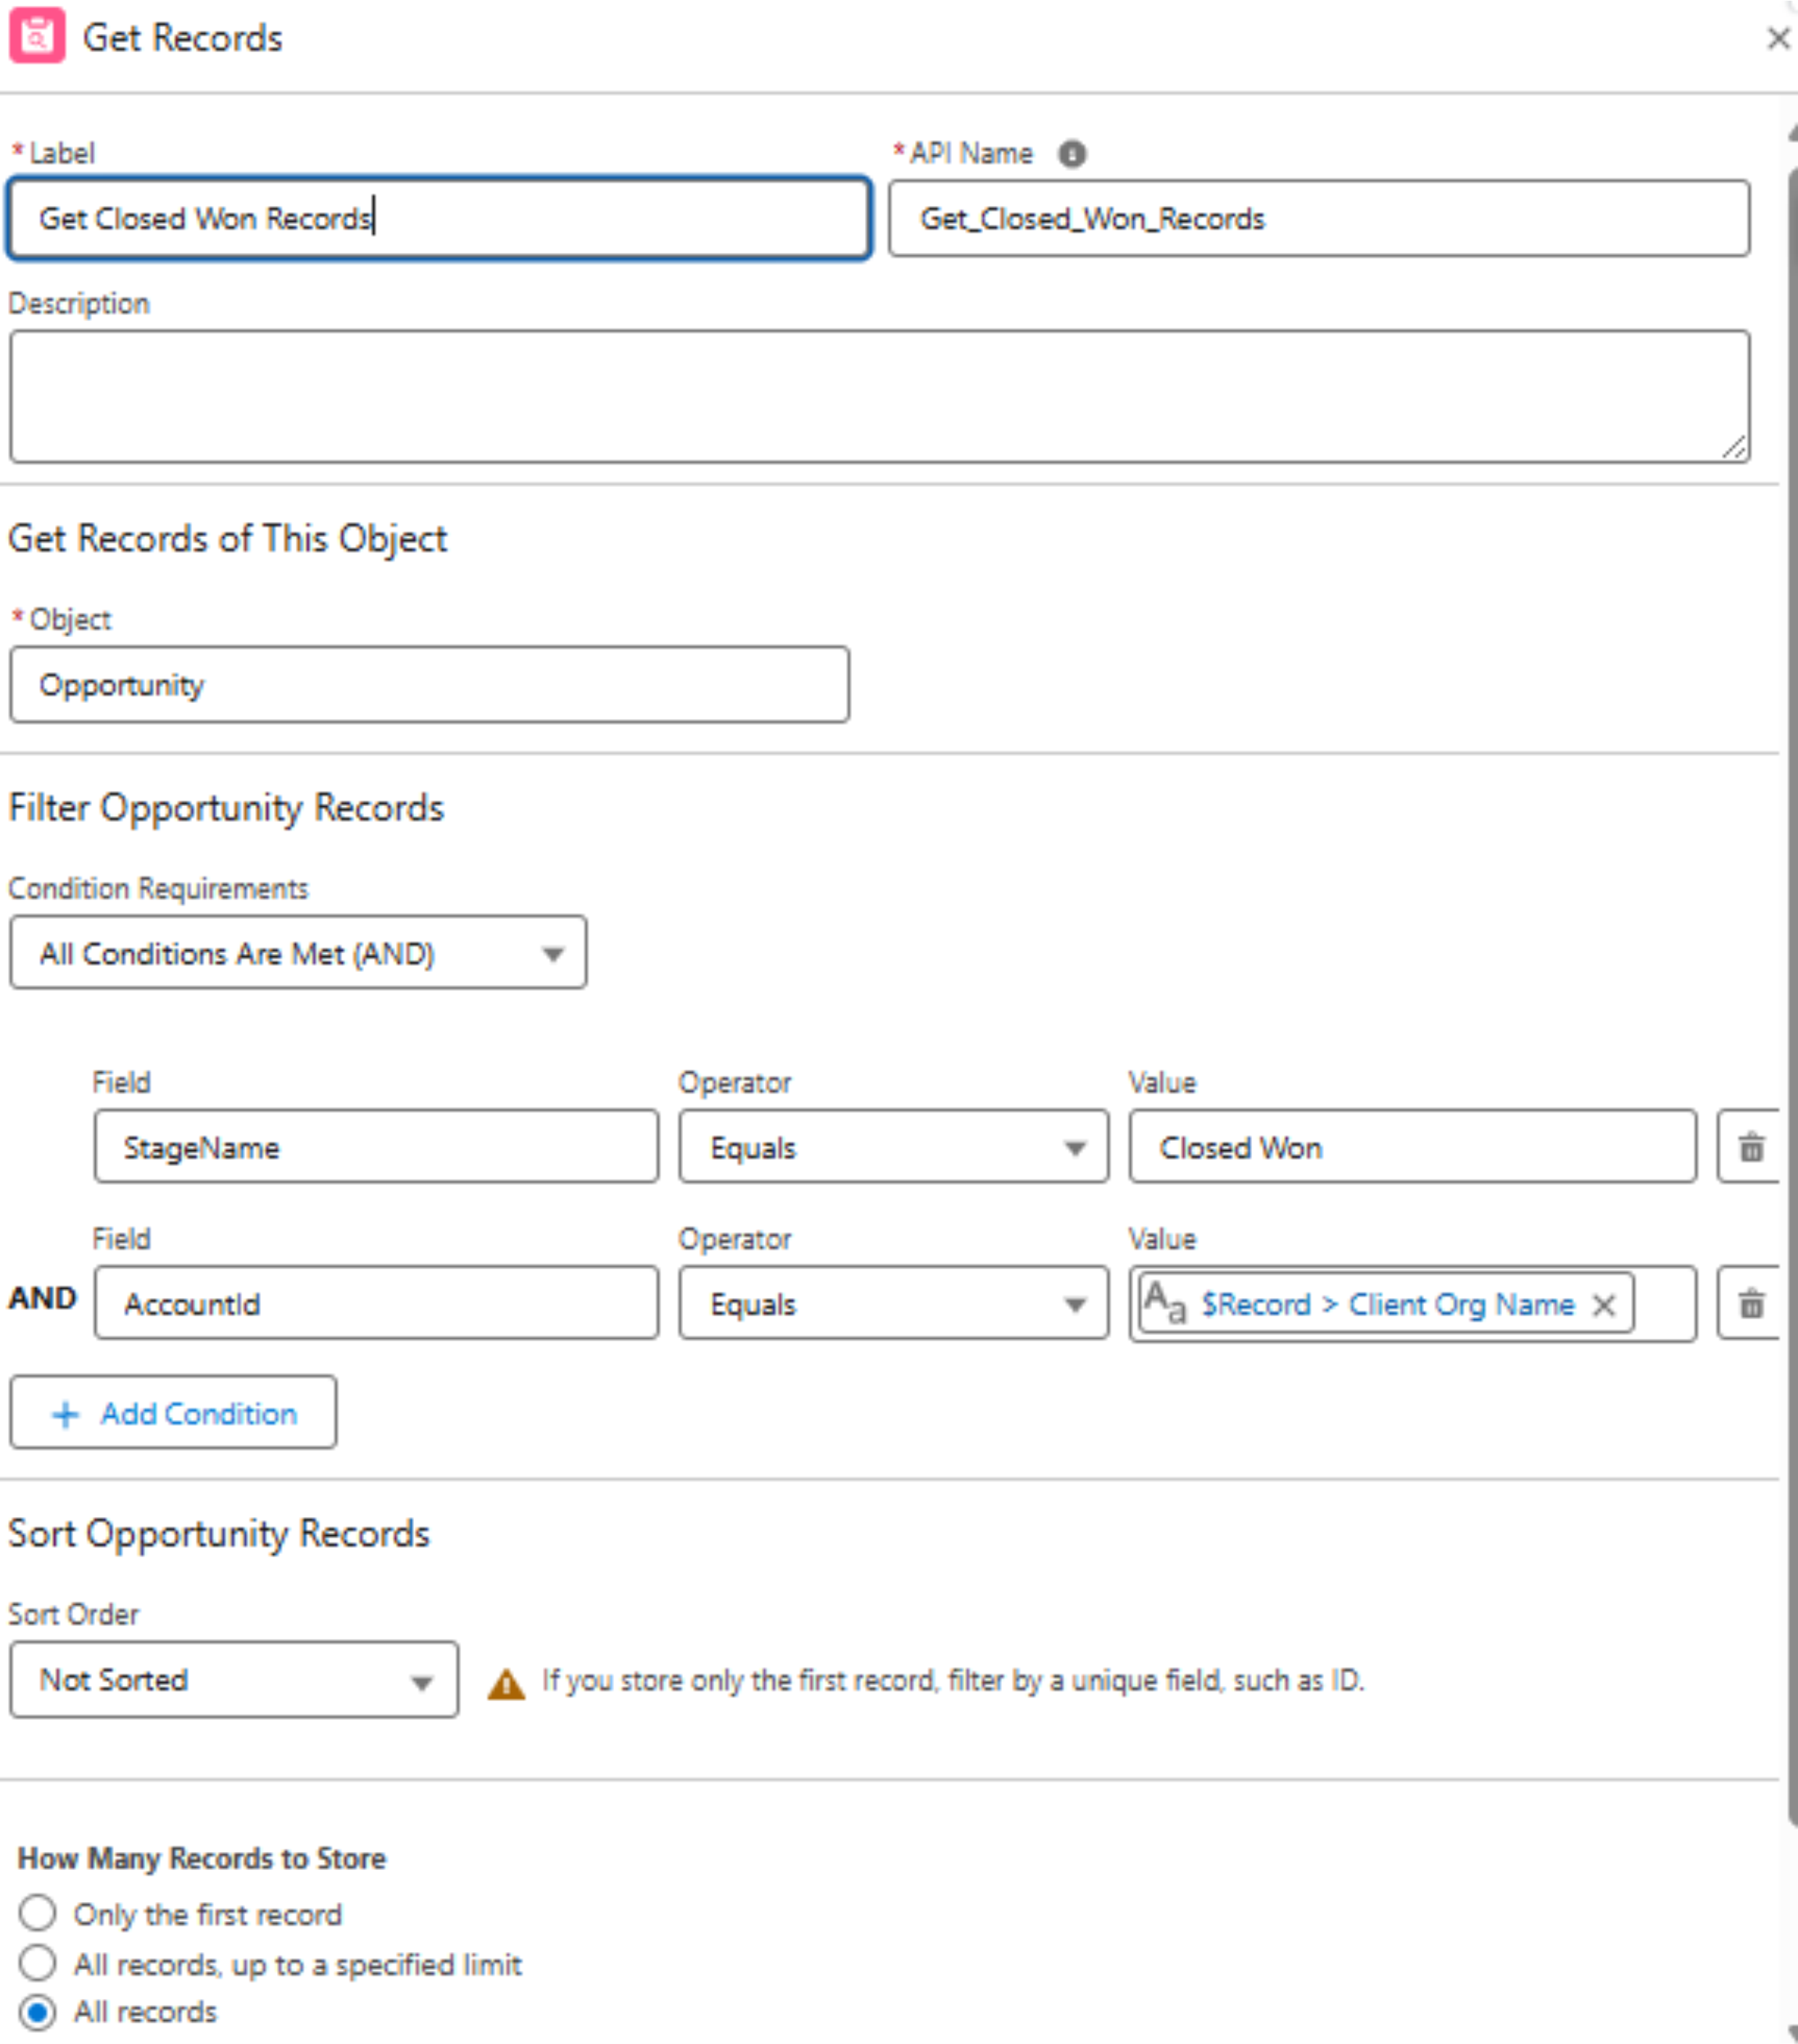
Step 3: Use the Get Records element to fetch all Opportunities related to the Account of the triggering Opportunity. Apply the necessary conditions as shown in the screenshot.
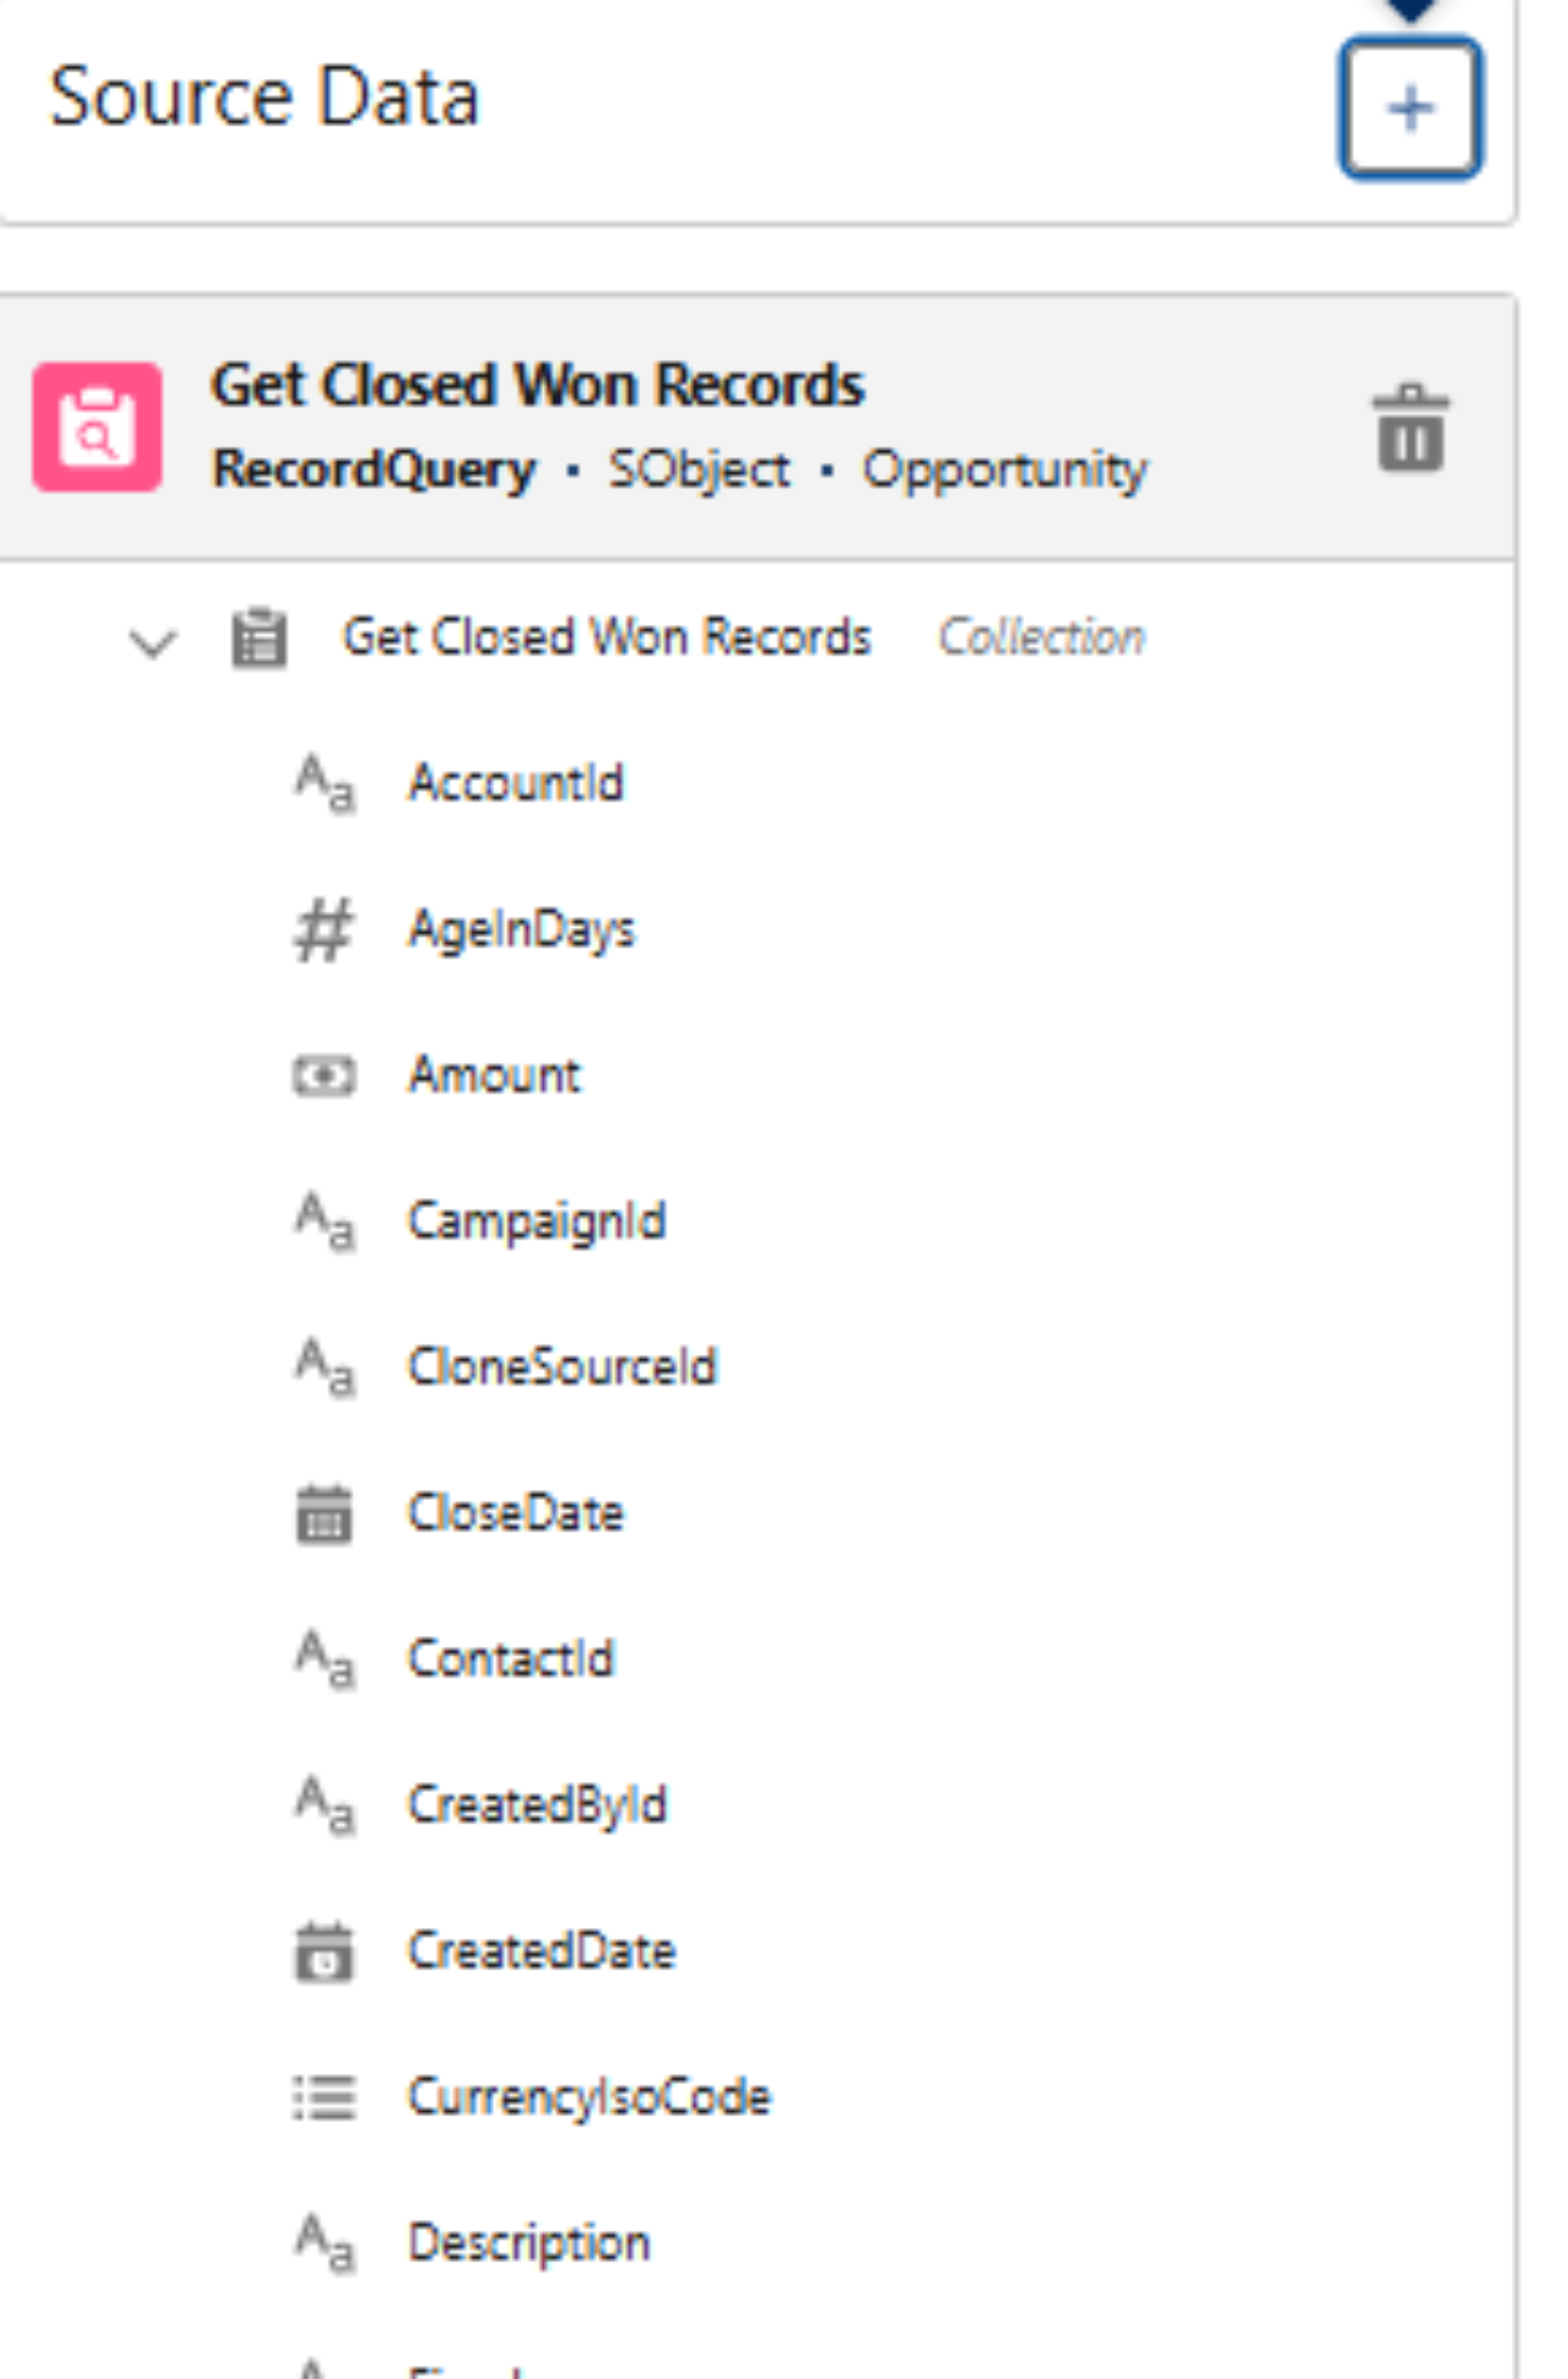
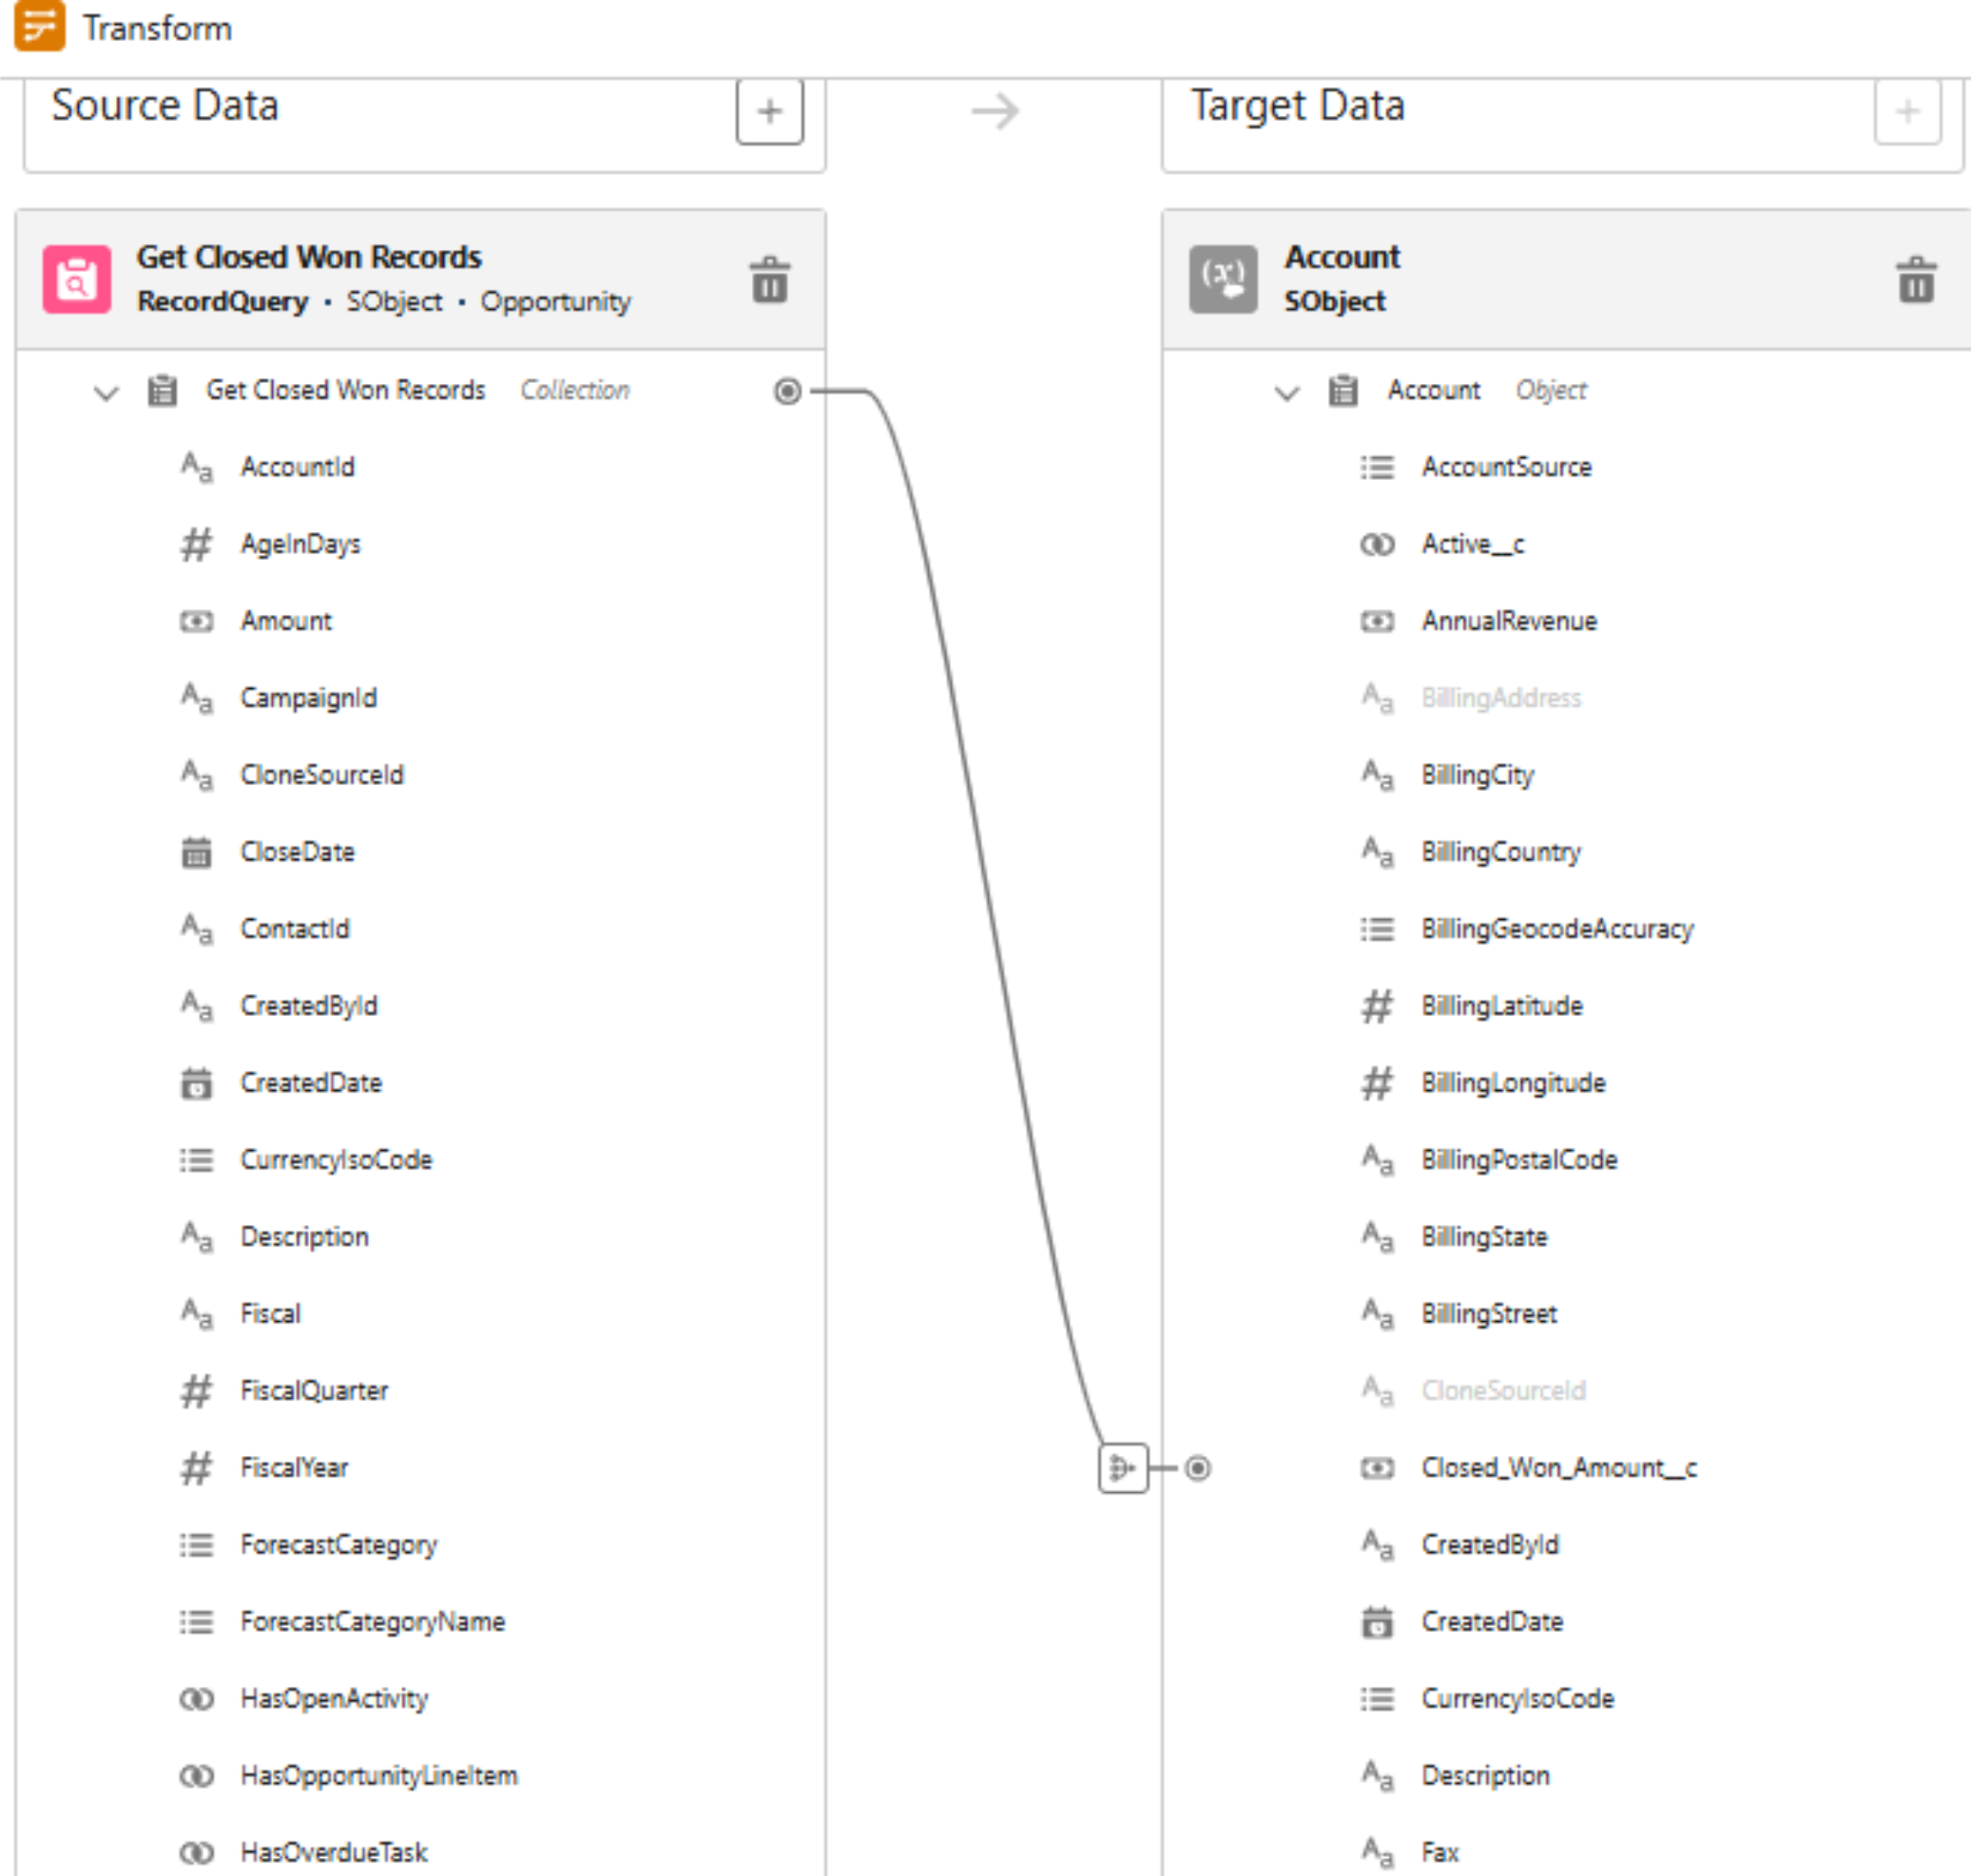
Step 4: Drag in a Transform element. Under Source Data, click the ( + ) icon and select the Closed Won Opportunities collection retrieved in Step 3.
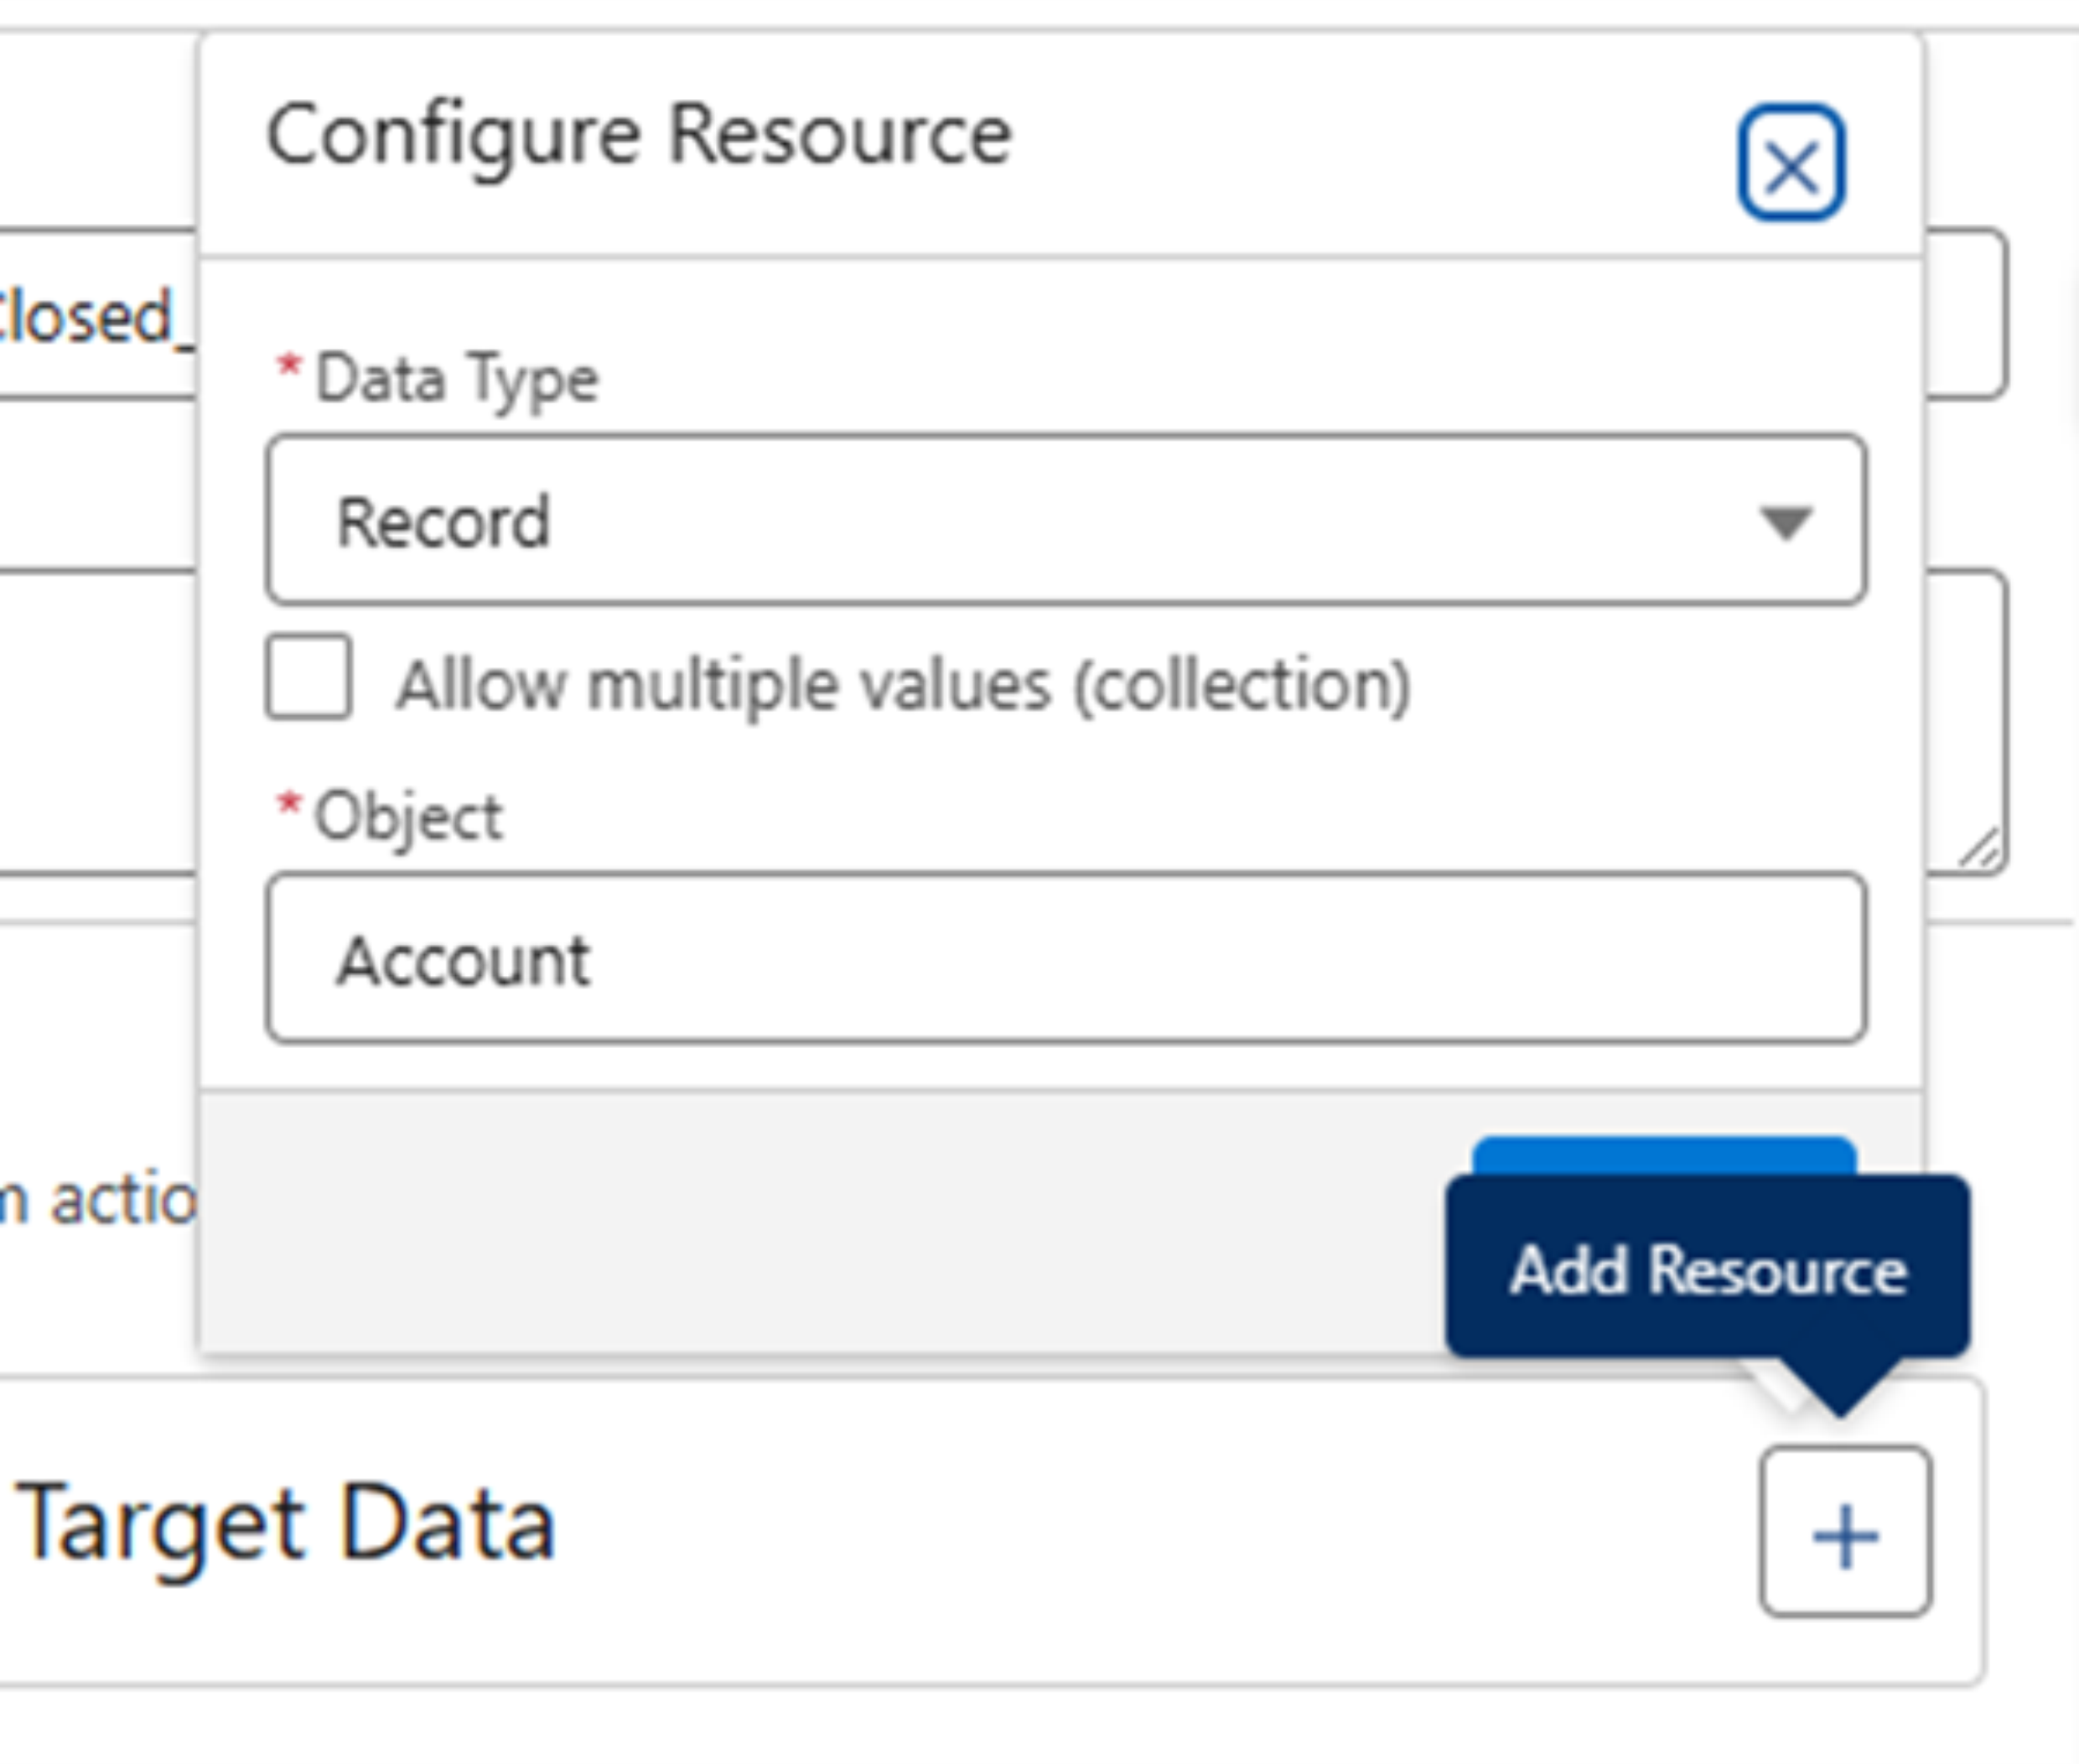
Step 5: Next, click the Target Data ( + ) icon. Choose Record as the data type and select the Account object.
Step 6: Map the relevant source fields to the target fields.
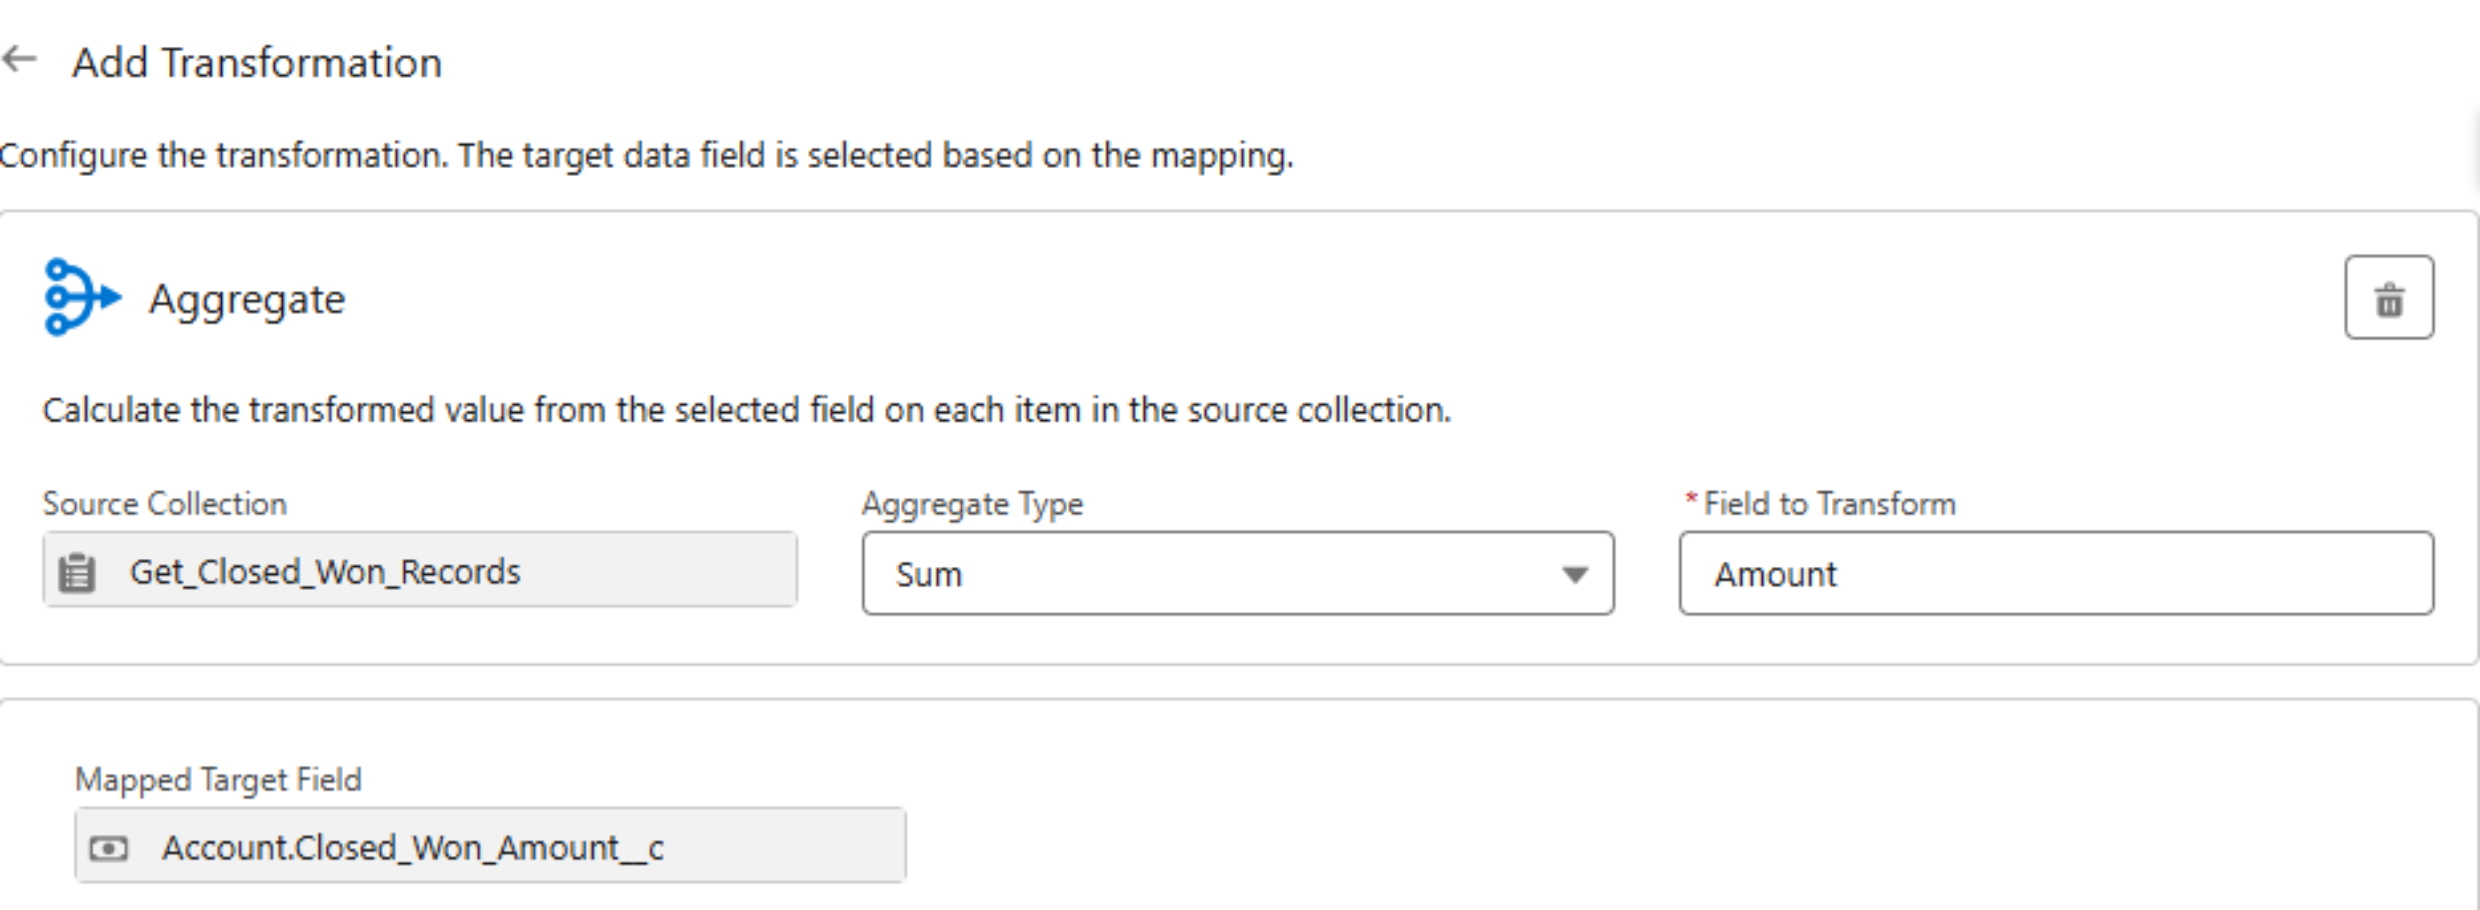
Step 7: After mapping, you’ll be taken to the Aggregation section. Set up the aggregation variables (like summing the Amount field) as shown in the screenshot.
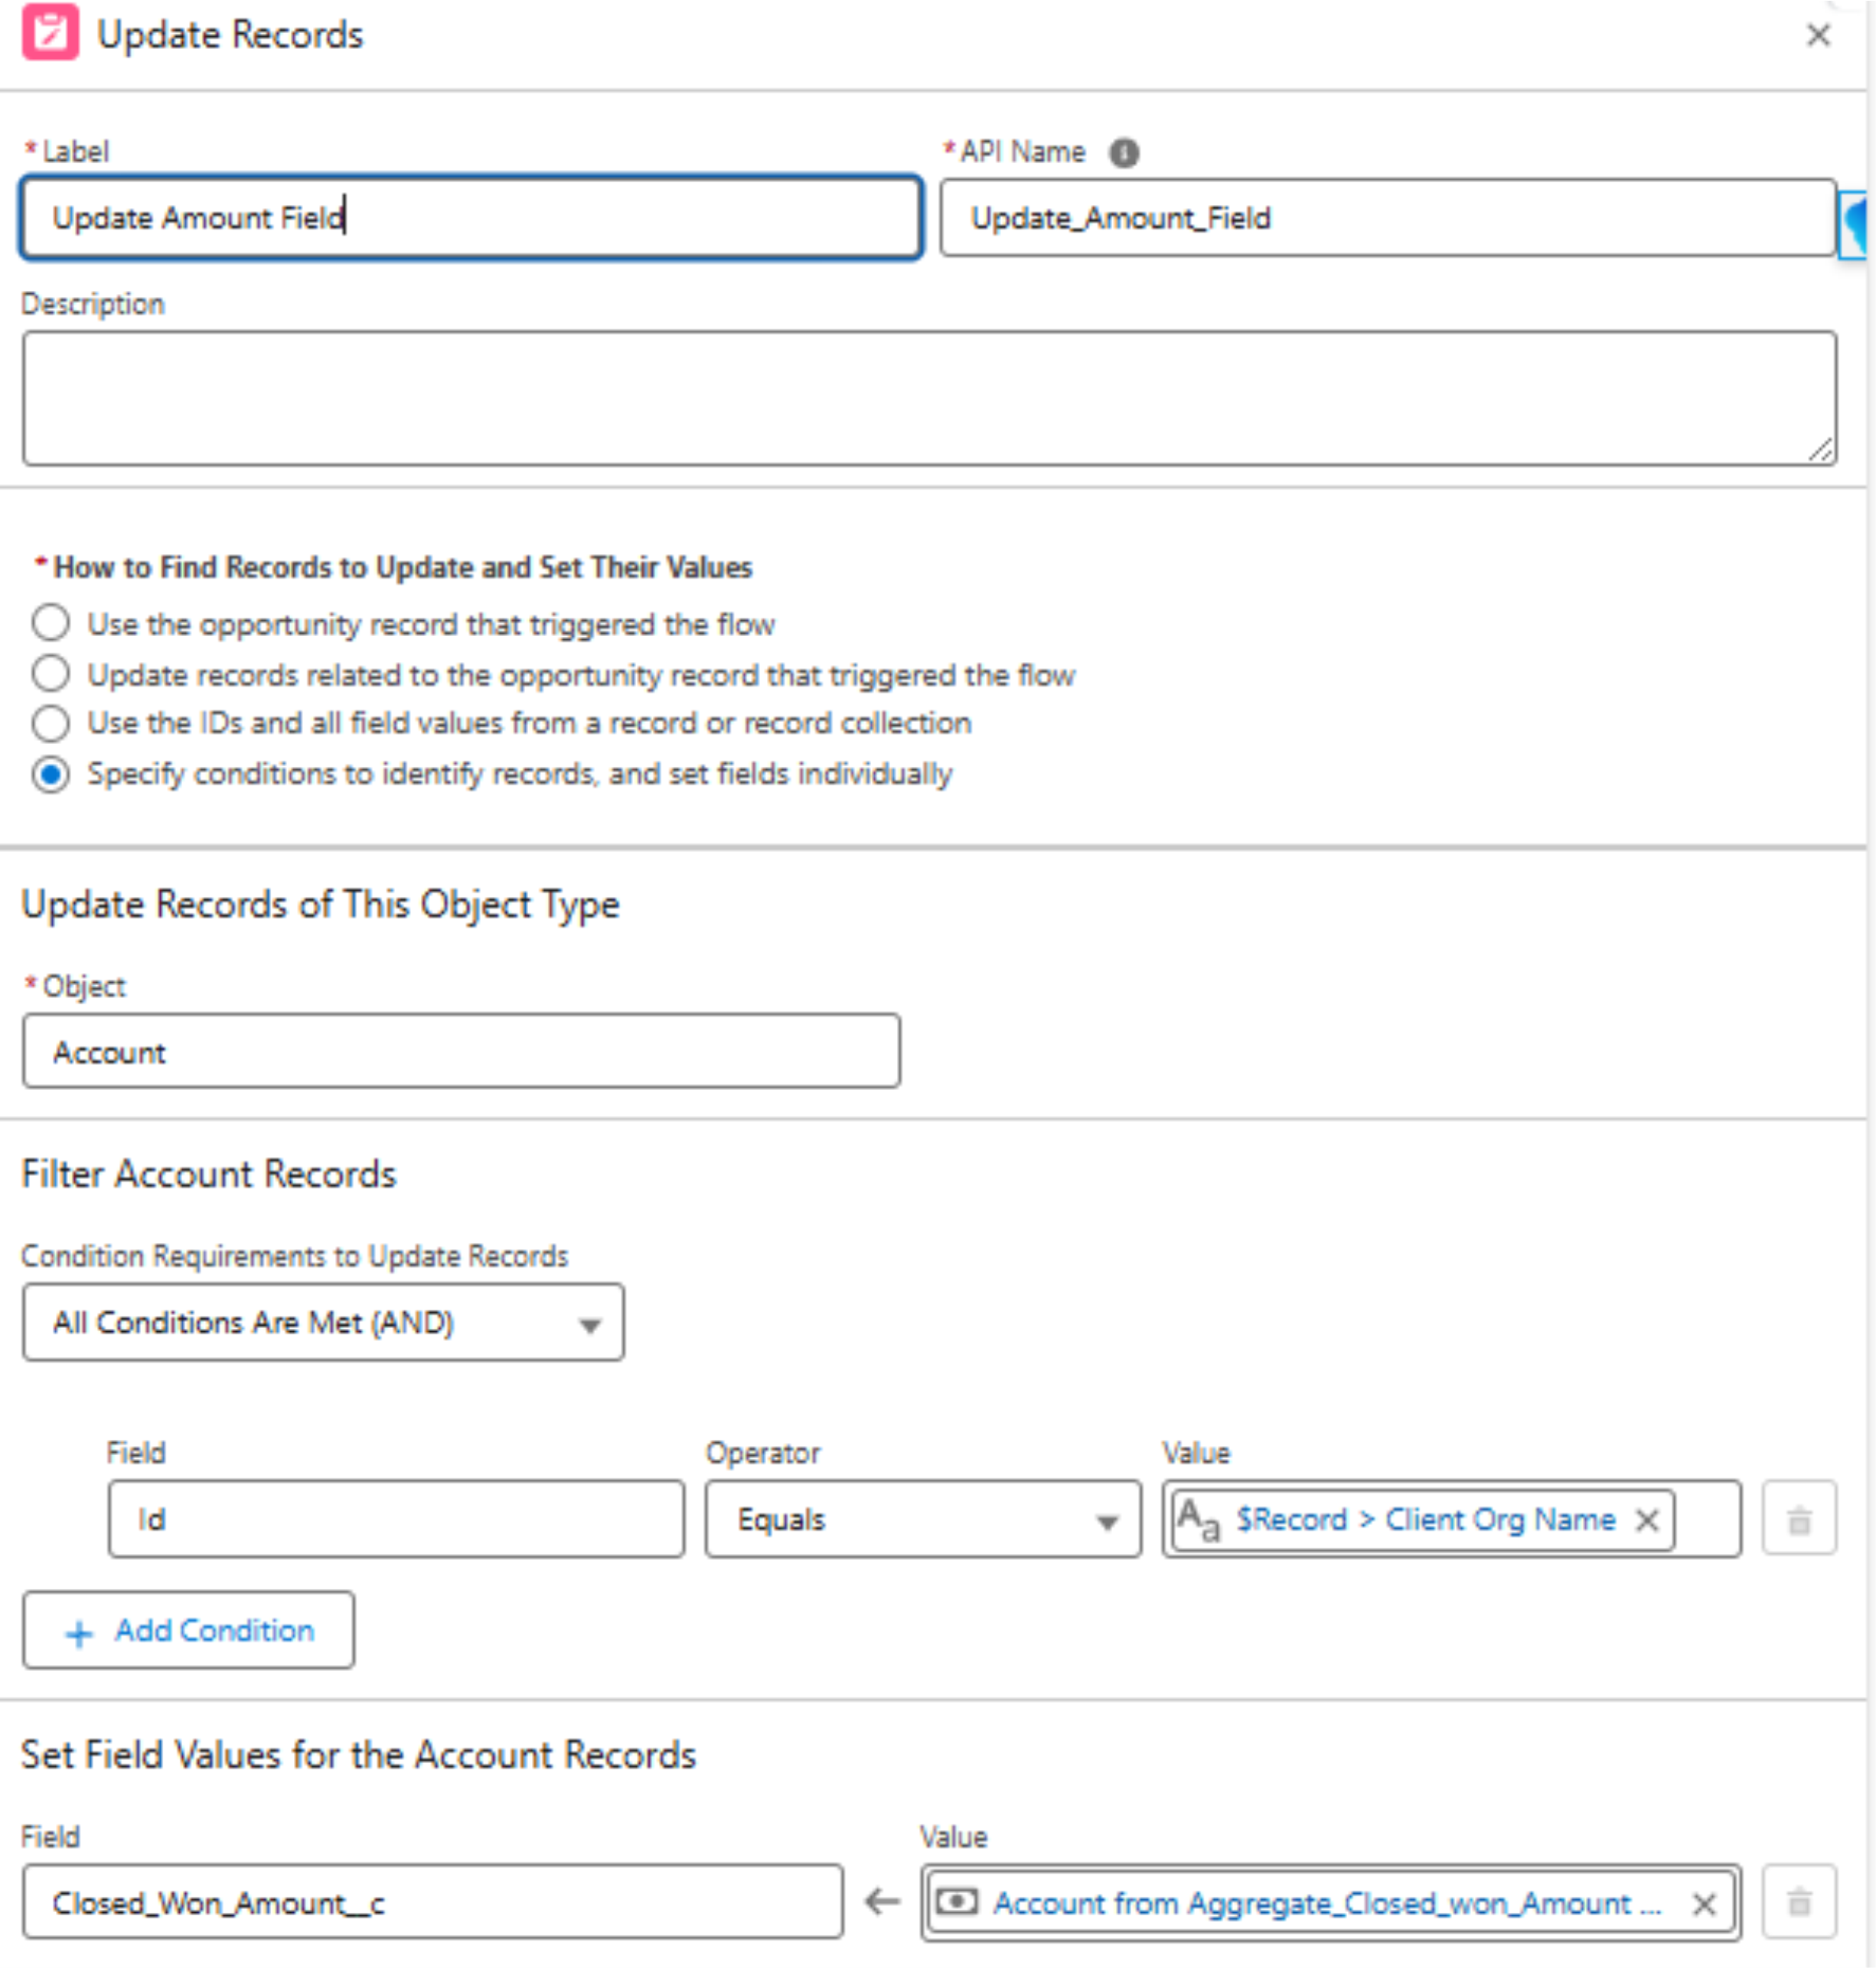
Step 8: Finally, use an Update Records element to update the Closed Won Amount field on the Account with the aggregated value.
Best Practices
Prefer Transform Over Assignments – Keeps Flows clean.
Use Conditional Mapping Wisely – Filter unnecessary data early.
Test Before Deployment – Validate mappings to ensure accuracy.
Final Thoughts
The Transform element is a game-changer, making Salesforce automation more efficient. By mastering it, you can simplify data transformations and create smarter workflows.
In today’s digital-first world, businesses need to provide quick and efficient customer service. Einstein Bots, powered by Salesforce, help companies automate customer interactions, improving response time and overall customer satisfaction. Whether you’re new to Einstein Bots or looking to understand the basics, this guide will walk you through what they are, how they work, and how they can enhance your customer service.
What Are Einstein Bots?
“Einstein Bots are AI-driven virtual assistants that streamline customer support by automating repetitive tasks, addressing common inquiries, and seamlessly integrating with Salesforce. Leveraging Natural Language Processing (NLP) and structured conversation flows, these bots enhance customer interactions while reducing the burden on human agents.”
Enabling Einstein Bots
Before using Einstein Bots, you must enable them in Salesforce:
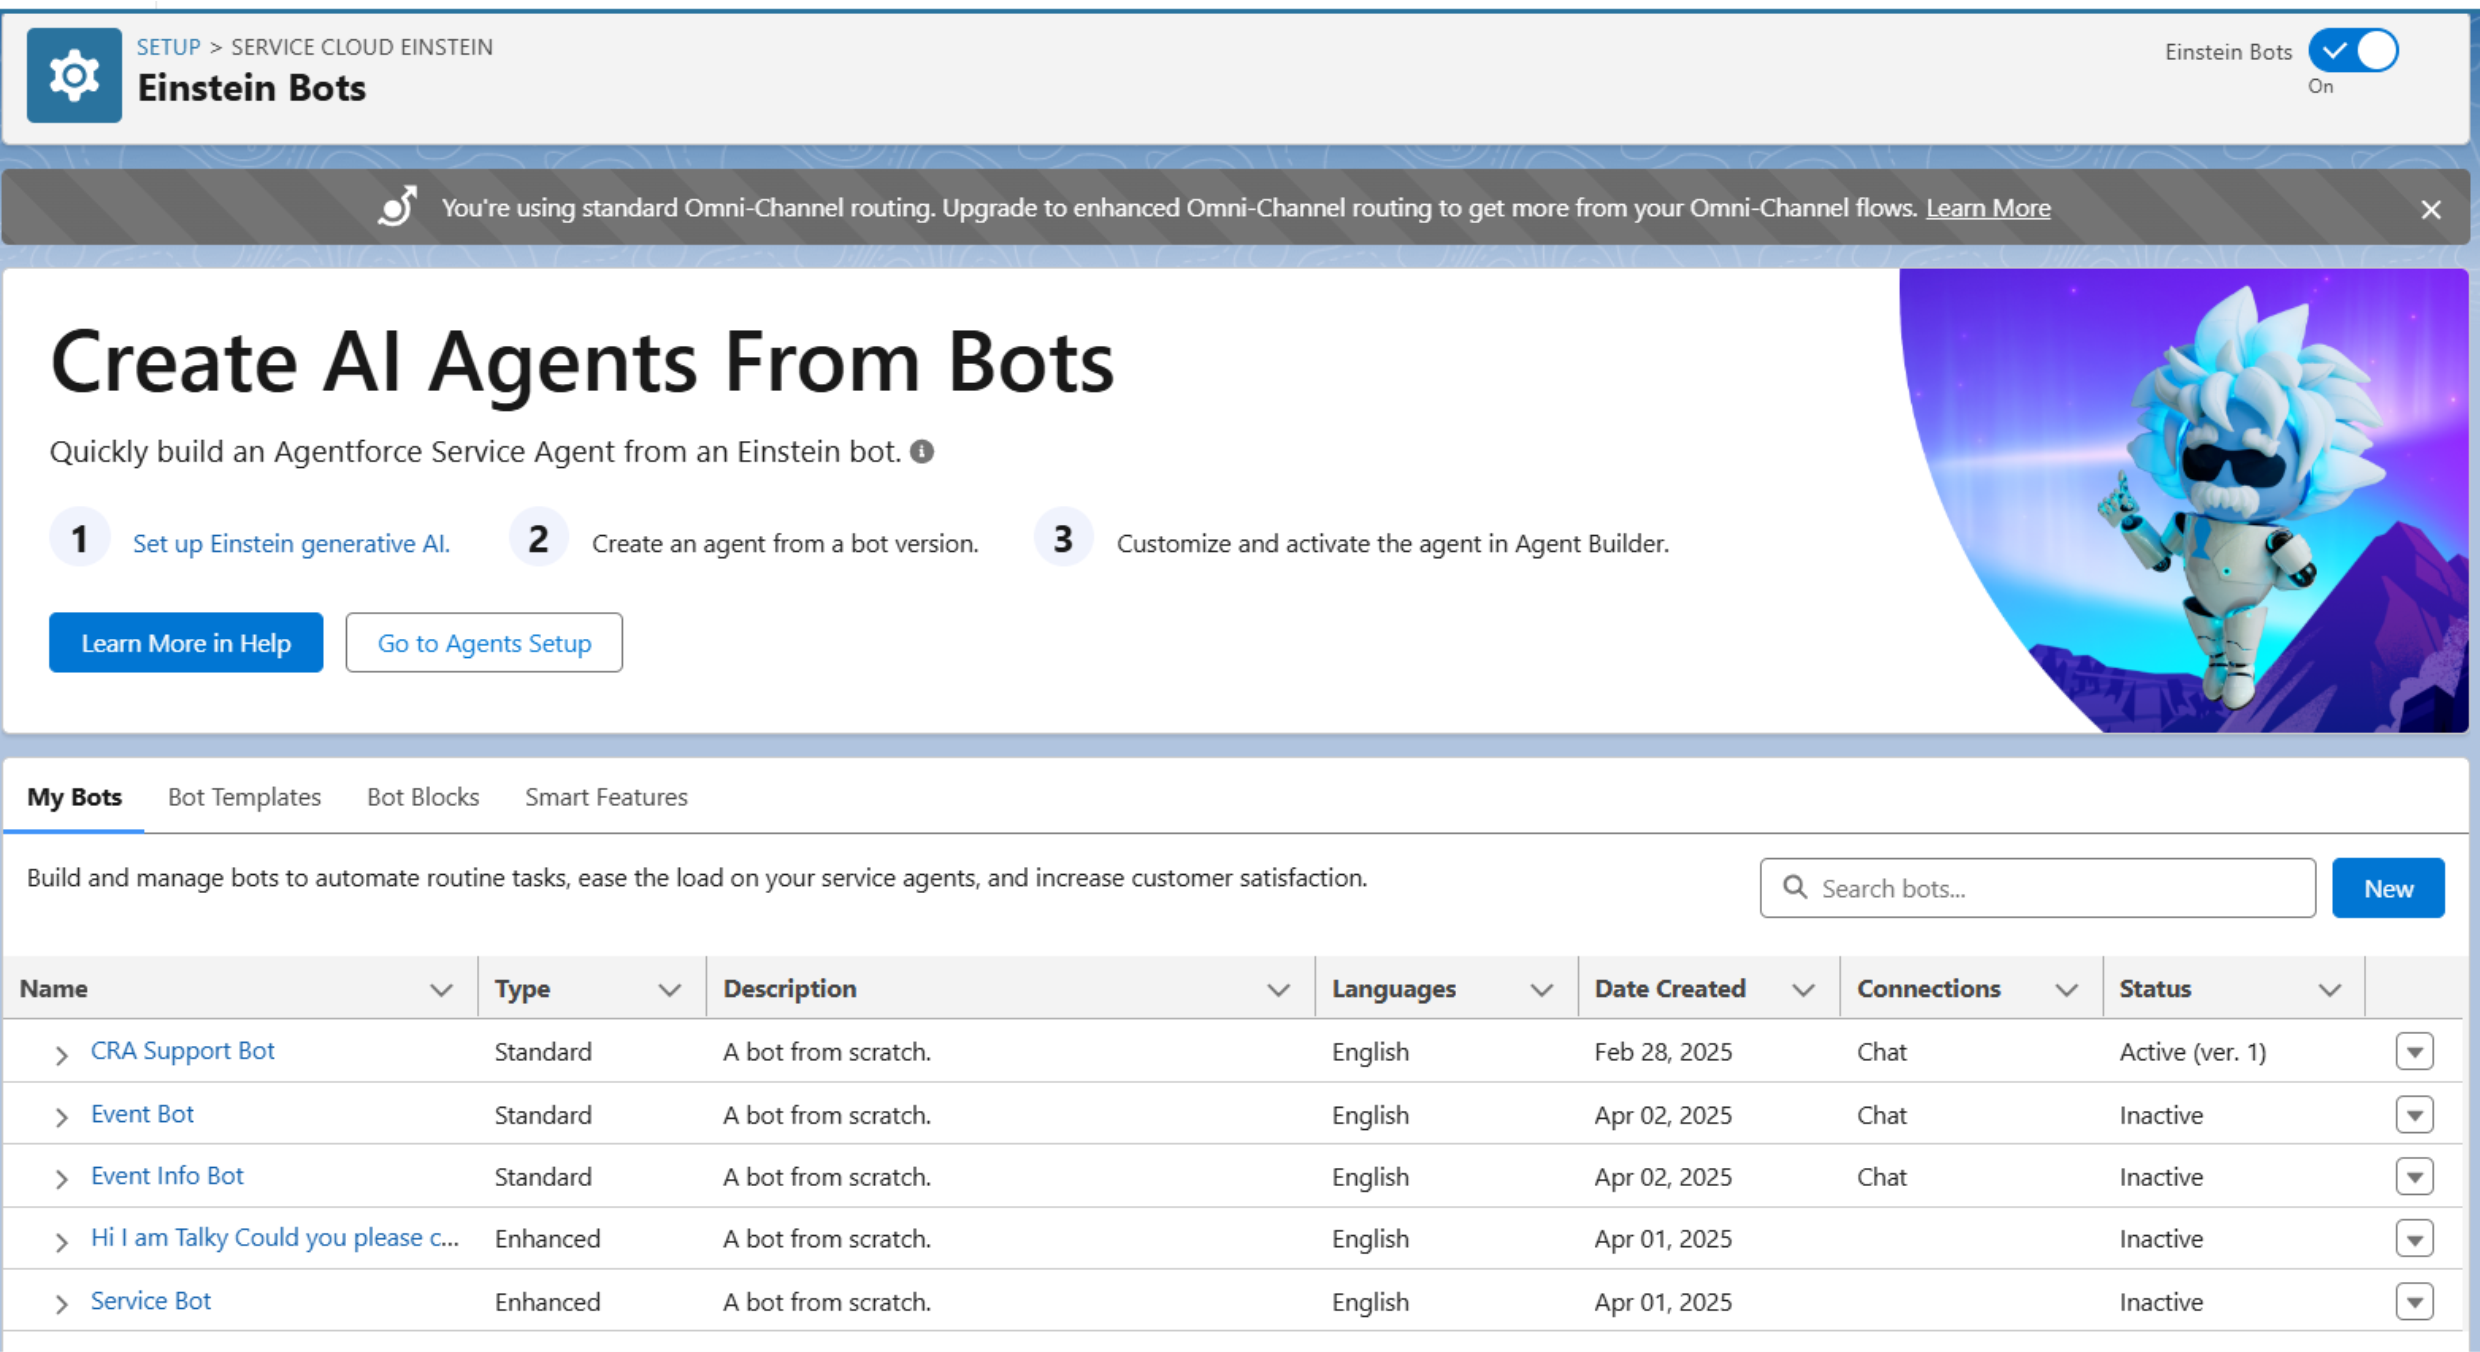
Navigate to Setup > Einstein Bots > Enable.
2. Click the New button to create a new bot
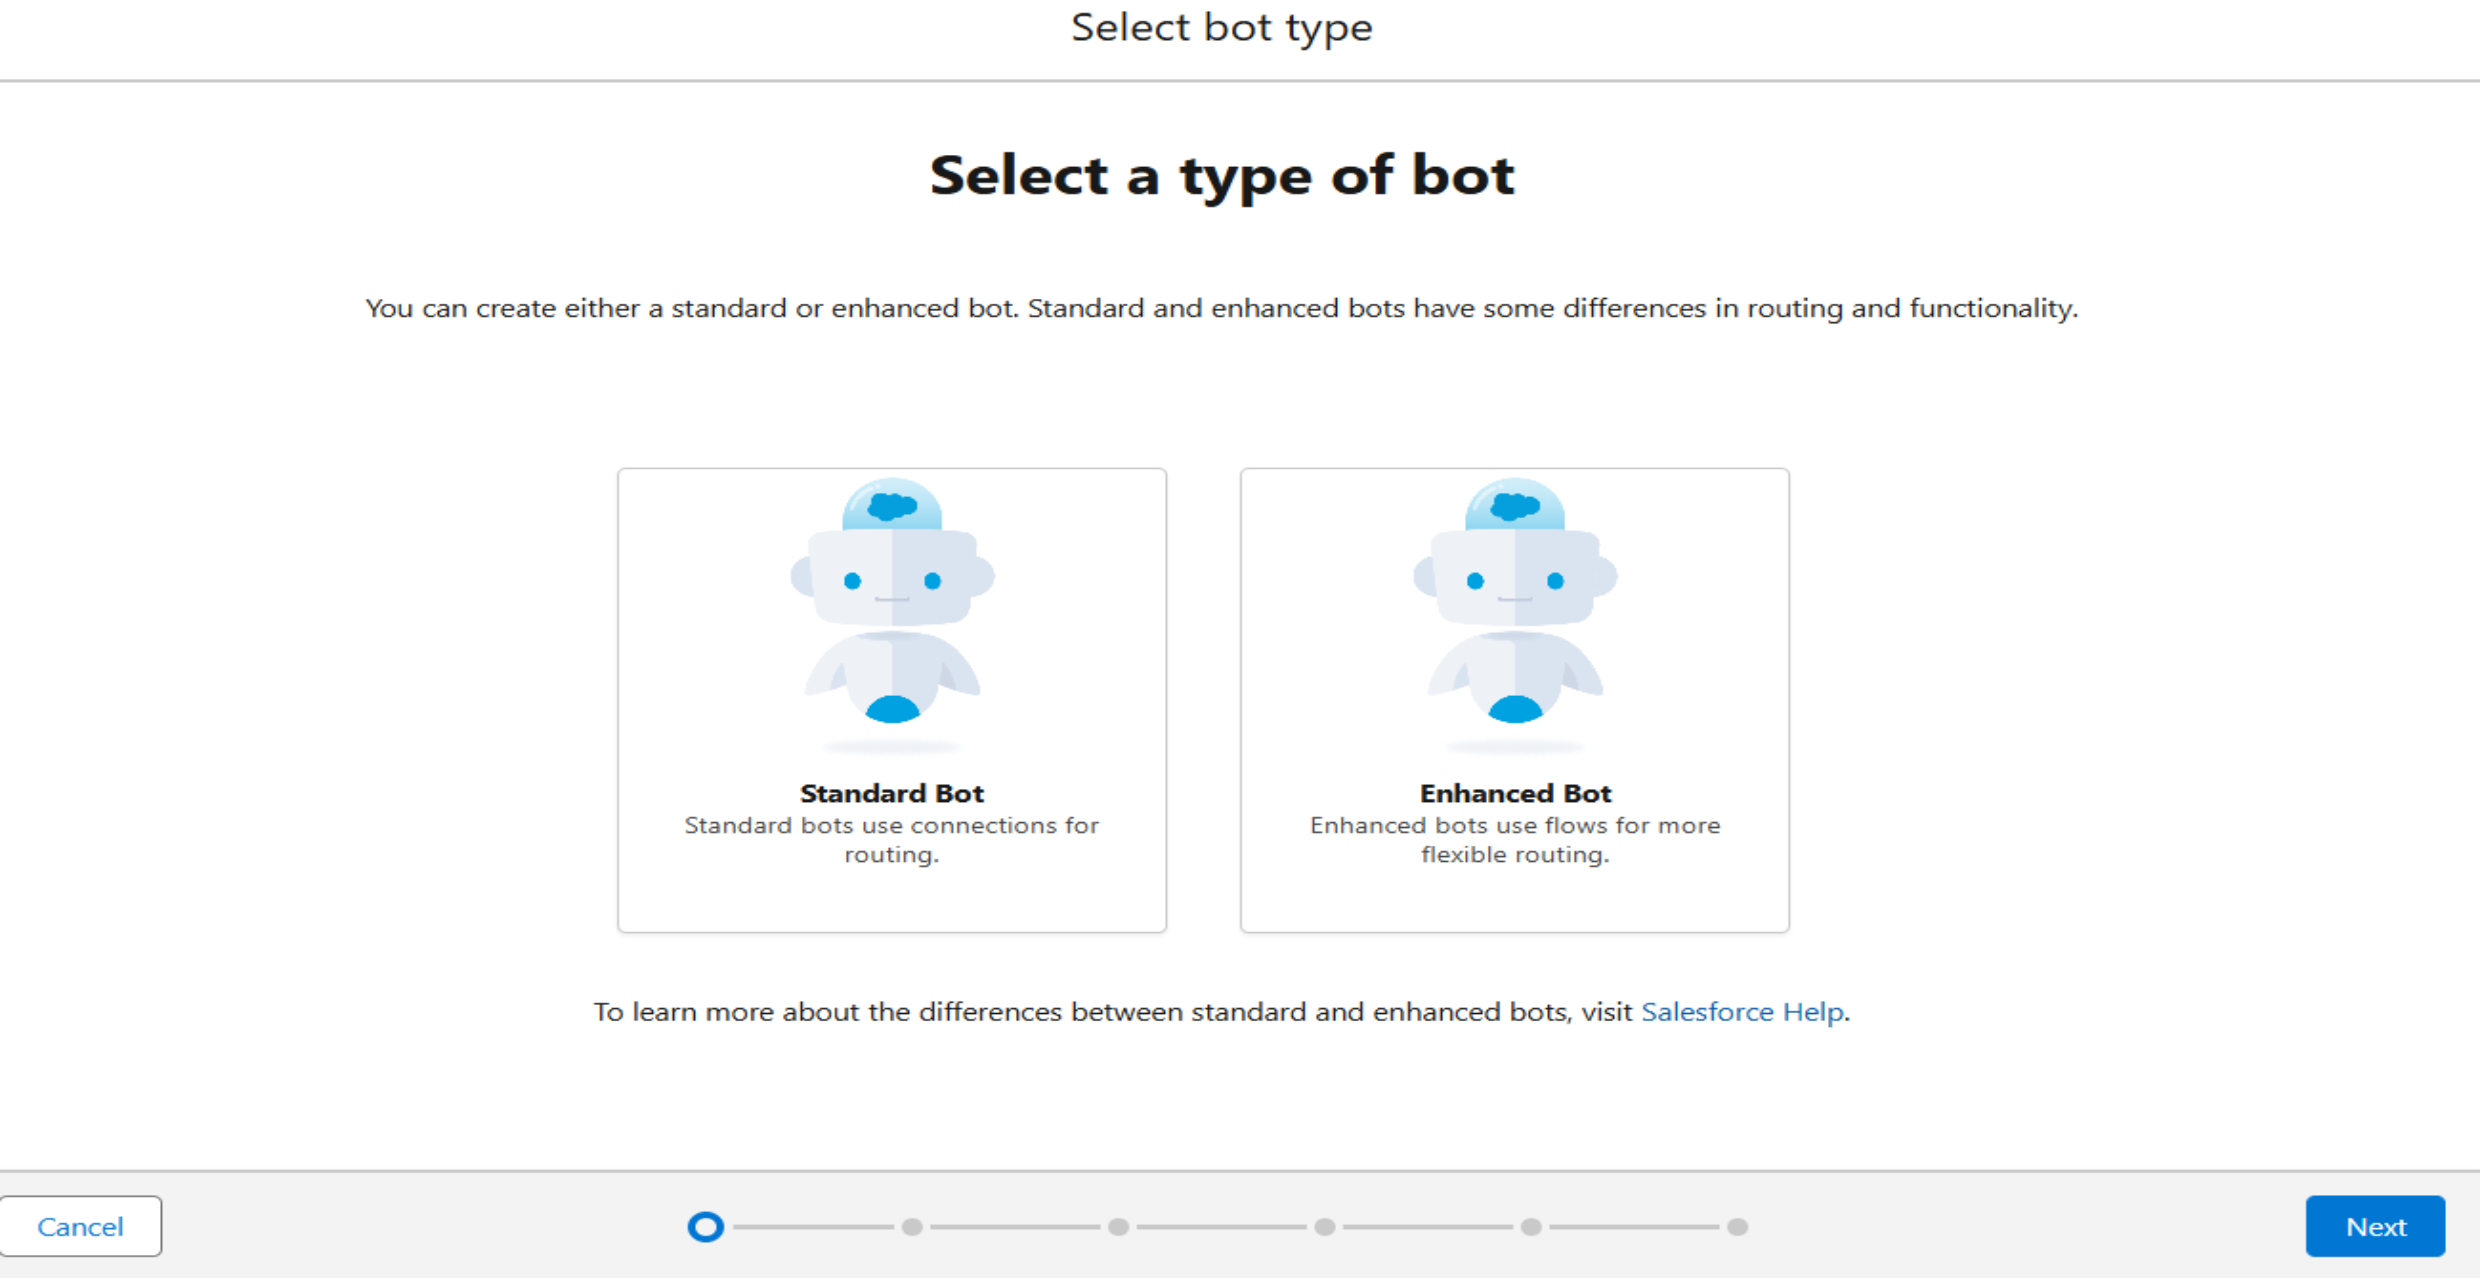
3. Select the Type of Bot that suits your business needs.
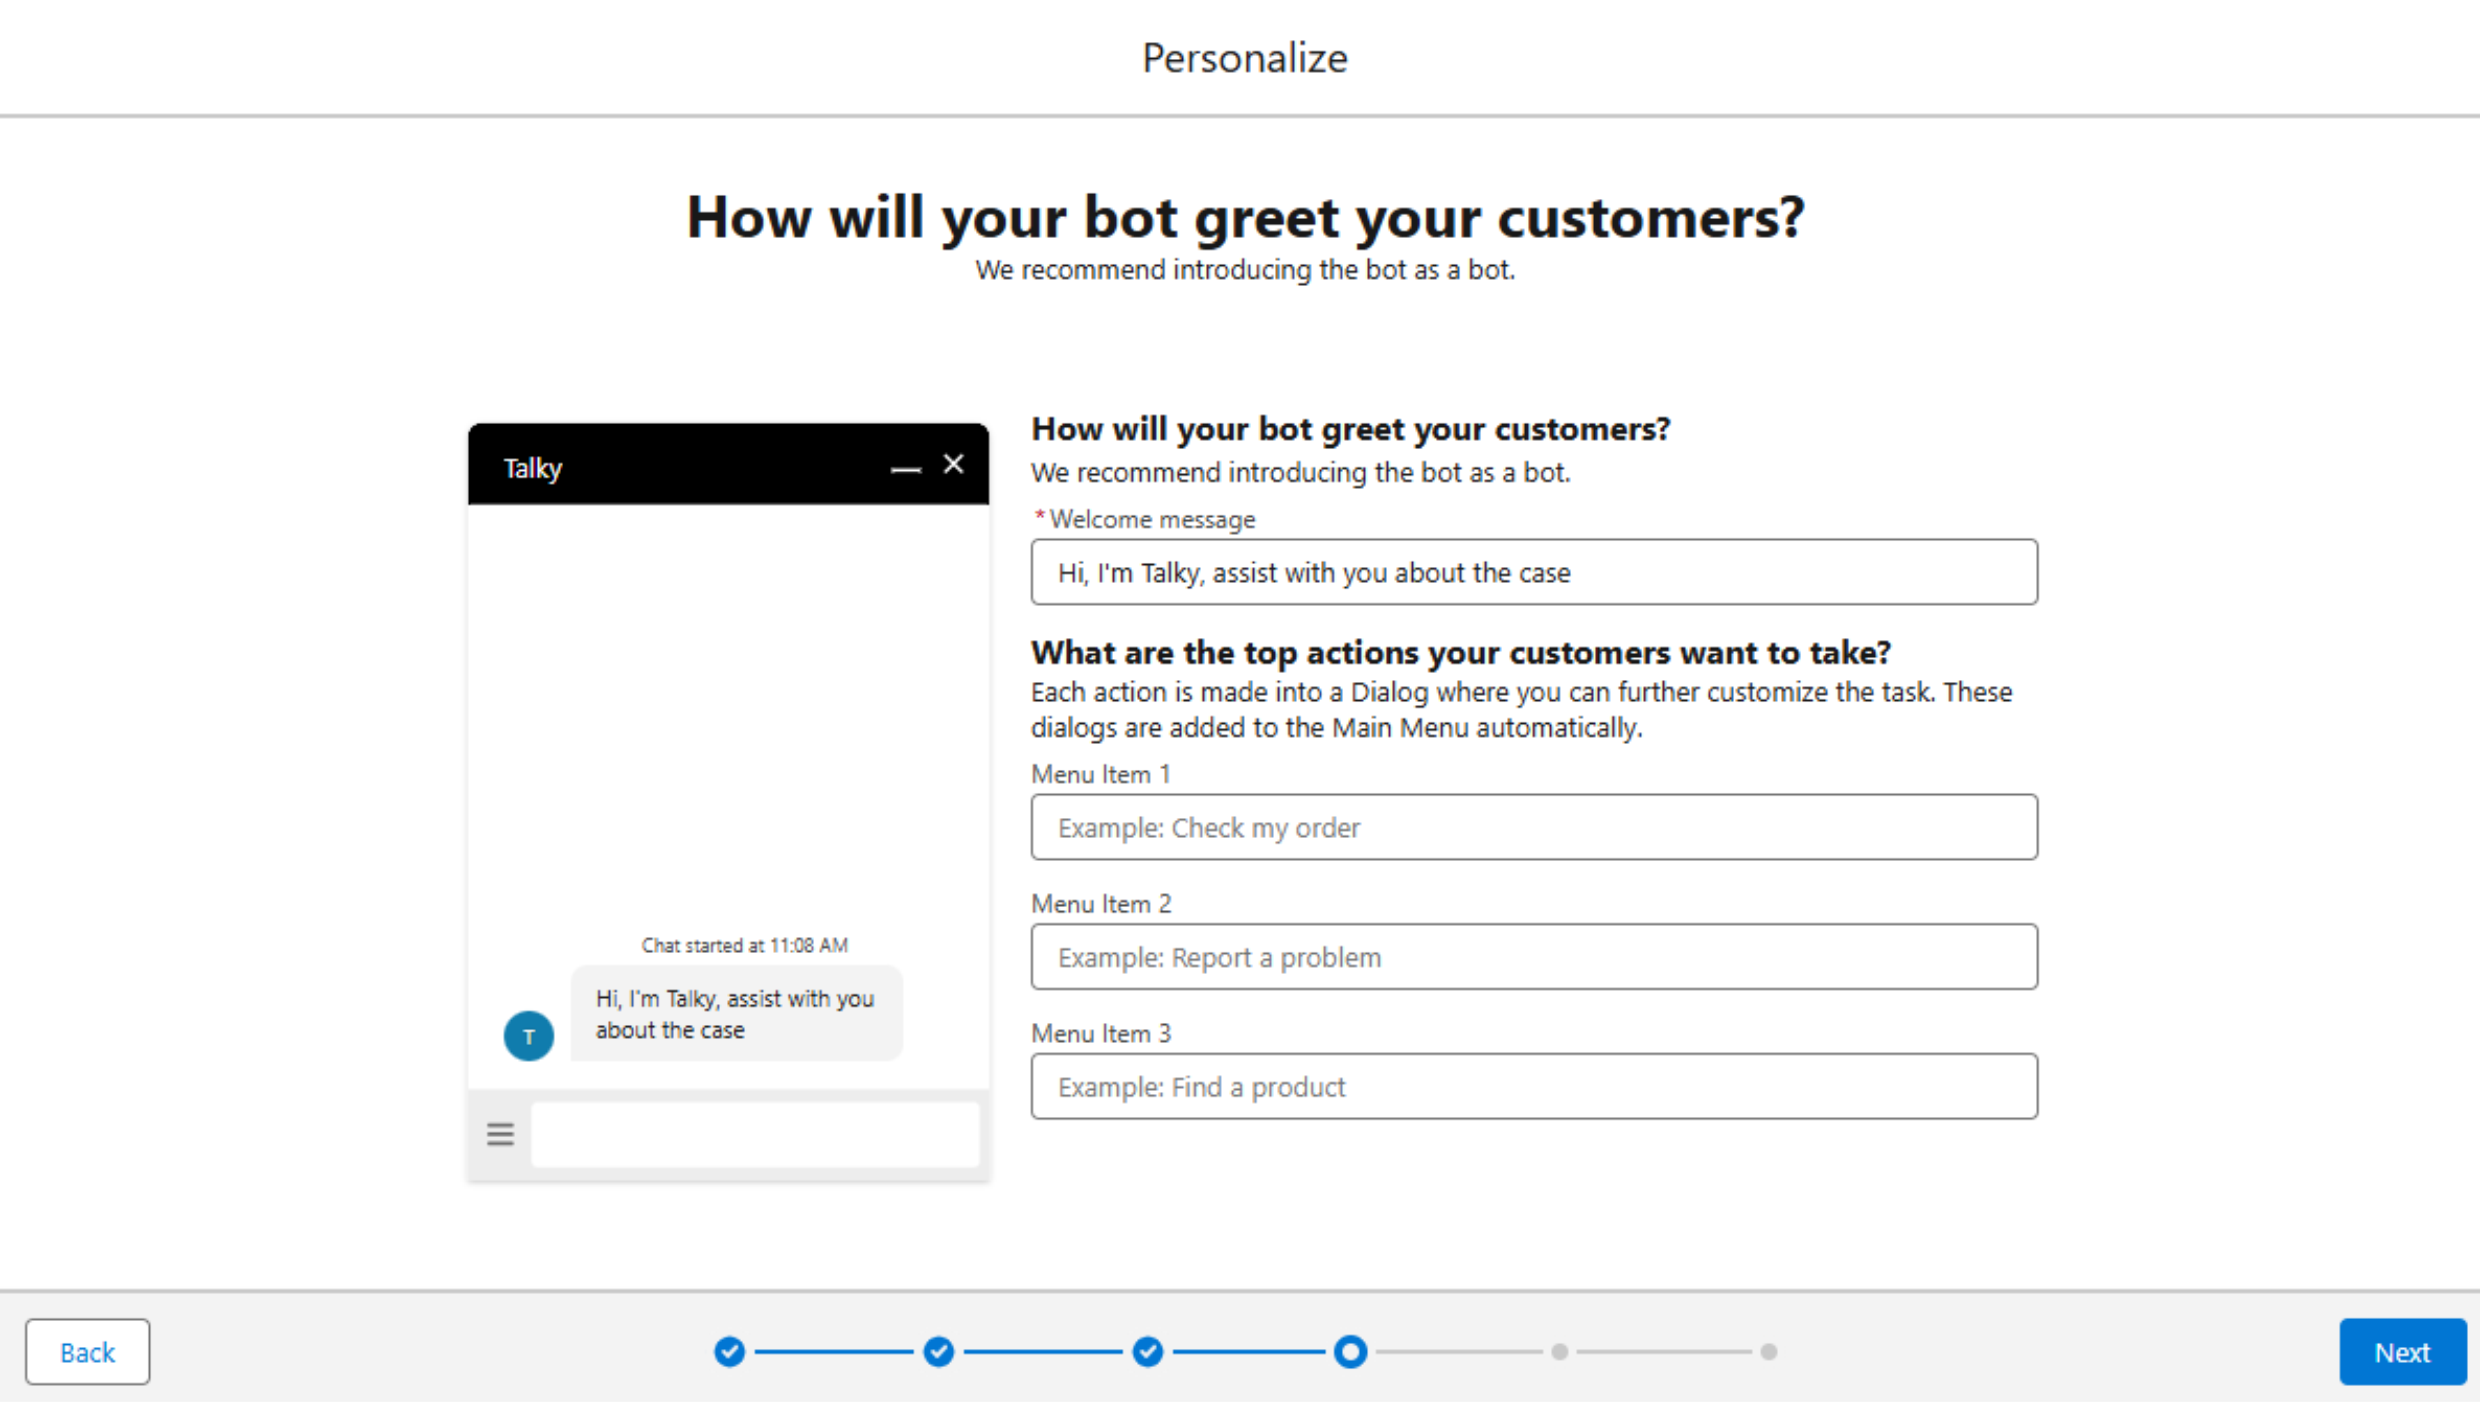
4. Enter the Bot Name and customize the Welcome Message.
Setting Up the Einstein Bot
Once the bot is created, you can configure its interactions:
When a customer starts a chat, they will be given two options:
Check the status of an existing case.
Create a new case.
If the customer selects existing case, the bot retrieves and provides relevant information, such as case status.
If they choose new case, the bot will ask a series of questions, create the case, and share the case number with the customer.
All actions can be configured within the same chat screen.
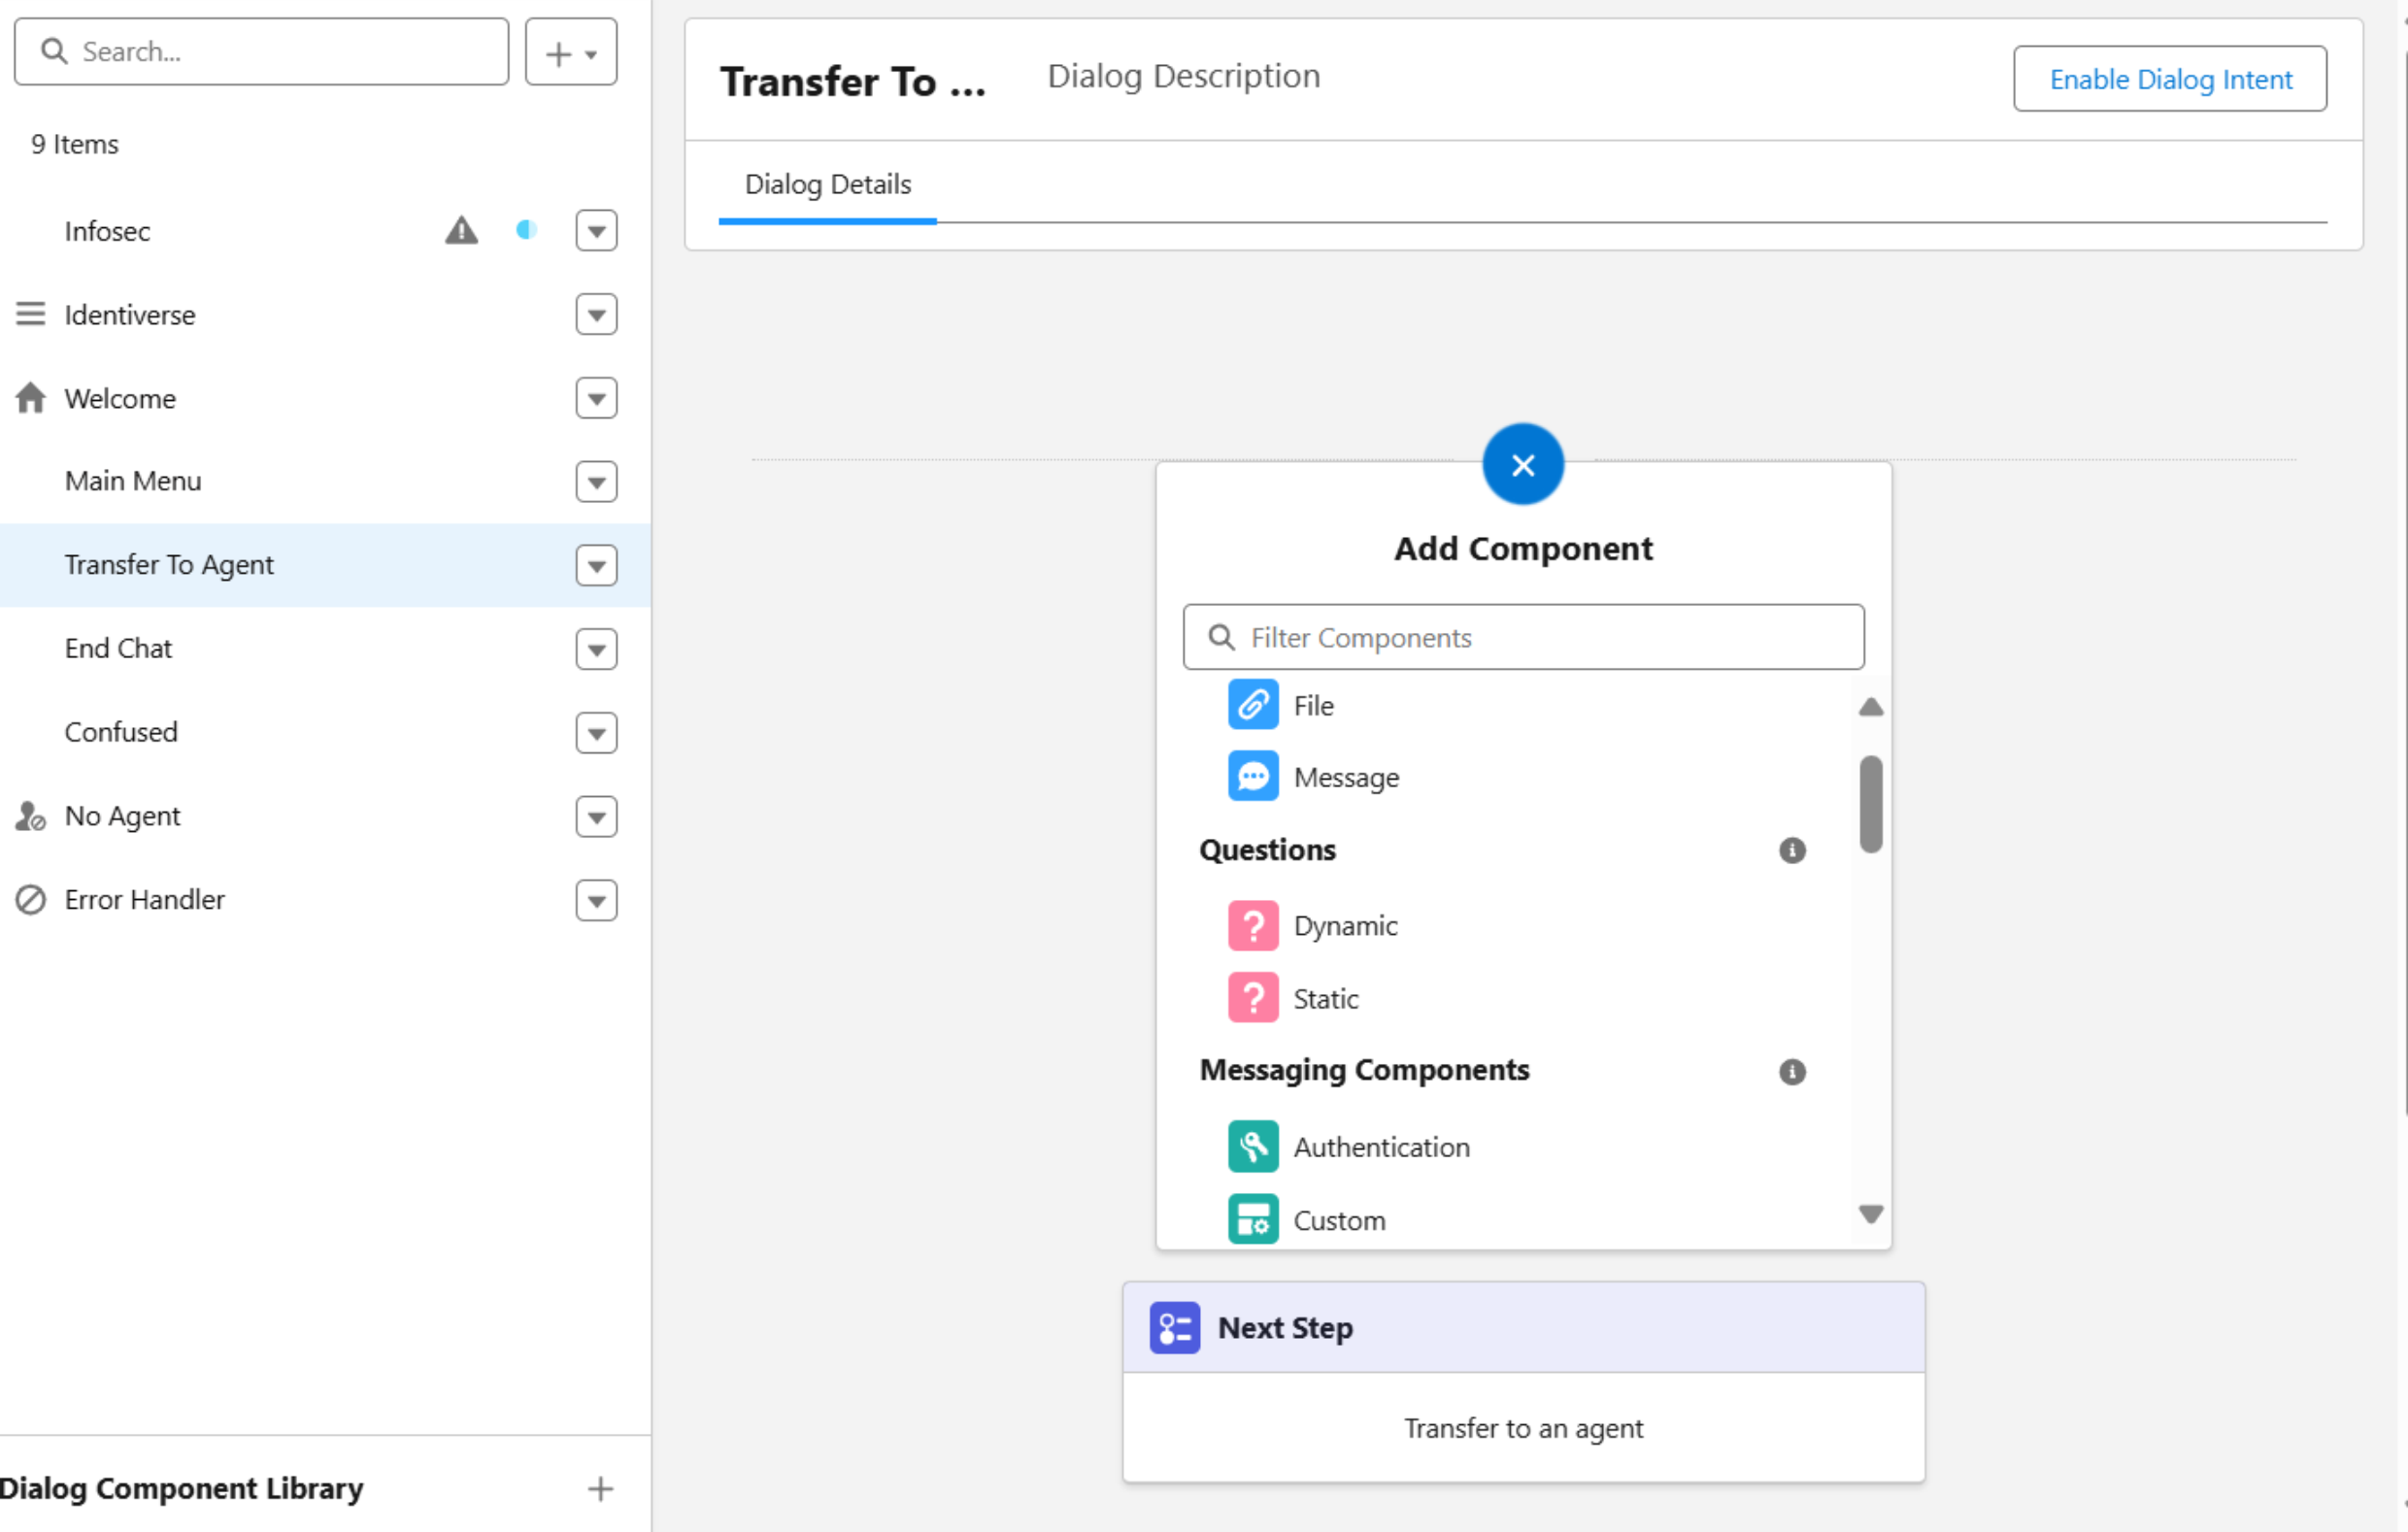
Adding Components
To enhance bot interactions, you can add components:
Use the Add Component feature.
2. Choose Static Question.
3. Enter a question, e.g., “Please enter your Email Address or Case Number?”.
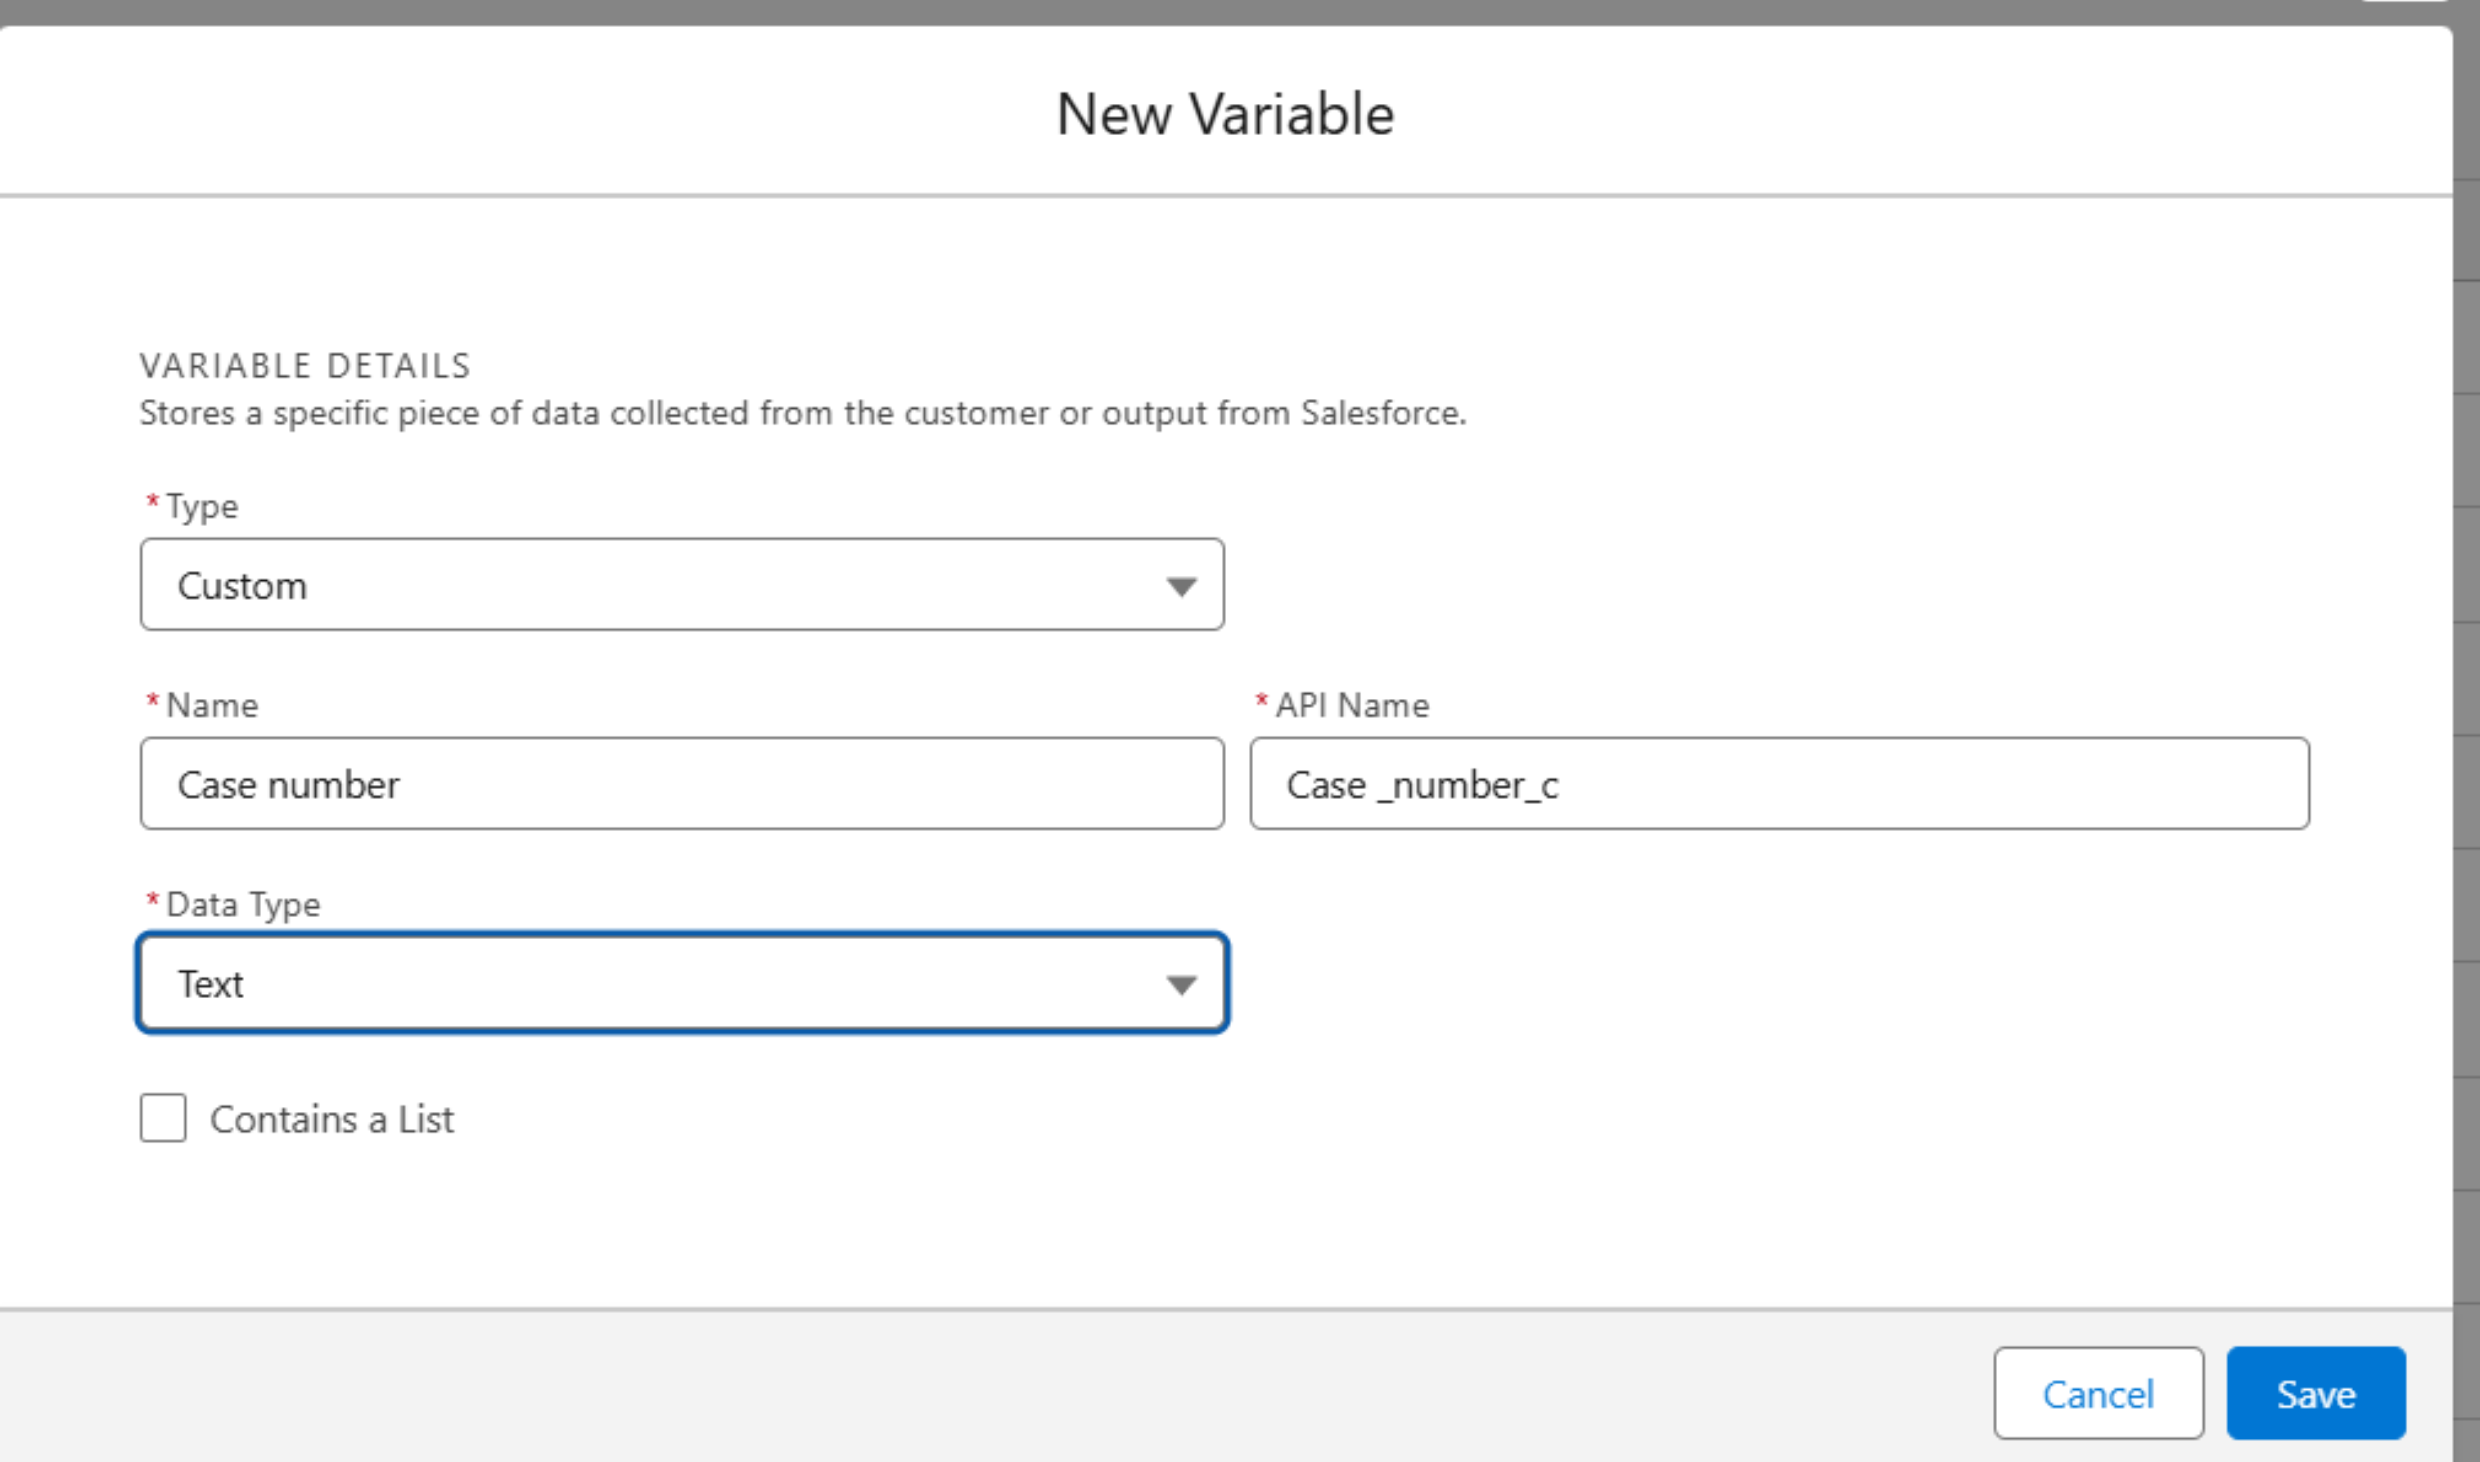
4. Select the Entity Name.
5. Store customer responses in a Variable for later use.
Additionally, you can add Actions within components to create dynamic interactions. Some examples include:
API Calls: Fetch real-time data from Salesforce or external systems.
Record Updates: Modify records based on user input.
Conditional Navigation: Guide users to different dialogs based on their responses.
Trigger Workflows: Initiate automated processes such as case escalation
How Einstein Bots Work
Einstein Bots operate through predefined conversational flows, guiding customers to the right information or action. Here’s a simplified breakdown:
User Initiates Conversation – A customer interacts with the bot via a website, mobile app, or social channel.
Bot Processes Input – Using NLP, the bot understands the customer’s intent.
Guided Responses – The bot provides relevant information or directs the user to a human agent if needed.
Salesforce Integration – The bot can retrieve and update customer records in Salesforce.
Resolution or Escalation – The bot resolves the query or escalates it to an agent for further assistance.
Key Components of Einstein Bots
Intents – Define the purpose of user interactions (e.g., “Check Order Status”).
Entities – Extract specific details from user input (e.g., order number, date, name).
Dialogs – Predefined conversation flows that guide the customer.
Variables – Store and retrieve information throughout the conversation.
APIs & Integrations – Connect the bot with external systems for more dynamic responses.
Best Practices for Einstein Bots
Keep conversations simple and user-friendly.
Use fallback messages when the bot doesn’t understand a request.
Regularly update the bot’s training data for better accuracy.
Provide an easy way to escalate to a human agent.
Continuously test and refine your bot for optimal performance.
Conclusion
Einstein Bots empower businesses to deliver faster, smarter, and more efficient customer service. By automating routine inquiries and integrating with Salesforce, these bots can significantly enhance customer interactions while reducing operational costs. Whether you’re just starting or looking to optimize your chatbot strategy, Einstein Bots are a game-changer for modern customer service.
Are you ready to implement Einstein Bots in your business? Start today and revolutionize your customer experience!
Clear and effective data visualization plays a crucial role in making dashboards more intuitive and insightful. One common challenge in Salesforce Analytics (CRM Analytics) is ensuring that the colors used in donut and stacked bar charts are distinct enough to differentiate data segments easily. When colors are too similar, it can make interpretation difficult, reducing the overall effectiveness of the visual representation. Enhancing color contrast helps improve readability, supports accessibility, and enhances the user experience. In this blog, we’ll discuss best practices for optimizing color contrast in these chart types.
Why Colour Contrast Matters
1. Improves Accessibility
Users may struggle with low-contrast visuals. Enhancing contrast ensures data is clearly visible to a wider audience.
2. Enhances Data Clarity
When colours in charts are too similar, it can be difficult to distinguish between different segments. Using high-contrast colours makes data easier to analyse at a glance.
Best Practices for Enhancing Colour Contrast
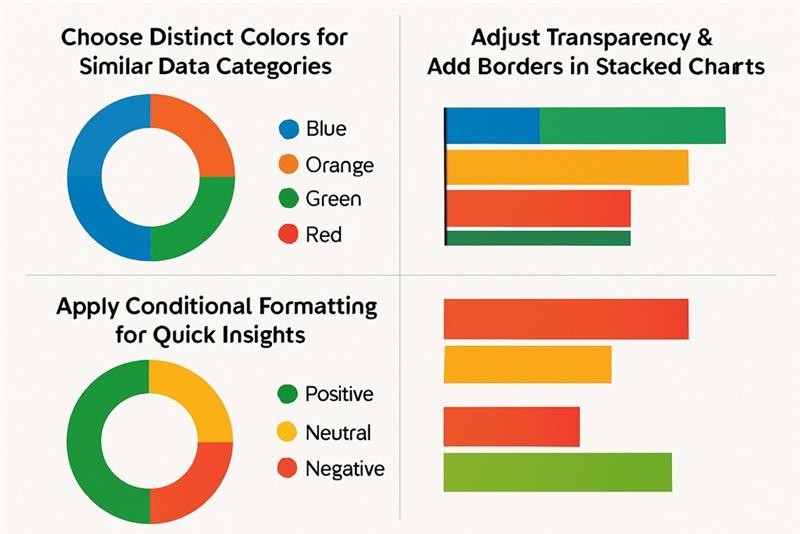
1. Choose Distinct Colors for Similar Data Categories
To make data categories easily distinguishable, avoid using multiple shades of the same color. Instead, select bold and contrasting colors that create a clear visual distinction between segments.
Best practice: Use contrasting colours such as blue, orange, green, and red. Avoid: Multiple shades of the same colour, like light blue, medium blue, and dark blue.
2. Adjust Transparency & Add Borders in Stacked Bar Charts
When multiple data categories are stacked together, they can blend into one another. Adjusting transparency and adding borders can help improve clarity.
How to Adjust Transparency:
Select the Stacked Bar Chart in your dashboard.
Go to Chart Formatting.
Lower the Transparency setting to enhance contrast.
Enable Border Lines to create clear separations between segments.
3. Apply Conditional Formatting for Quick Insights
Salesforce Analytics allows you to use conditional formatting to highlight key data points with distinct colours. This makes it easier to identify trends at a glance.
Steps to Apply Conditional Formatting:
Open the Lens or Dashboard.
Select the Donut Chart or Stacked Bar Chart.
Click on Conditional Formatting.
Set rules such as:
Green for positive trends
Red for negative trends
Yellow for neutral or warning values
Apply and save changes.
Conclusion
Enhancing colour contrast in donut charts and stacked bar charts within Salesforce Analytics ensures better readability, accessibility, and usability. By using distinct colours, adjusting transparency, and leveraging conditional formatting, you can create visually compelling dashboards that provide clear and actionable insights.
Start optimizing your Salesforce Analytics charts today and elevate your data storytelling!
Salesforce leverages Einstein AI and Agent force to provide intelligent virtual agents that help businesses improve customer service. By automating responses and streamlining processes, these AI-driven agents assist in handling inquiries efficiently, ensuring a seamless customer experience.
1. Enable Einstein in Salesforce
Einstein AI must be activated for agent functionalities to work properly. Follow these steps:
Open Setup in Salesforce.
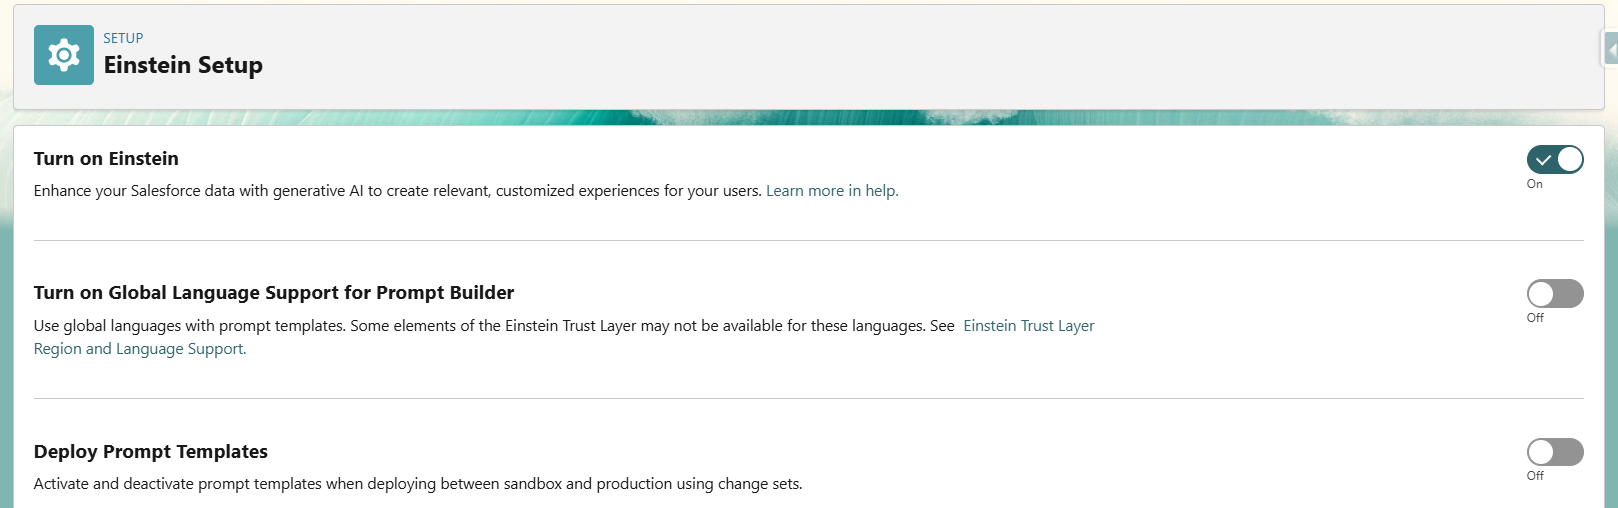
In the Setup Quick Find search bar, type Generative AI and select Einstein Setup.
Click the Turn on Einstein toggle to enable AI capabilities.
2. Publish the Experience Cloud Site
Agents are deployed via Coral Cloud’s Experience Cloud site. To prepare for deployment, follow these steps:
In the Setup Quick Find, search and select All Sites.
Click Builder next to the coral-cloud site. If a popup appears, click OK.
Click Publish in the upper-right corner.
Click Publish in the confirmation window.
Click Got It after successful publication.
Click the Experience Builder Menu icon.
Select Salesforce Setup.
Refresh your browser to reload Setup. You can now close the Experience Site browser tab.
3. Create a New Agent
Now that the Experience Cloud site is ready, create your agent by following these steps:
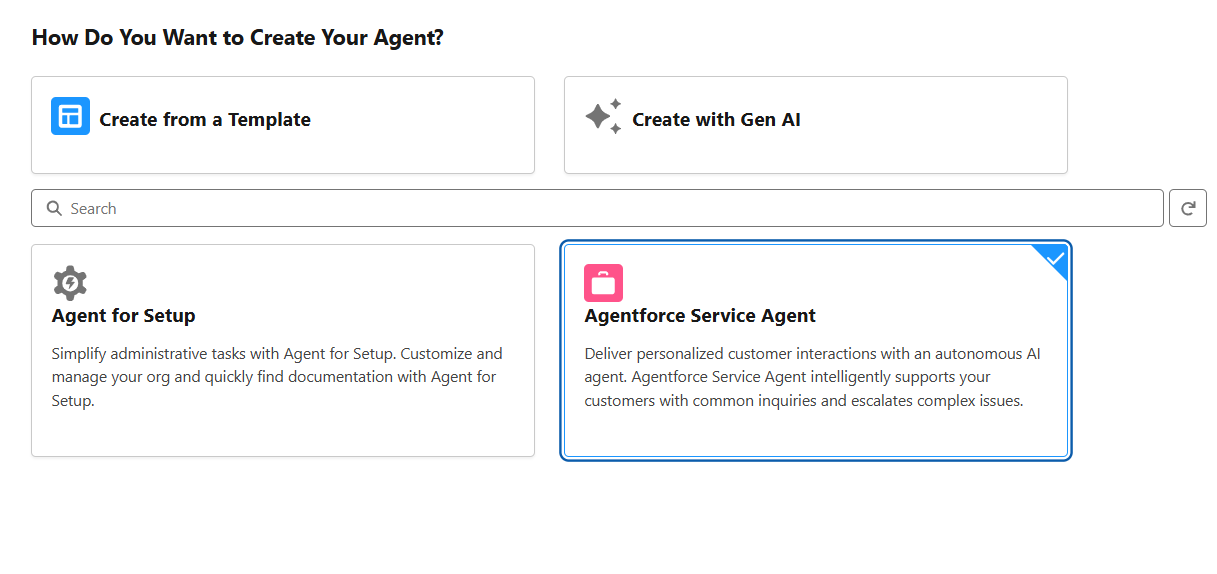
In the Setup Quick Find, search for and select Agents.
Click + New Agent.
Select Agentforce Service Agent as the type.
Click Next.
Leave all topics as added and click Next.
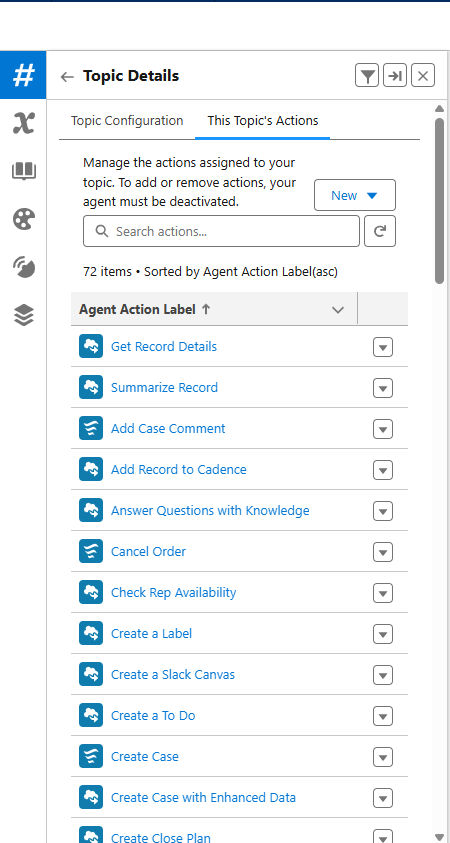
4. Create a Custom Topic for Your Agent
After setting up the agent, define a relevant topic for its functionality
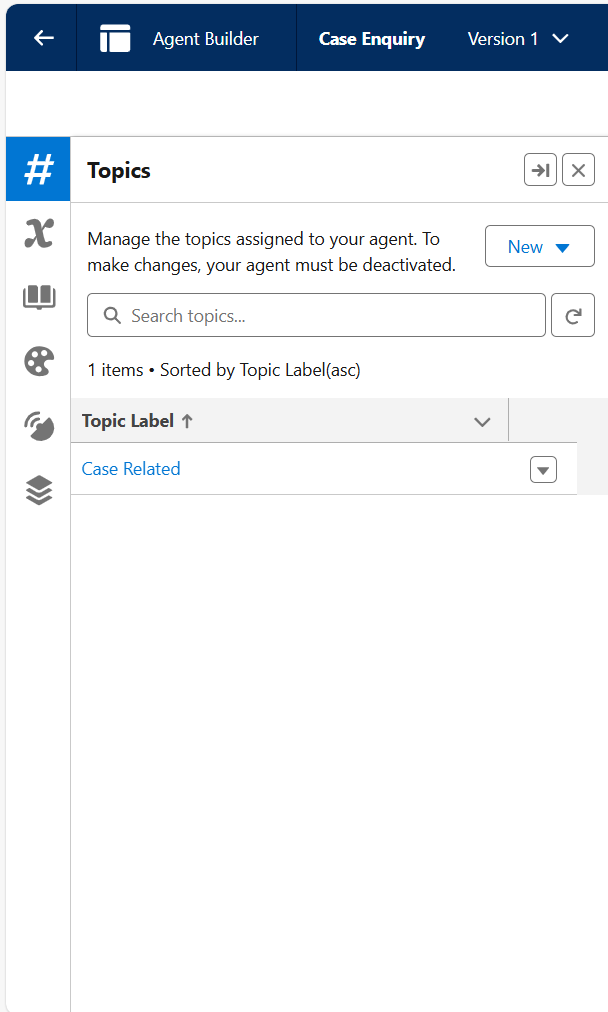
Remove the default topic by clicking the down arrow next to MigrationDefaultTopic and selecting Remove from Agent.
Click the down arrow next to Manage the topics assigned to your agent, then select New Topic.
Configure the new topic with the following details:
Topic Label: Customer Experience Support
Classification Description: This topic addresses customer inquiries and issues related to booking experiences at Coral Cloud Resorts, including making reservations, modifying bookings, and answering queries about experience details.
Scope: The agent’s role is to assist customers in managing bookings for various experiences offered by Coral Cloud Resorts, ensuring smooth service and issue resolution.
Instruction: If a customer inquires about Activities or Experiences, execute the Get Experience Details action and summarize the results for improved readability. Ensure customer identification before running this action.
5. Setting Up Agent Actions
Agent actions define the tasks your AI agent can perform. These actions allow the AI to interact with Salesforce objects, retrieve data, and update records. To set up agent actions:
Navigate to Agent Actions: Go to Agent Studio and click on Agent Actions.
Create a New Action: Click on New Agent Action and provide a name for the action.
Define Action Parameters: Specify the required inputs for the action, such as record ID, customer name, or case number.
Choose Action Type:
Data Retrieval: Fetch relevant data from Salesforce records (e.g., retrieving an account’s open cases).
Record Creation: Create new records in Salesforce (e.g., logging a support case).
Record Updates: Modify existing Salesforce records based on AI responses.
Configure API Calls (if needed): If the action involves integrating with external systems, configure API calls to fetch or send data.
Test the Action: Run a test to ensure that the action works as expected and returns the correct results.
Save and Deploy: Once validated, save the action and assign it to the appropriate agent.
Conclusion
By following these steps, you have successfully enabled and configured an AI-powered agent in Salesforce using Einstein and Agentforce. This setup ensures seamless customer service interactions, helping businesses provide enhanced support and streamline customer inquiries efficiently.
Imagine This: A marketing manager needs to launch a targeted campaign—fast. Traditionally, this would mean submitting a request to IT, waiting for development resources, and dealing with a long process. But what if that manager could build their own campaign dashboard without writing a single line of code?
This is no longer just a ‘what if.’ It’s the reality of the evolving Salesforce ecosystem. Low-code and no-code (LCNC) tools are empowering non-technical users to create solutions, automate processes, and drive innovation. This quiet revolution is reshaping how businesses harness Salesforce’s power.
The Rise of Citizen Developers
Salesforce has been steadily building tools to democratize development, enabling business users to translate their ideas into real-world solutions without coding. Tools like Flows, Lightning App Builder, Dynamic Forms, and Experience Cloud are designed to bridge the gap between business needs and technical execution.
A sales manager can now automate lead assignment using Flow Orchestration, while a customer service rep can build a self-service portal with Experience Cloud—all without IT intervention. The power is shifting from traditional developers to business users, fostering a new wave of “citizen developers.”
Real-World Success Stories
Manufacturing Efficiency: A mid-sized manufacturer used Flows to automate inventory tracking, reducing stock discrepancies by 25% and improving order fulfillment times.
Non-Profit Engagement: A non-profit leveraged Experience Cloud to create a volunteer management portal, increasing participation by 40% through improved onboarding and communication.
Retail Personalization: A retail business built a customer feedback analysis dashboard with Lightning App Builder, enabling them to personalize marketing campaigns and boost retention by 15%.
The Tangible Benefits for Businesses
The implications of this shift are significant.
Agility and Speed: Businesses can respond to market shifts instantly, reducing development cycles.
Cost Efficiency: Less reliance on IT means lower costs and better resource allocation.
Enhanced Collaboration: Business and IT teams work together more effectively, reducing delays.
Increased Innovation: Business users can experiment and iterate solutions without waiting for developers.
The Evolving Role of the Salesforce Professional
This doesn’t mean the role of the Salesforce professional is becoming obsolete. Rather, it’s evolving. The focus is shifting from writing code to enabling others.
Enablement and Training: Salesforce professionals are becoming educators, providing training and support to empower citizen developers.
Governance and Security: They play a crucial role in establishing and maintaining governance frameworks to ensure security and compliance.
Strategic Guidance: They provide strategic guidance on how to leverage low-code/no-code tools to achieve business objectives.
Tips for Successful Implementation
Establish a Center of Excellence: Create a dedicated team to provide training, support, and governance.
Build a Reusable Component Library: Develop templates and components to accelerate development.
Implement Robust Testing and Deployment: Ensure quality and stability through rigorous testing.
Create a Clear Governance Plan: Define guidelines for security, compliance, and data integrity.
Foster Collaboration: Encourage communication and collaboration between IT and business users.
Addressing the Skill Gap and Training
Salesforce Trailhead is an excellent platform for developing low-code and no-code skills Investing in training programs is crucial for empowering citizen developers. Continuous learning is important to stay updated.
The Future of Automation and AI Integration
AI-powered features like Salesforce Einstein are further enhancing low-code/no-code capabilities. Imagine AI automating the creation of Flows or providing intelligent recommendations for building custom apps. This will continue to blur the lines between technical and non-technical development.
Measuring Success
Time-to-Market: Track the time it takes to deploy new solutions.
Cost Reduction: Measure the decrease in development costs.
User Adoption: Monitor the number of users adopting low-code/no-code solutions.
Process Efficiency: Evaluate improvements in business process efficiency.
Conclusion
The democratization of Salesforce development is not just a trend; it’s a fundamental shift. It’s about empowering individuals, fostering innovation, and transforming the way businesses operate. By embracing this change, businesses can unlock the full potential of Salesforce and drive sustainable growth.
Salesforce has introduced Account Plans, a powerful new feature embedded directly into its CRM platform. This feature helps the Sales and customer success teams manage accounts more strategically using data, resulting in stronger customer relationships, increased revenue and teamwork.
By integrating Account Plans into Salesforce CRM, businesses can now seamlessly manage key accounts within their existing CRM workflow, eliminating the need for external spreadsheets or disconnected planning tools.
Available in
Lightning Experience
Enterprise, Performance, Unlimited, and Einstein 1 Sales Edition Editions with Sales Cloud.
Why Account Planning Matters
Many organizations struggle with fragmented data, lack of collaboration, and inconsistent execution. By embedding Account Planning along with CRM Analytics (CRMA) directly into Salesforce, businesses can now:
Align teams around shared goals
Leverage real-time data for better decision-making
Track progress and measure impact within their CRM of the account’s KPI metrics and Product Whitespace Dashboards.
Strengthen customer relationships with a proactive approach
How Salesforce Account Plans Work
Account Plans provide a structured framework within Salesforce, allowing sales teams to:
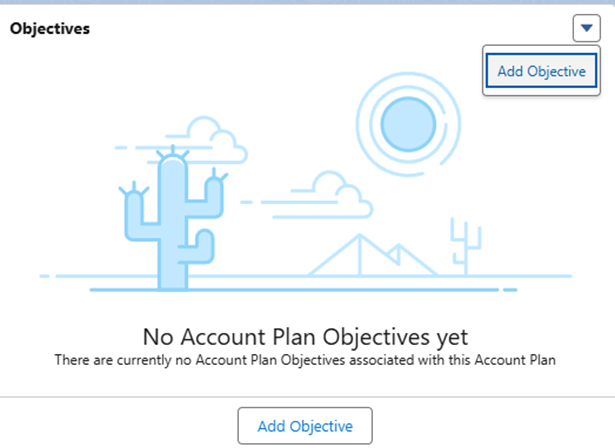
Define Objectives
Identify Key Stakeholders using Relationship Map
Strategic Initiatives using SWOT Analysis
Monitor Progress
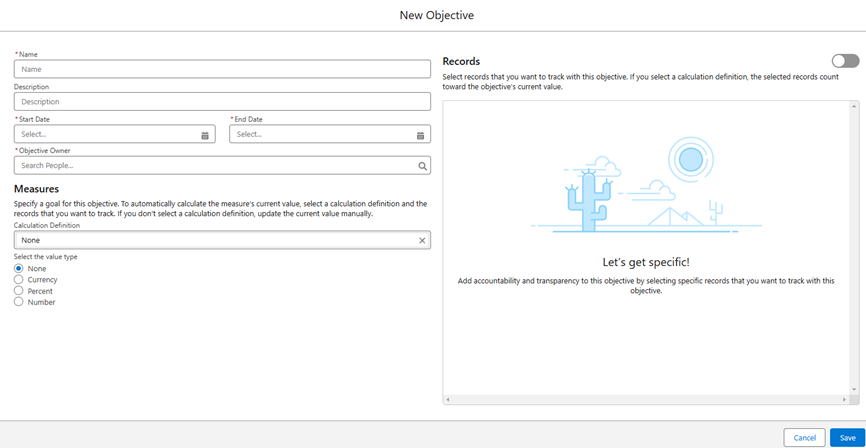
Define Objectives
Setting Objectives, sets clear and measurable goals. Selecting the Closed won Opportunity records, and specifying the service start and end date helps keep the objectives aligned with the account’s performance and sales targets and goals.
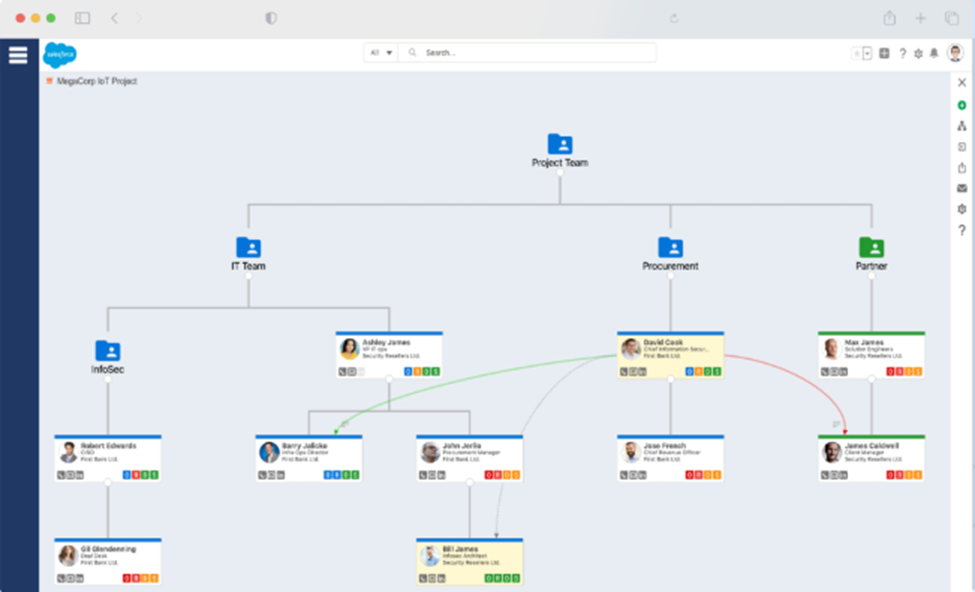
Identify Key Stakeholders using Relationship Map
Create visual relationship maps to see how stakeholders are connected. These maps show key decision makers, influencers, and team members, making it easier to understand the account’s structure. By mapping these connections, you can focus on the right people and build stronger relationships.
Strategic Initiatives using SWOT Analysis
SWOT Analysis helps guide your engagement strategy with the key accounts by highlighting their strengths, weaknesses, opportunities and threats. These text fields with conditional formatting allow the Sales manager to capture insights, such as where the account excels, areas for improvement, growth opportunities and external challenges to watch for.
Monitor Account Progress
Track account health and progress using the standard Account Plan KPI dashboard or create a custom CRM Analytics dashboard, which you can add to the Lightning page layout. These dashboards show key metrics for each account’s health, giving you real-time visibility into critical performance indicators. By consolidating data into a single pane of glass, you can assess the effectiveness of your initiatives, make informed adjustments, and stay on track for continued success with your key accounts.
Account Planning + Account-Based Selling (ABS)
Account-Based Selling (ABS) focuses on high-value accounts by fostering deep, strategic relationships. Salesforce Account Plans align seamlessly with ABS by helping teams:
🔹 Prioritize the Key accounts 🔹 Create customized SWOT analysis 🔹 Work together with sales, marketing, and customer success teams directly within Salesforce 🔹Track real-time progress and adapt strategies dynamically
1. Enable Account Plans Feature
Login to Salesforce as an admin.
Navigate to Setup (gear icon at the top right) and search for “Account Plans” in the Quick Find box.
Click on Account Plans.
Click on Enable to activate the feature.
2. Set Up Account Plan Object and Fields
Go to “Object Manager”.
Find and select Account Plan.
Here, you can add custom fields, set field-level security, and add them to page layouts. Add any additional fields needed for tracking objectives, key metrics, and progress.
3. Add Account Plan to Page Layout
Create a new Lightning Page if not already there.
Open Lightning Page Layout to edit.
In the page layout editor, drag and drop the Account Plan fields to the layout.
Save the changes.
4. Add Account Plan to Account Page Layout
In Account Object, go to the page layout
Go to Related Lists, Add Account Plan to the related list layout.
Save.
5. Set Permissions and Access
Ensure that the right users have access to Account Plans and the related objects.
Go to Profiles or Permission Sets in Setup.
Edit the profiles or permission sets to ensure users have access to the Account Plan object, including read, write, and view permissions.
Also, ensure that users have access to related records (e.g., Account Team members, Opportunities).
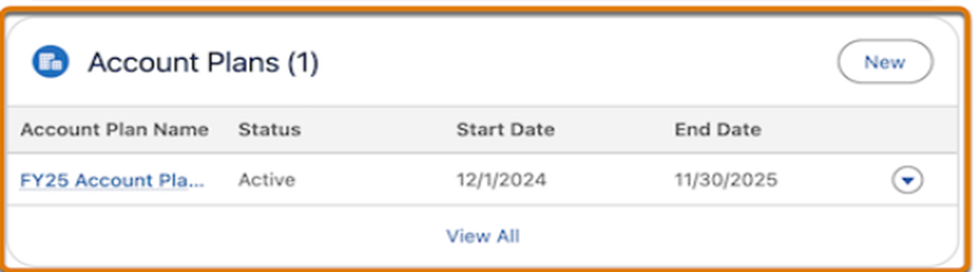
6. Create a new Account Plan
Create a new Account Plan by selecting the new action button or automate it by creating a Record-Triggered Flow linked to a custom field on the account for automating the process of creating a new account plan with the associated Team members. The flow can
Create a new Account Plan with the account name.
Retrieve the Account Team members and loop through them.
Create Account Plan objective (not measures) for each team member.
7. Configure Dashboards and Reports for Monitoring Progress
Develop a custom CRM Analytics Dashboard and Salesforce Reports for real-time tracking of key metrics.
In Setup, search for “Reports”
Create custom reports or dashboards that track key metrics for your Account Plans (e.g., account health, objectives, milestones).
Add these reports to the Account Plan page layout for easy access.
Account Plans KPIs Dashboard
The standard Account Plan KPIs dashboard highlights the number of open opportunities by their respective stages for each account, Revenue and Opportunity Win Rate, but you can create a personalized dashboard keeping in mind the client requirements and using the CRM Analytics to provide a dynamic view.
Revenue: This metric shows the total amount from Closed Won opportunities within the current or previous quarter.
Opportunity Win Rate: Opportunity Win Rate shows the percentage of the Opportunities Win Rate in the last quarter compared to this quarter.
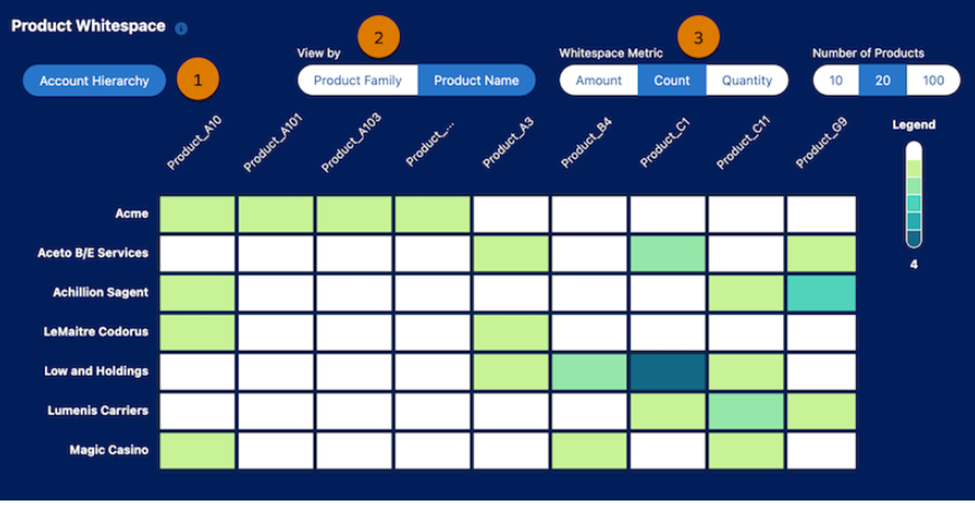
Account Plan Product Whitespace Dashboard
The Account Plan Product Whitespace Dashboard helps identify untapped potential within an account by analyzing products or services that have not been purchased yet. This dashboard allows sales teams to see where there may be opportunities for additional sales and growth by highlighting areas where the account is not currently utilizing certain products or features.
Summary
Account Plans is an exciting new feature rolled out by Salesforce. It helps businesses strategize and build long-term, meaningful relationships with clients. With Account Plans, companies can better understand customer needs, set clear goals, and create actionable steps to deliver value. A solid account plan typically includes a client overview, key objectives, tailored solutions, a roadmap for execution, and regular check-ins to track progress. The aim is to align with the client’s priorities and drive shared success.
Note: This is not intended as financial or GAAP-compliant reporting but rather a revenue recognition tracking approach for operational visibility within Salesforce.
For Chief Revenue Officers (CROs), VPs of Sales, Sales Operations, and Revenue Operations leaders, ensuring accurate revenue recognition reporting in Salesforce is crucial. Booking a deal is only half the story—tracking when and how revenue is delivered is key to accurate forecasting, financial transparency, and strategic decision-making.
The Revenue Recognition Reporting Challenge
Revenue recognition varies across different business models, making it a complex process for many organizations. Here are some common scenarios:
Media Products – A digital advertising campaign might be booked today but delivered over 12 months, requiring incremental revenue recognition each month.
Event Products – Conference sponsorships and event packages are delivered within a short timeframe, so revenue must be recognized at the time of the event.
Subscription Products – SaaS platforms involve recurring revenue with recognition happening on a monthly or annual basis, depending on contract terms.
Usage-Based Products – Cloud storage or API consumption models are recognized based on actual usage, which fluctuates monthly, requiring dynamic reporting updates.
Without structured revenue recognition processes in Salesforce, companies struggle with inaccurate reporting, leading to forecasting issues and financial misalignment.
How Sweet Potato Tec Solves This with Salesforce
At Sweet Potato Tec, we built a scalable Salesforce revenue recognition reporting solution using Line Item Schedules and Flow automation. While Salesforce allows manual creation of schedules, it lacks real-time automation, making revenue tracking inefficient.
Our Approach:
✔ Leveraging Standard Line Item Schedules – Salesforce provides a built-in way to schedule revenue, but it requires manual configuration.
✔ Extending with Flow Automation – We built Salesforce Flow automation to dynamically create and update revenue schedules based on the product type and delivery timeline.
✔ Custom Revenue Dashboards – Integrated with CRM Analytics (formerly Tableau CRM) to offer a real-time view of revenue being recognized month over month.
✔ Alignment with Finance Teams – Ensures revenue reports match finance expectations, reducing discrepancies between booked and recognized revenue.
Watch Outs: Key Considerations When Implementing Revenue Recognition Reporting
While implementing revenue recognition in Salesforce, here are some critical challenges and solutions:
Event Products (e.g., Conference Sponsorships, One-Time Workshops) – Requires a single line item schedule on the service start date for accurate revenue tracking.
Flat Pricing Products (e.g., Fixed Monthly Software Licenses) – Revenue is charged at a fixed rate per period, but quantity is not split in the line item schedules.
Quantity-Based Products (e.g., Digital Ads, Print Media Placements) – Both revenue and quantity are split equally over the contract term. Example: A campaign with 120 ad units would be recognized as 10 units per month.
Usage-Based Products (e.g., API Calls, Cloud Storage) – Revenue fluctuates monthly based on actual consumption, requiring automated updates in Salesforce.
Standard vs. Custom Reporting Gaps – If no line item schedule exists, standard Salesforce reports pick up the total price or opportunity amount as a proxy. However, custom reports may not work the same way.
Rounding Errors – Splitting revenue can cause decimal-based rounding discrepancies, which need accurate handling.
Editing Challenges – Once line item schedules are created, you cannot edit the price at the opportunity product level. To make changes, schedules must be deleted and recreated.
Total Price Management – It is essential to store the original total price for accurate revenue tracking.
High-Level Automation Logic
Our Salesforce Flow automation standardizes revenue recognition with three key logic blocks:
✔ Event-Based Revenue – A single line item schedule is created per product to reflect revenue recognition at the time of service.
✔ Flat Pricing Revenue – Revenue is charged on a flat monthly basis, but quantity is not split in the schedule.
✔ Quantity-Based Revenue – Both revenue and quantity are split according to predefined contract rules.
Additionally, product setup plays a crucial role. Initially, we did not create line item schedules for event products, but we later realized that maintaining consistency in reporting was key to accuracy and tracking.
Why This Matters for Revenue Leaders
✔ Accurate Revenue Forecasting – Sales and finance teams can see how much revenue is being realized in real time.
✔ Clear Revenue Attribution – Understand exactly which deals contribute to recognized revenue at any moment.
✔ Automated, Scalable Solution – Eliminates manual data entry, reducing errors and inefficiencies.
Let’s Talk – Improve Your Salesforce Revenue Recognition Today
If you’re struggling with revenue recognition in Salesforce or finding it difficult to track booked vs. delivered revenue, we can help.
📩 Get in touch with Sweet Potato Tec today to discuss a customized Salesforce revenue recognition solution that fits your business model.
🚀 Let’s streamline your revenue reporting together!
Salesforce Prompt Builder is revolutionizing how businesses interact with AI by enabling dynamic and context-driven prompts tailored to specific needs. Whether you’re creating AI prompts for customer support, sales, or marketing automation, this tool ensures your AI generates meaningful and actionable responses.
In this blog, we will guide you through the steps to set up and create your first prompt using Salesforce Prompt Builder.
Why Use Salesforce Prompt Builder?
Salesforce Prompt Builder allows you to:
Leverage Salesforce Data: Personalize AI prompts by pulling real-time data from Salesforce objects like Accounts, Contacts, Leads, and Opportunities.
Create Tailored Experiences: Design prompts for specific audiences or workflows, ensuring relevance and accuracy.
Streamline Automation: Integrate prompts into workflows, saving time and boosting productivity.
Step 1: Access Salesforce Prompt Builder
To get started:
Log in to Salesforce: Navigate to the Salesforce dashboard.
Go to Setup: In the search bar, type “Prompt Builder” and select it from the options.
Enable the Tool (if required): Ensure that Prompt Builder is enabled for your org by checking permissions under Setup > Permissions Sets.
Step 2: Define the Use Case
Before creating a prompt, clarify its purpose.
Are you designing a sales assistant prompt to recommend products?
Do you need customer support prompts for faster query resolution?
Or are you enabling marketing teams with AI-generated email suggestions?
Having a clear objective will guide the structure of your prompt.
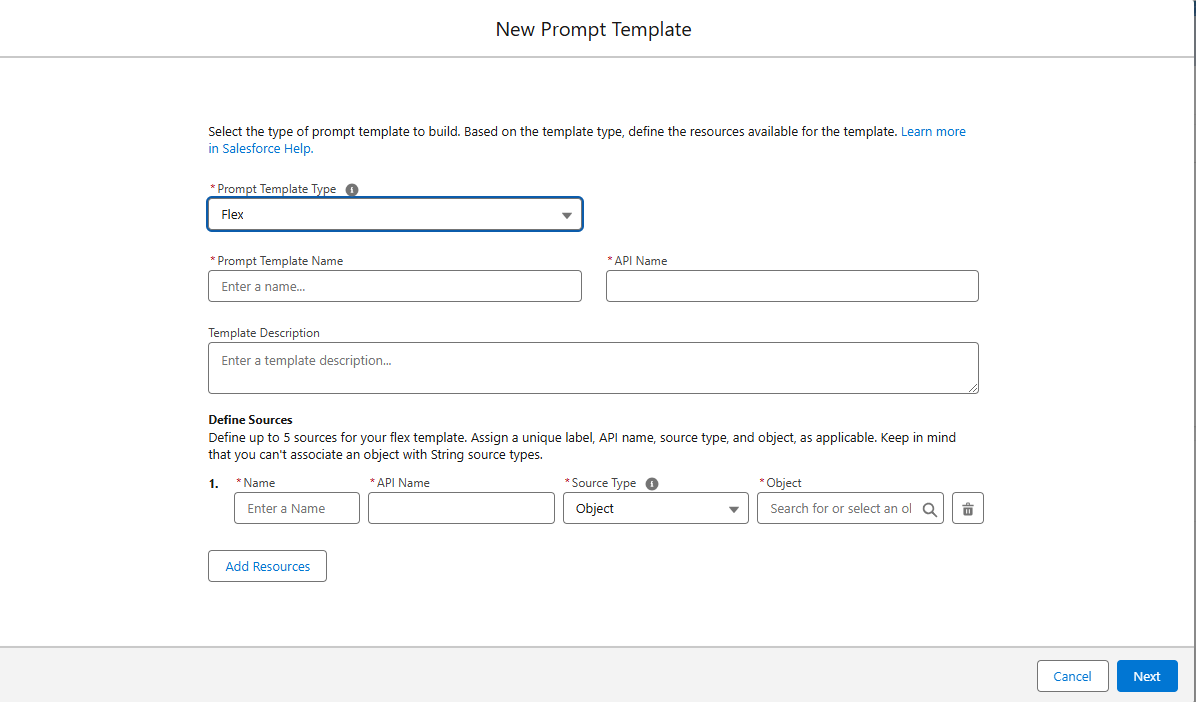
Step 3: Create a New Prompt
Click “New Prompt”: In the Prompt Builder interface, select “New Prompt.”
Select a Template: Use a predefined template or start from scratch. For example, templates for lead follow-ups or customer onboarding are readily available.
Add Context: Define the scenario your prompt will address.
Example: “Recommend the best product for a contact based on their purchase history and recent interactions.”
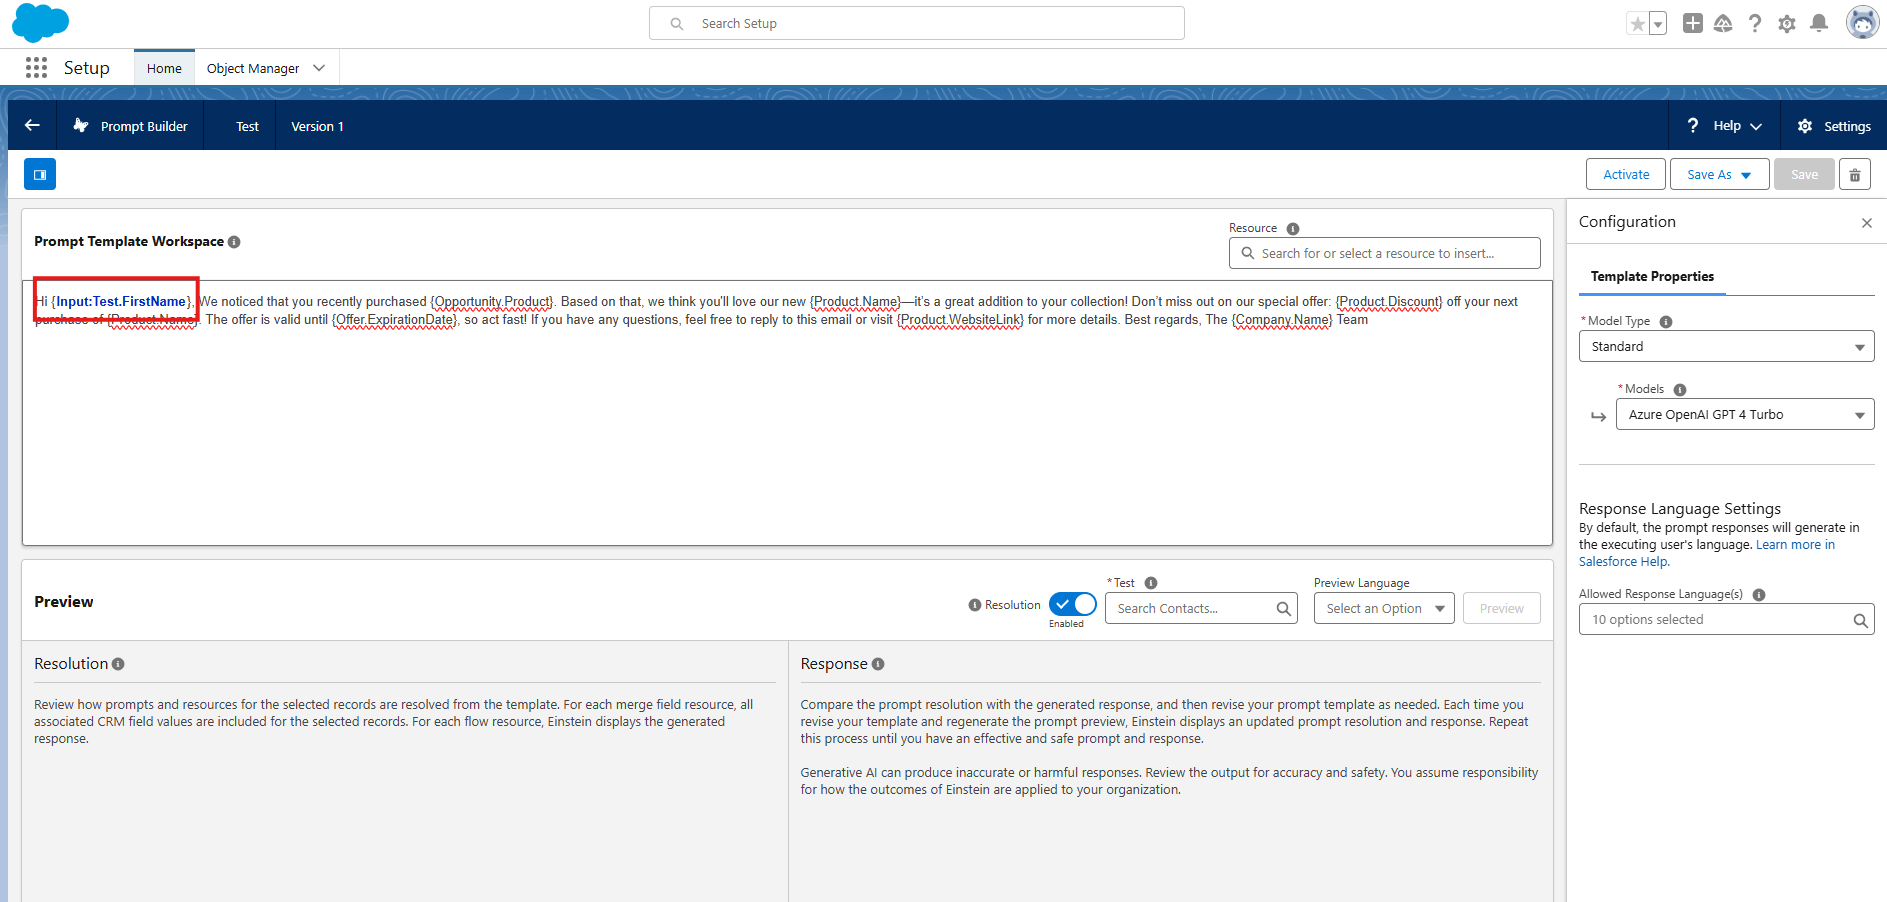
Step 4: Insert Dynamic Variables
Dynamic variables make your prompts personalized and context-aware
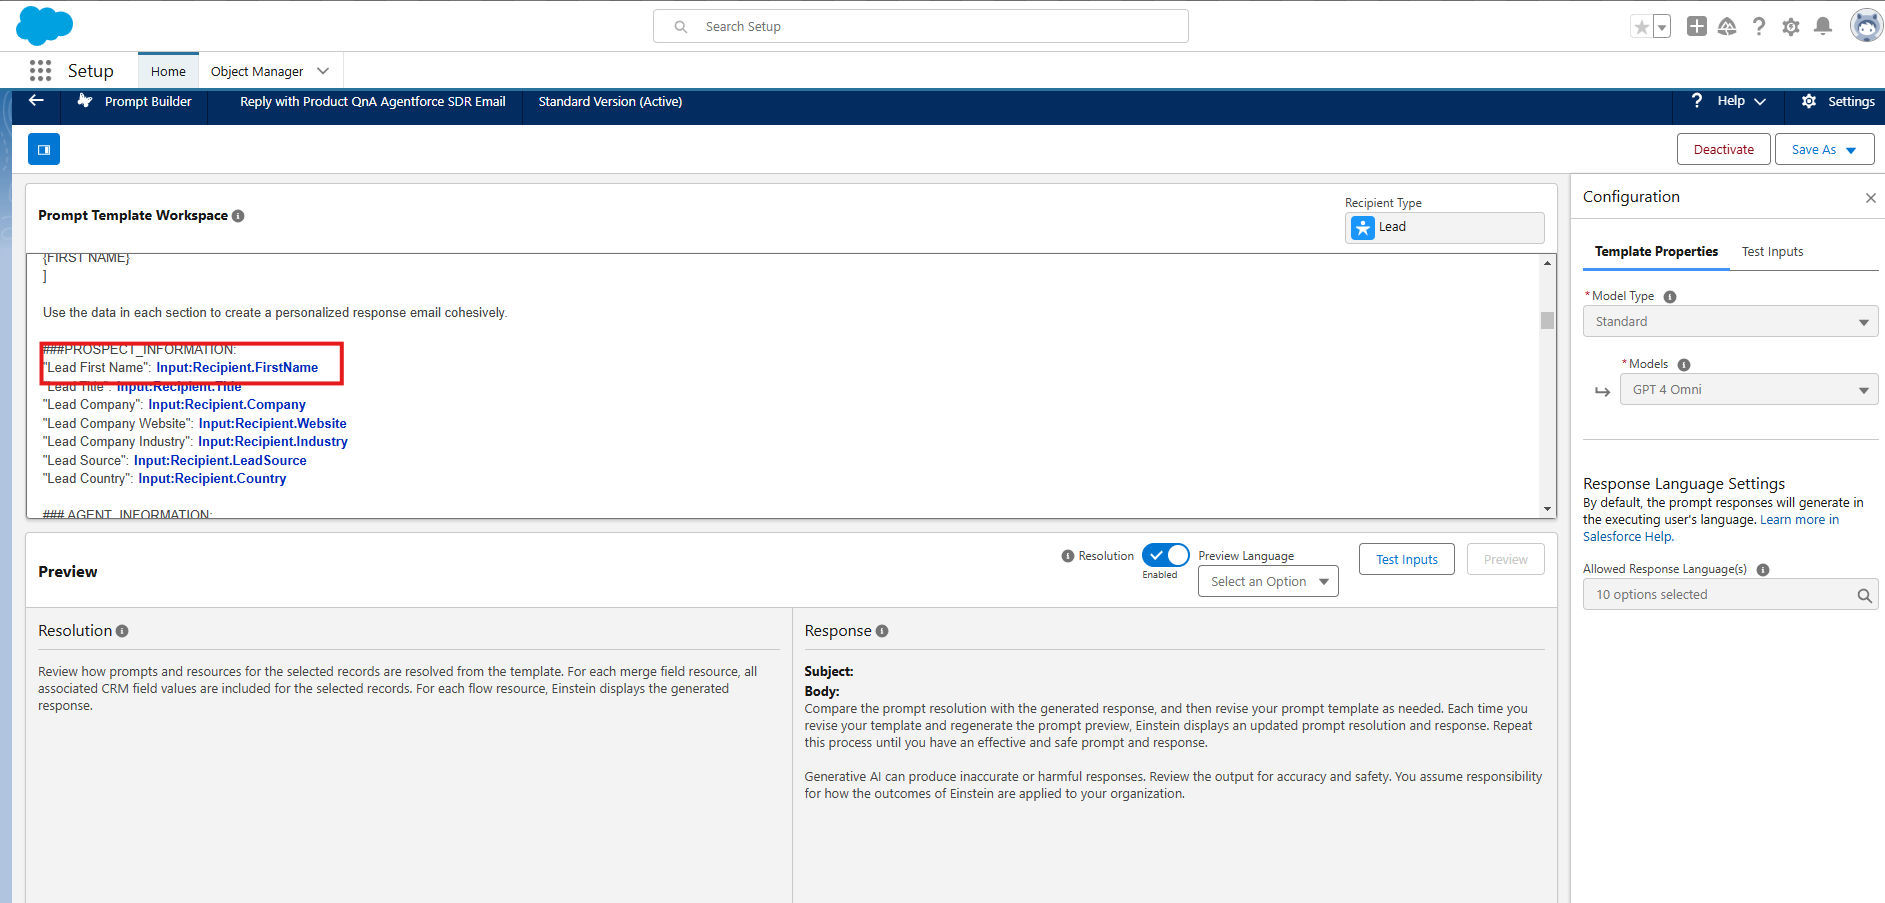
Use placeholders like {Contact.FirstName} or {Opportunity.Amount} to pull data directly from Salesforce records.
Example Prompt: “Hi {Contact.FirstName}, based on your recent purchase of {Opportunity.Product}, we think you’ll love our new {Product.Name}!”
Step 5: Configure AI Behavior
Set parameters to fine-tune the AI’s responses:
Tone: Choose between professional, conversational, or creative styles.
Response Length: Limit how detailed the AI response should be.
Intent: Specify whether the AI should summarize, recommend, or elaborate.
Step 6: Test Your Prompt
Salesforce Prompt Builder provides a testing interface where you can see how the AI responds to your prompt.
Preview Outputs: Use sample Salesforce records to verify the accuracy and tone of responses.
Iterate: Refine the wording, variables, or context to improve outputs.
Step 7: Deploy the Prompt
Once satisfied with the prompt:
Save and assign it to relevant teams or workflows.
Integrate it into flows, automations, or Lightning components.
Monitor performance and collect user feedback to ensure ongoing improvements.
Example Use Case: Sales Follow-Up Prompt
Scenario: A sales rep needs to follow up with a lead after a product demo.
Prompt: “Hi {Lead.FirstName}, it was great discussing {Opportunity.Product} during our demo. Do you have any questions, or would you like to explore the next steps? Let us know how we can help!”
AI Output: A conversational response tailored to the lead’s recent interaction.
Best Practices for Using Salesforce Prompt Builder
Be Clear and Specific: Avoid ambiguity in prompts to get precise responses.
Incorporate Feedback Loops: Continuously refine prompts based on user feedback and AI performance.
Leverage Automation: Integrate prompts into flows and processes to maximize efficiency.
Conclusion
Salesforce Prompt Builder empowers businesses to unlock the full potential of AI by creating intelligent, dynamic prompts. By integrating Salesforce data and user-friendly tools, you can build prompts that enhance productivity, improve customer engagement, and streamline workflows.
Ready to get started? Access Salesforce Prompt Builder today and create your first prompt to experience the power of tailored AI interactions!
Salesforce Analytics Studio, part of the broader Salesforce CRM Analytics platform, empowers users to analyze and visualize their data with ease. Among its many features, Output Connections play a crucial role in integrating data back into Salesforce or other external systems. Let’s dive into what Output Connections are, how they work, and why they matter.
What are Output Connections?
An Output Connection in Salesforce Analytics Studio allows you to take insights derived from your CRM Analytics recipes, dashboards, or datasets and push that refined data back into Salesforce objects or external systems. This enables seamless data updates, ensuring that your Salesforce instance reflects the latest information derived from analytics processing.
Benefits of Output Connections
Real-Time Updates: Automatically update Salesforce records with the latest analytics insights, minimizing manual effort.
Data Enrichment: Enhance your Salesforce data with calculated fields, aggregated metrics, or external data sources.
Improved Decision-Making: Equip your sales, service, and marketing teams with actionable data directly in their workflows.
Automation: Reduce repetitive tasks by automating updates through scheduled recipes.
Setting Up an Output Connection
1. Preparation
Before setting up an Output Connection, ensure that:
You have the necessary permissions in Salesforce and Analytics Studio.
The dataset and Salesforce object fields are mapped correctly.
The integration user has access to the target Salesforce object.
2. Create a Recipe
Navigate to Data Manager in Salesforce Analytics Studio.
Select Recipes and create a new recipe or modify an existing one.
Define your data transformations and ensure the output fields align with the target object fields.
3. Add the Output Connection
In the recipe’s settings, select Add Output.
Choose Salesforce Data as the output connection type.
Map the transformed dataset fields to the respective Salesforce object fields.
4. Test the Connection
Run the recipe for a single record or a small dataset to verify that the fields update as expected.
5. Schedule the Recipe
Once verified, schedule the recipe to run at desired intervals (e.g., daily at midnight).
Best Practices
Field Mapping: Ensure field names in the dataset align with the target Salesforce object fields.
Test Before Deployment: Always run a test before scheduling the recipe to avoid data mismatches.
Monitor Logs: Regularly check execution logs for errors or discrepancies in data updates.
Optimize Performance: Keep datasets streamlined to improve recipe performance.
Backup Your Data: Have a backup plan in case of inadvertent overwrites or updates.
Troubleshooting Tips
Error: “Field not writable”: Ensure the target Salesforce field is editable and the integration user has write permissions.
Data Mismatch: Check field data types and formats for consistency.
Recipe Fails to Run: Validate that all upstream nodes and data sources are active and functioning.
Conclusion
Output Connections in Salesforce Analytics Studio help integrate analytics with actionable insights by enabling data flow back into Salesforce. By configuring and utilizing Output Connections effectively, you can improve the accuracy and efficiency of Salesforce workflows, equipping teams with real-time, data-driven decision-making capabilities.
Explore the power of Output Connections today and transform the way you manage and utilize data within Salesforce!
Spring is here, bringing a fresh wave of innovative Salesforce features designed to empower admins, developers, and users alike. While every release is packed with updates, I’ve handpicked five standout features from the Spring ’25 release that truly caught my attention. These enhancements are set to streamline workflows, elevate data analysis, and deliver a seamless user experience, making your Salesforce journey even more efficient. Let’s dive in and explore how these updates can transform the way you work!
1. Dashboard Widgets to Refresh (Beta):
This is to refresh individual widgets on a dashboard rather than refreshing the entire dashboard. This enhancement gives users greater control over which data gets updated, improving performance and reducing unnecessary loading times, especially for large dashboards with multiple widgets. Users can focus on specific data points while maintaining the overall dashboard integrity, providing a more efficient and responsive experience.
From Setup, in the Quick Find box, and select Reports and Dashboards Settings. Select Let users refresh individual widgets for dashboards (Beta).
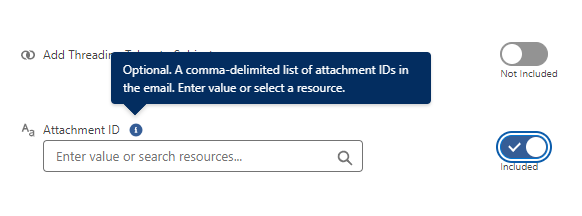
2. Send Attachments in Email action:
Enhance your Flow Builder emails by including documents or files as attachments using the Send Email action. To add an attachment, simply provide the file’s ID in the Send Email action. Note that the total size of the email, including attachments, cannot exceed 35 MB.
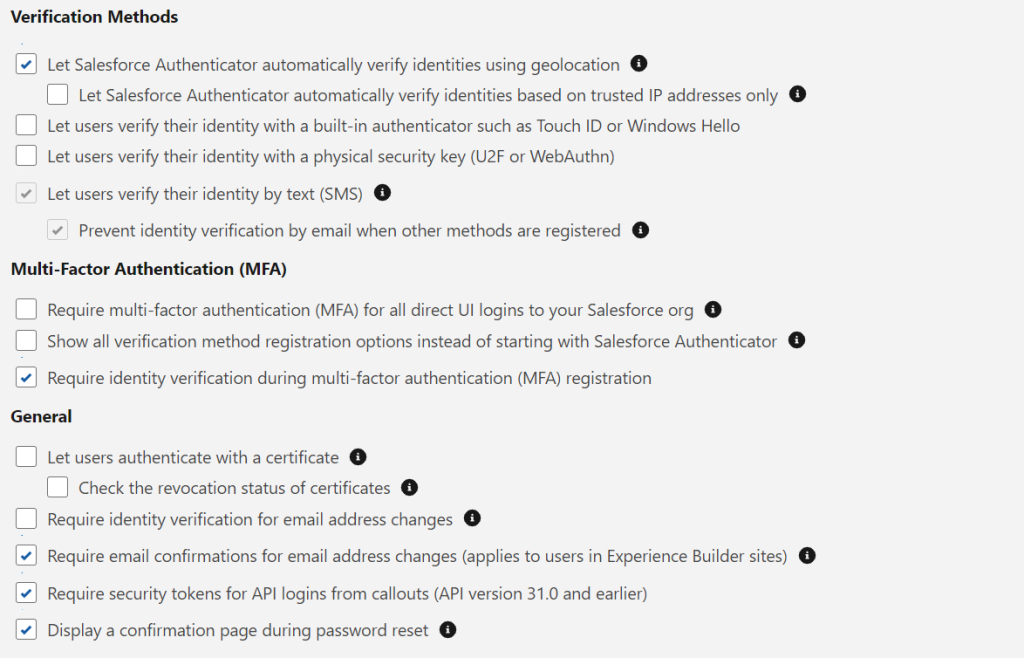
3. 24-Hour Password Reset Link Safety Net:
Enhances the password reset process by allowing users to click the reset link multiple times within a 24-hour period without invalidating it. Previously, if a user clicked the link but didn’t complete the password reset, or if the link was scanned by email security tools, it would become invalid. With this update, the link remains valid for 24 hours, even if clicked multiple times or scanned, reducing the need for users to request a new link if they accidentally click it or if their email security tools scan it.
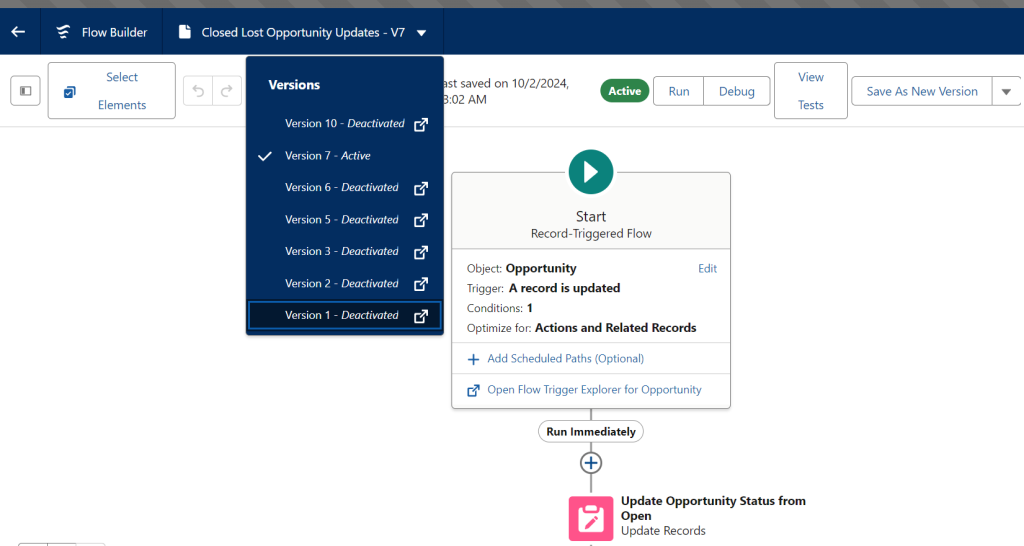
4. Open Flow versions from Canvas:
We can quickly open older or inactive versions of the flow without navigating to the Setup menu. It’s convenient for reviewing changes made in earlier versions or troubleshooting issues in specific versions.
5. Sort List views by multiple column:
Sorting by multiple columns is a powerful feature that allows you to organize and analyze data more effectively by applying hierarchical sorting criteria. For example, you can first sort by a primary column, such as “Region,” and then by a secondary column, like “Sales Amount,” to group and order data in a meaningful way. This method is especially useful in scenarios like reporting, data analysis, or prioritization, where multi-dimensional sorting reveals patterns and insights that single-column sorting might miss.
Spring releases are always a treasure trove of innovations, and the Spring ’25 release is no exception. Packed with AI-powered insights, enhanced workflows, and advanced analytics, these updates are designed to optimize sales processes, unlock deeper data insights, and streamline operations. Whether you’re an admin, developer, or business user, there’s something for everyone to make your Salesforce experience more seamless and impactful.
Which feature excites you the most? Share your thoughts in the comments—I’d love to hear how these updates can help drive productivity and innovation in your organization!
This website uses cookies so that we can provide you with the best user experience possible. Cookie information is stored in your browser and performs functions such as recognising you when you return to our website and helping our team to understand which sections of the website you find most interesting and useful.
Strictly Necessary Cookies
Strictly Necessary Cookie should be enabled at all times so that we can save your preferences for cookie settings.
If you disable this cookie, we will not be able to save your preferences. This means that every time you visit this website you will need to enable or disable cookies again.