Sweet Potato

Categories
Blog salesforce

Reduce Flow Complexity with the Transform Element

Salesforce Flow keeps evolving, and one of its standout features is the Transform element. This tool simplifies data mapping, reducing manual assignments and making automation more efficient. If you’ve ever struggled with mapping fields, the Transform element is here to help! 

What is the Transform Element? 

The Transform element in Salesforce Flow allows you to: 

  • Convert collections into different formats 
  • Map fields between objects seamlessly 
  • Minimize manual assignments and errors 
  • Enhance automation efficiency 

Why is It Important? 

Previously, handling complex data in Flow required multiple assignment elements and loops, making automation cumbersome. The Transform element streamlines this by enabling quick, declarative field mapping in one step, resulting in cleaner and faster Flows. 

Key Features 

  1. Intuitive Field Mapping – Drag and drop fields easily.
  1. Versatile Data Support – Works with records, collections, and Apex-defined types. 
  1. Conditional Mapping – Filter and transform data before assignment. 
  1. Simplified Flow Design – Reduces complexity and improves readability. 

How to Use It 

  1. Add a Transform Element – Drag it into your Flow. 
  1. Define Source and Target Data – Set input and output structures. 
  1. Map Fields – Use the visual mapping interface. 
  1. Use the Transformed Data – Pass it into Flow actions like Create or Update. 

Practical Example 

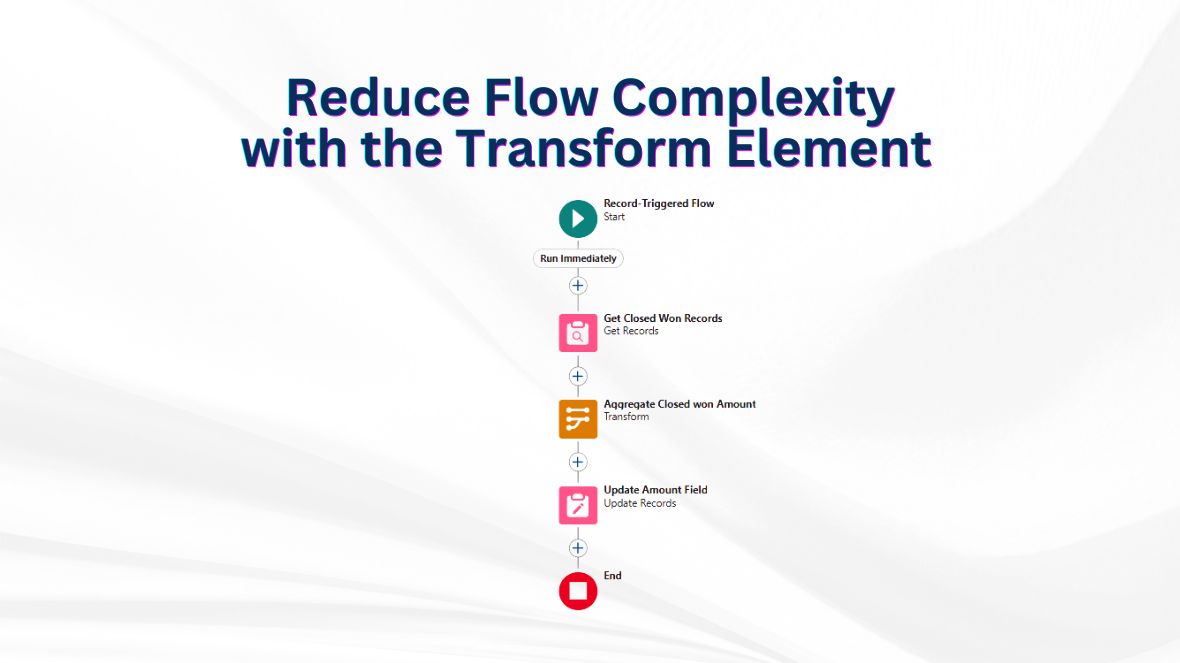
This blog explains how to use the Transform element in Salesforce Flow to summarize Closed Won Opportunity amounts at the Account level—without using a loop. 

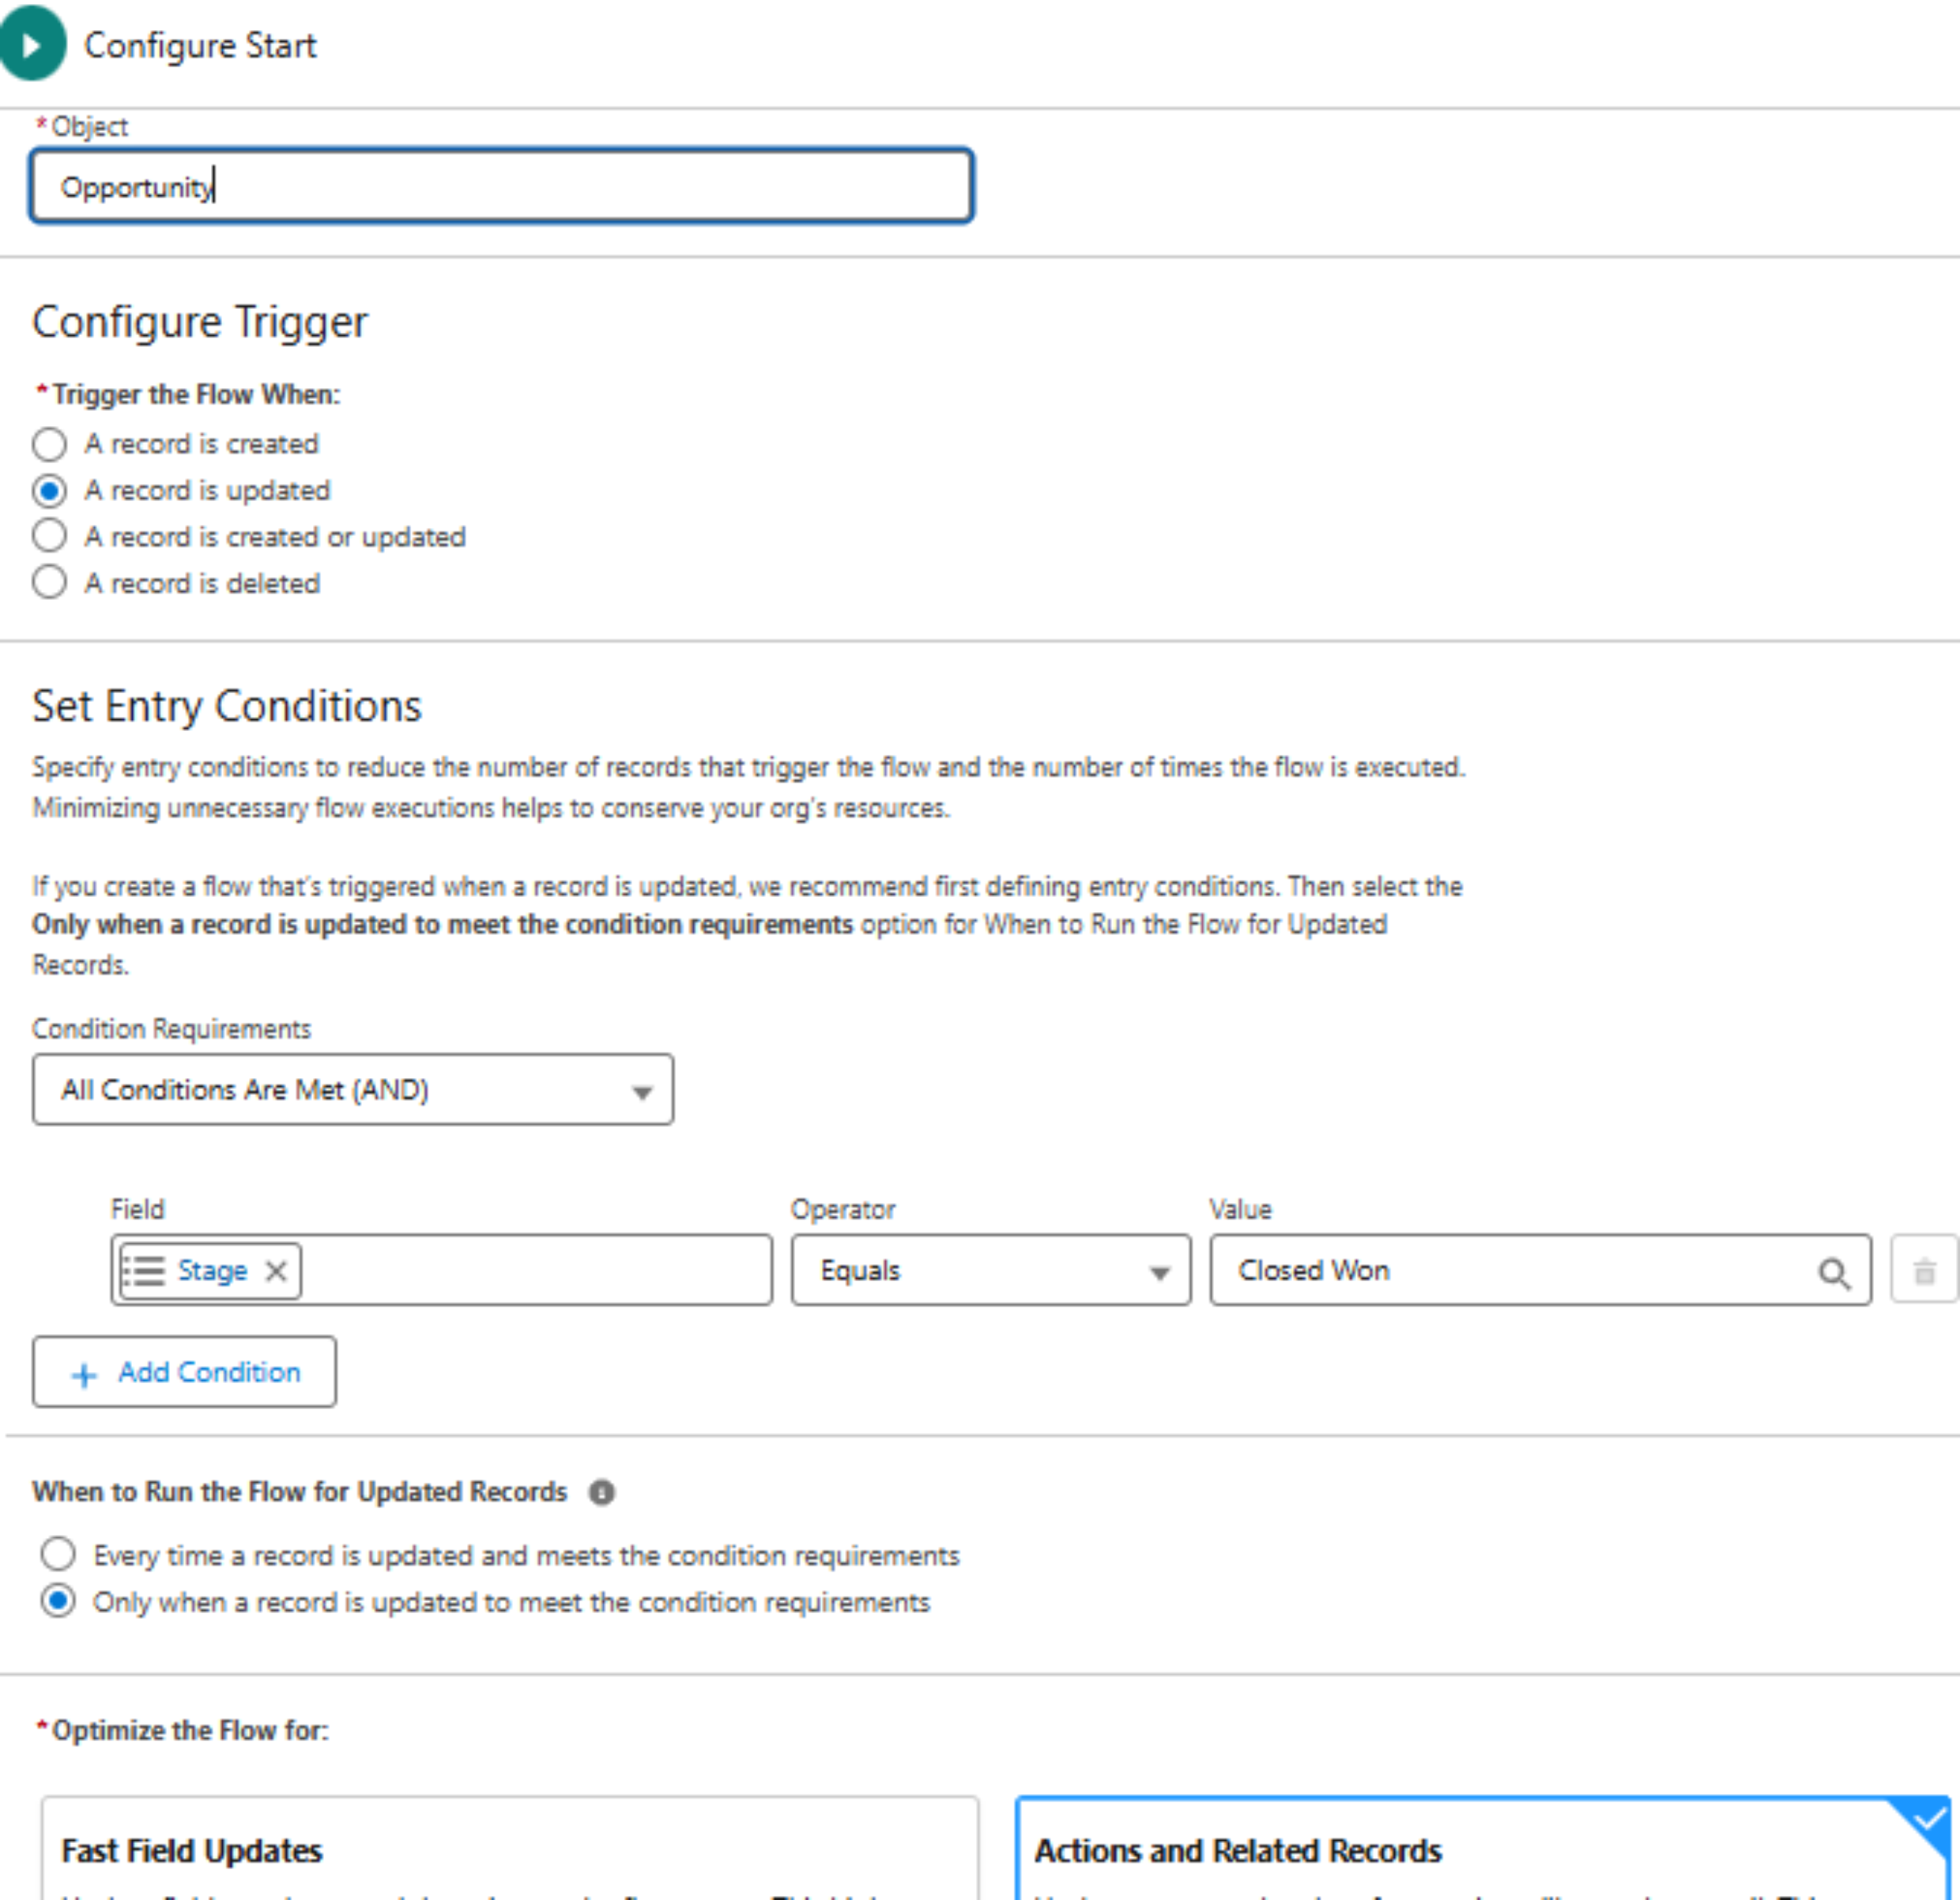
Step 1: Start by creating a Record-Triggered Flow

Step 2: Set the trigger object to Opportunity,  and define the entry condition where Stage equals “Closed Won.” 

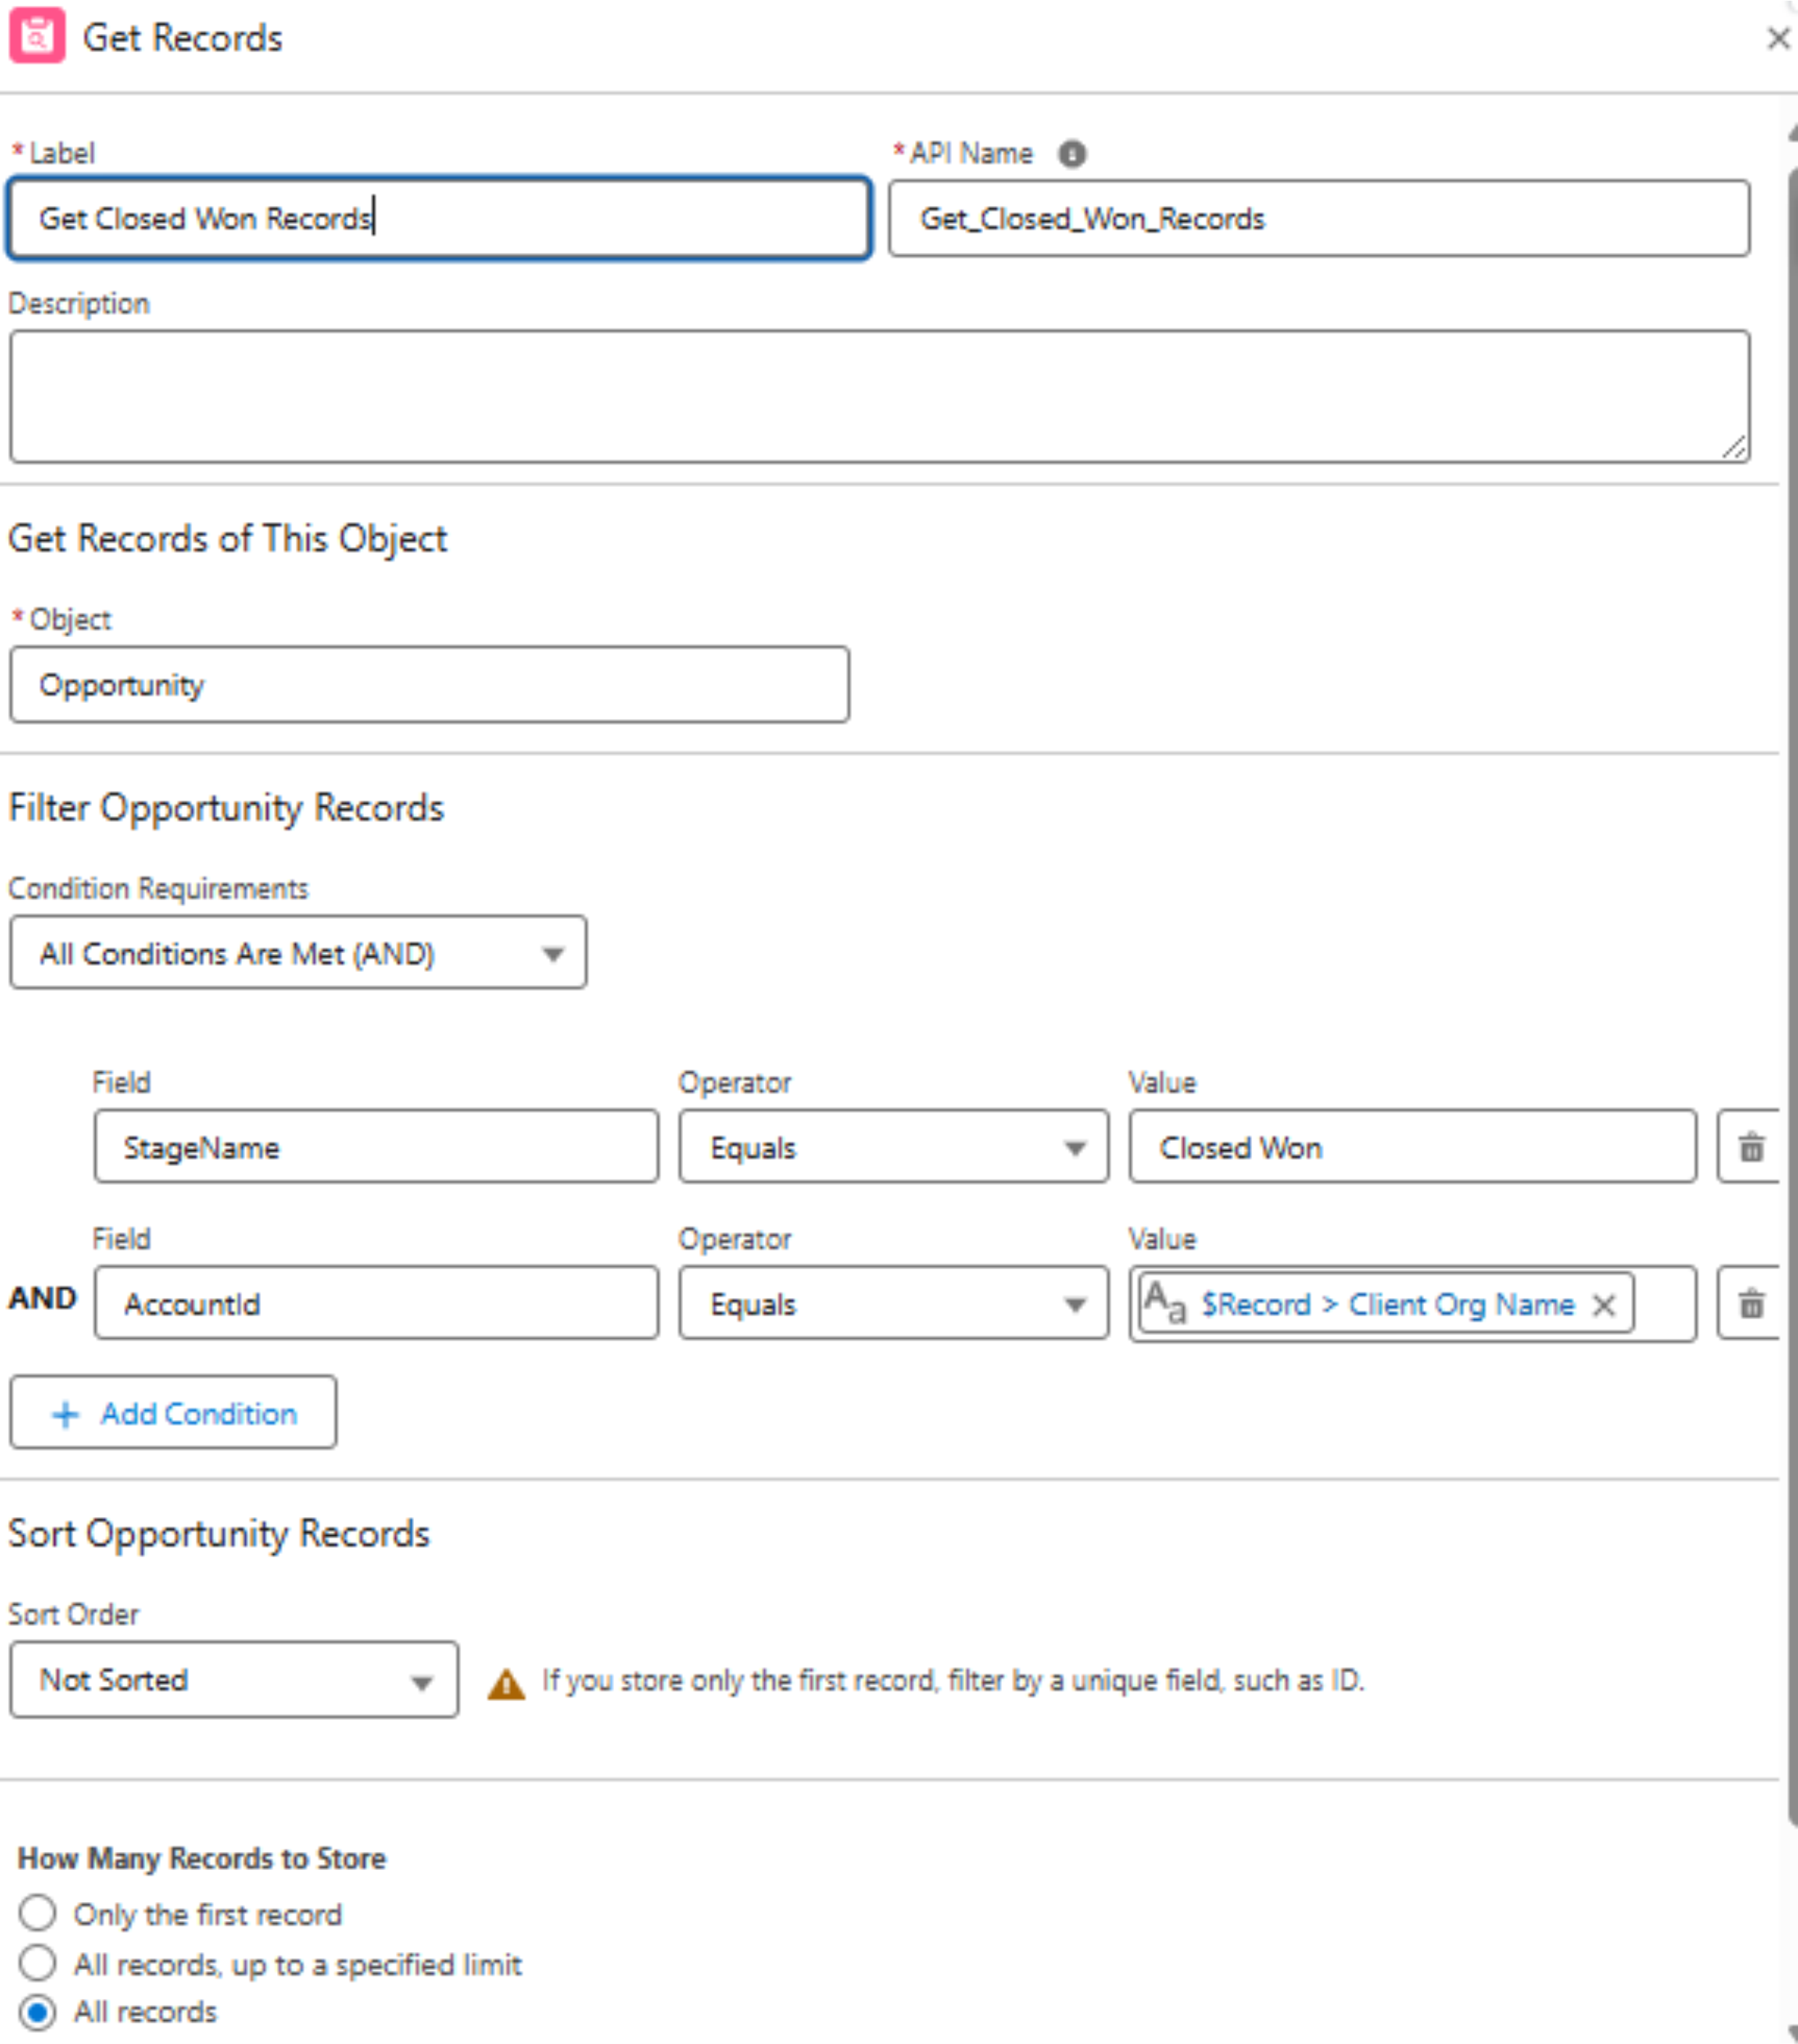
Step 3: Use the Get Records element to fetch all Opportunities related to the Account of the triggering Opportunity. Apply the necessary conditions as shown in the screenshot. 

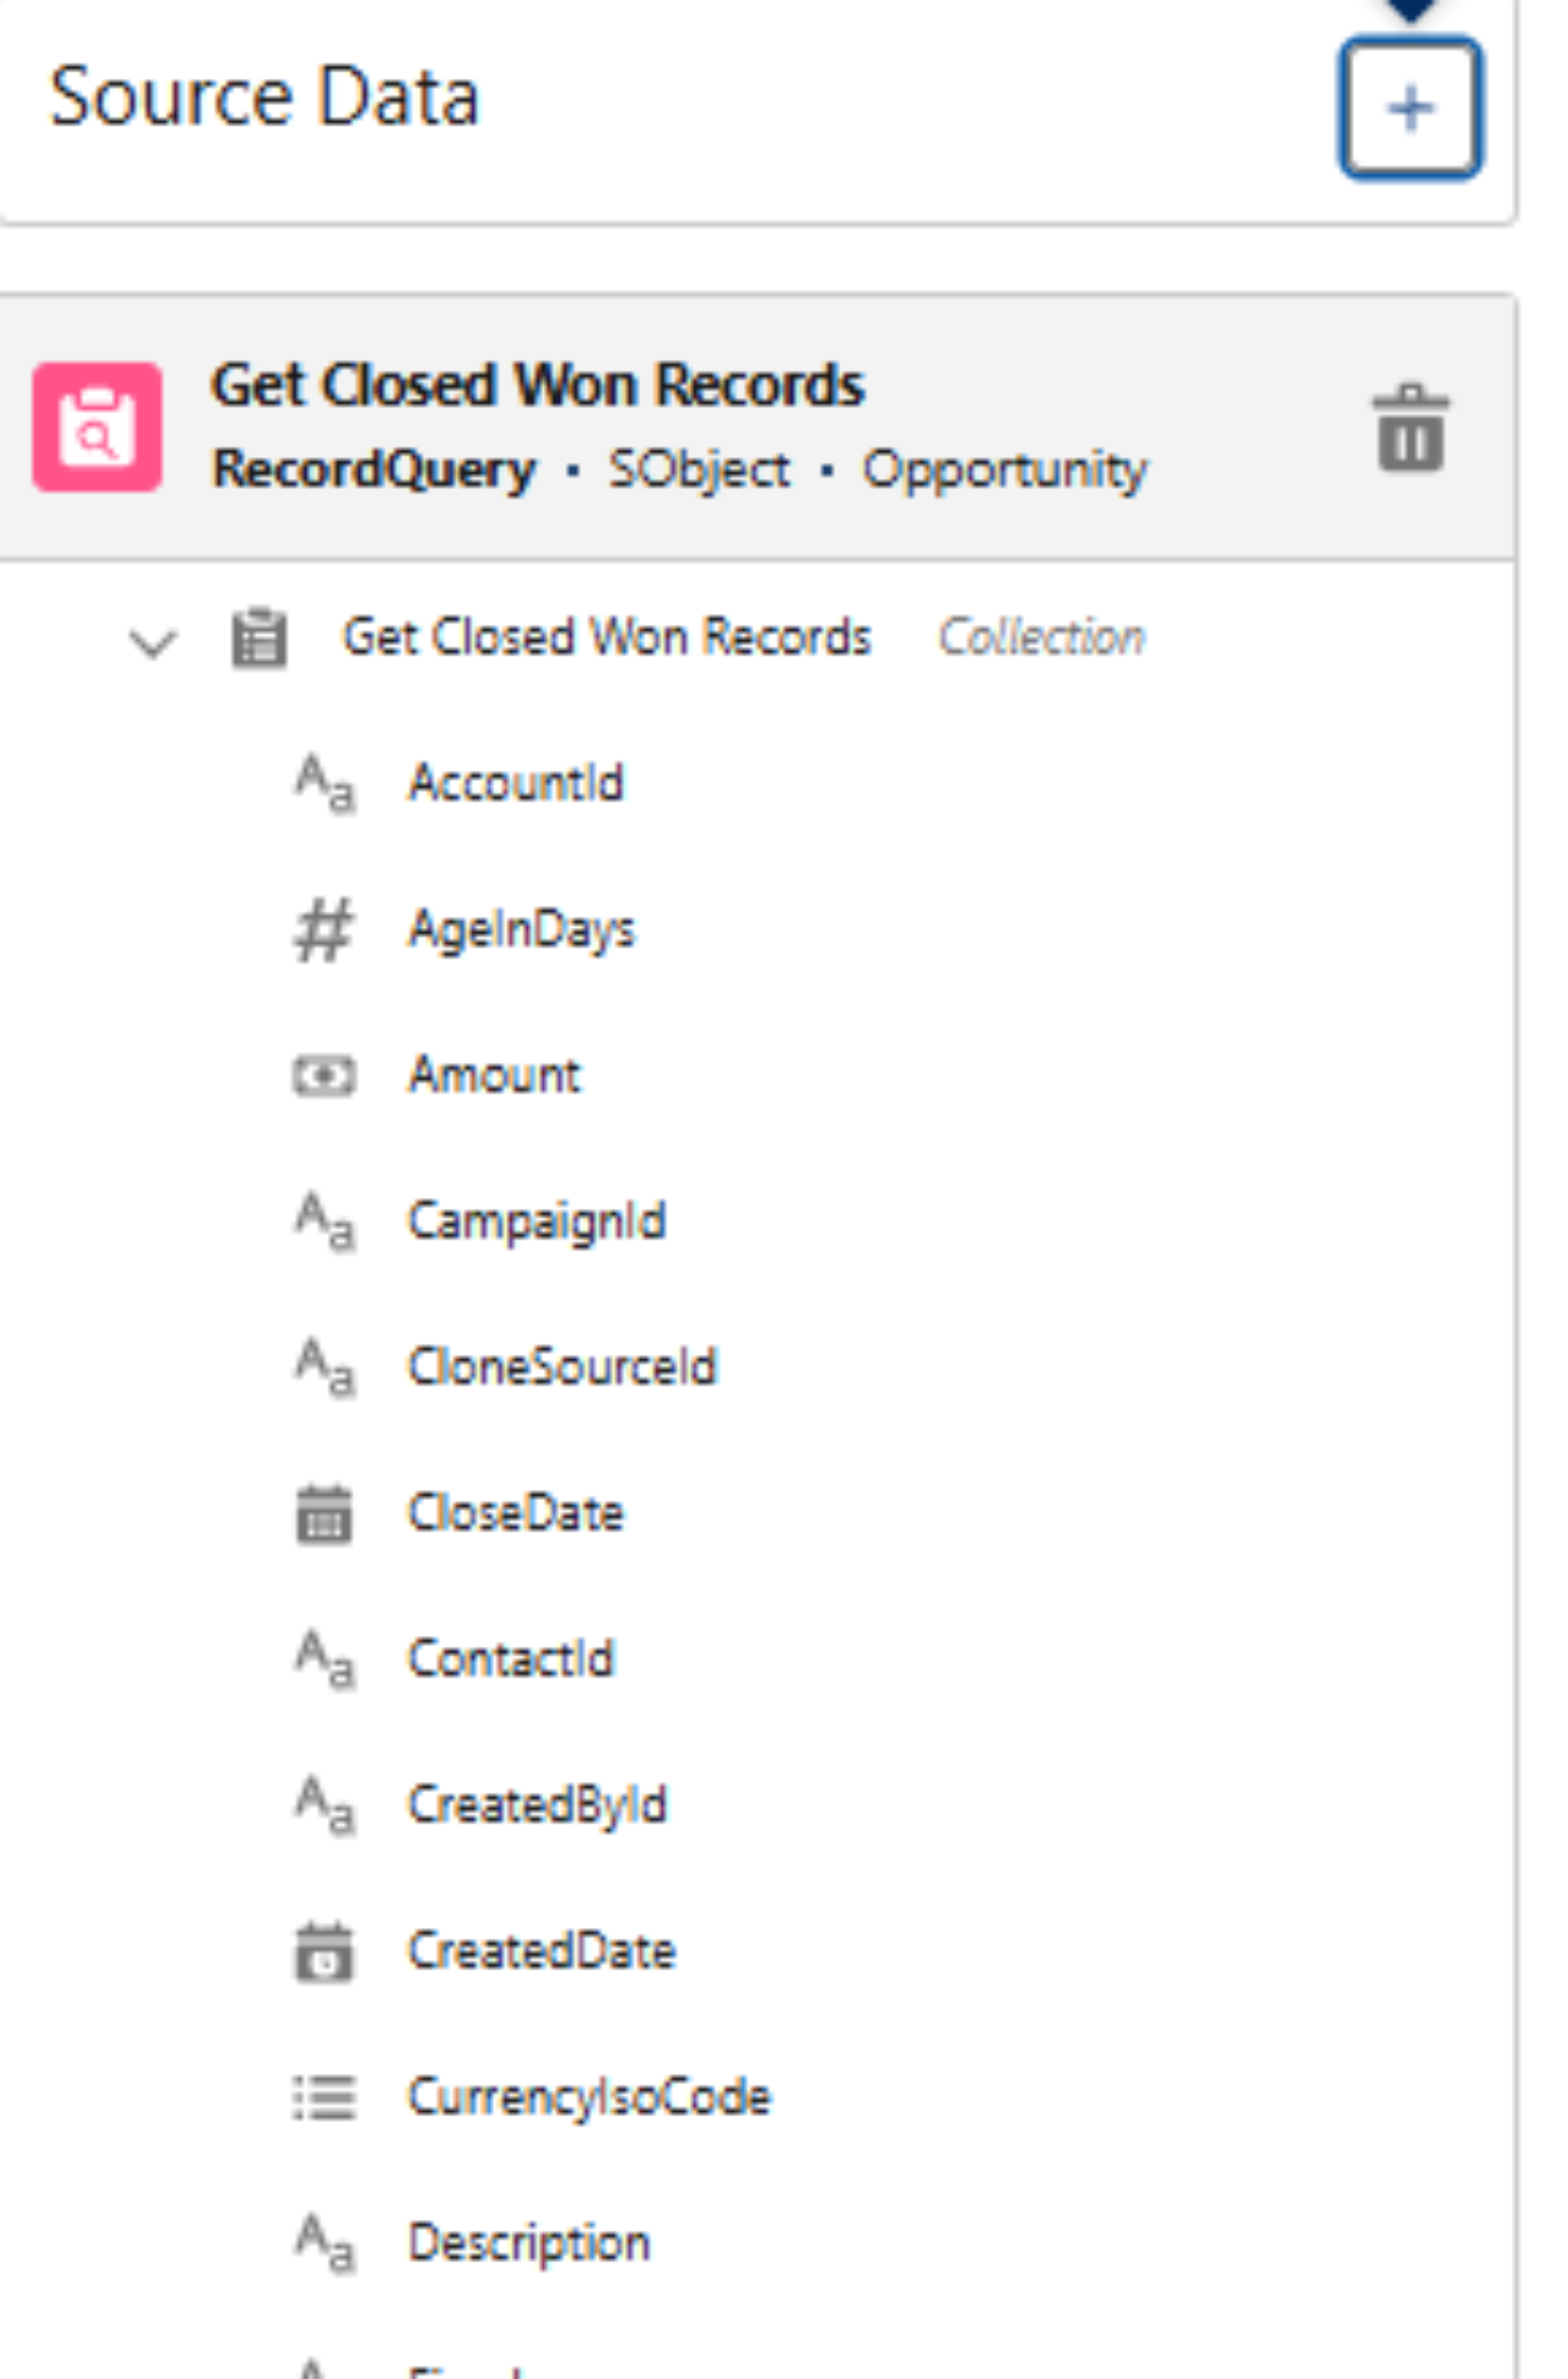
Step 4: Drag in a Transform element. Under Source Data, click the ( + ) icon and select the Closed Won Opportunities collection retrieved in Step 3. 

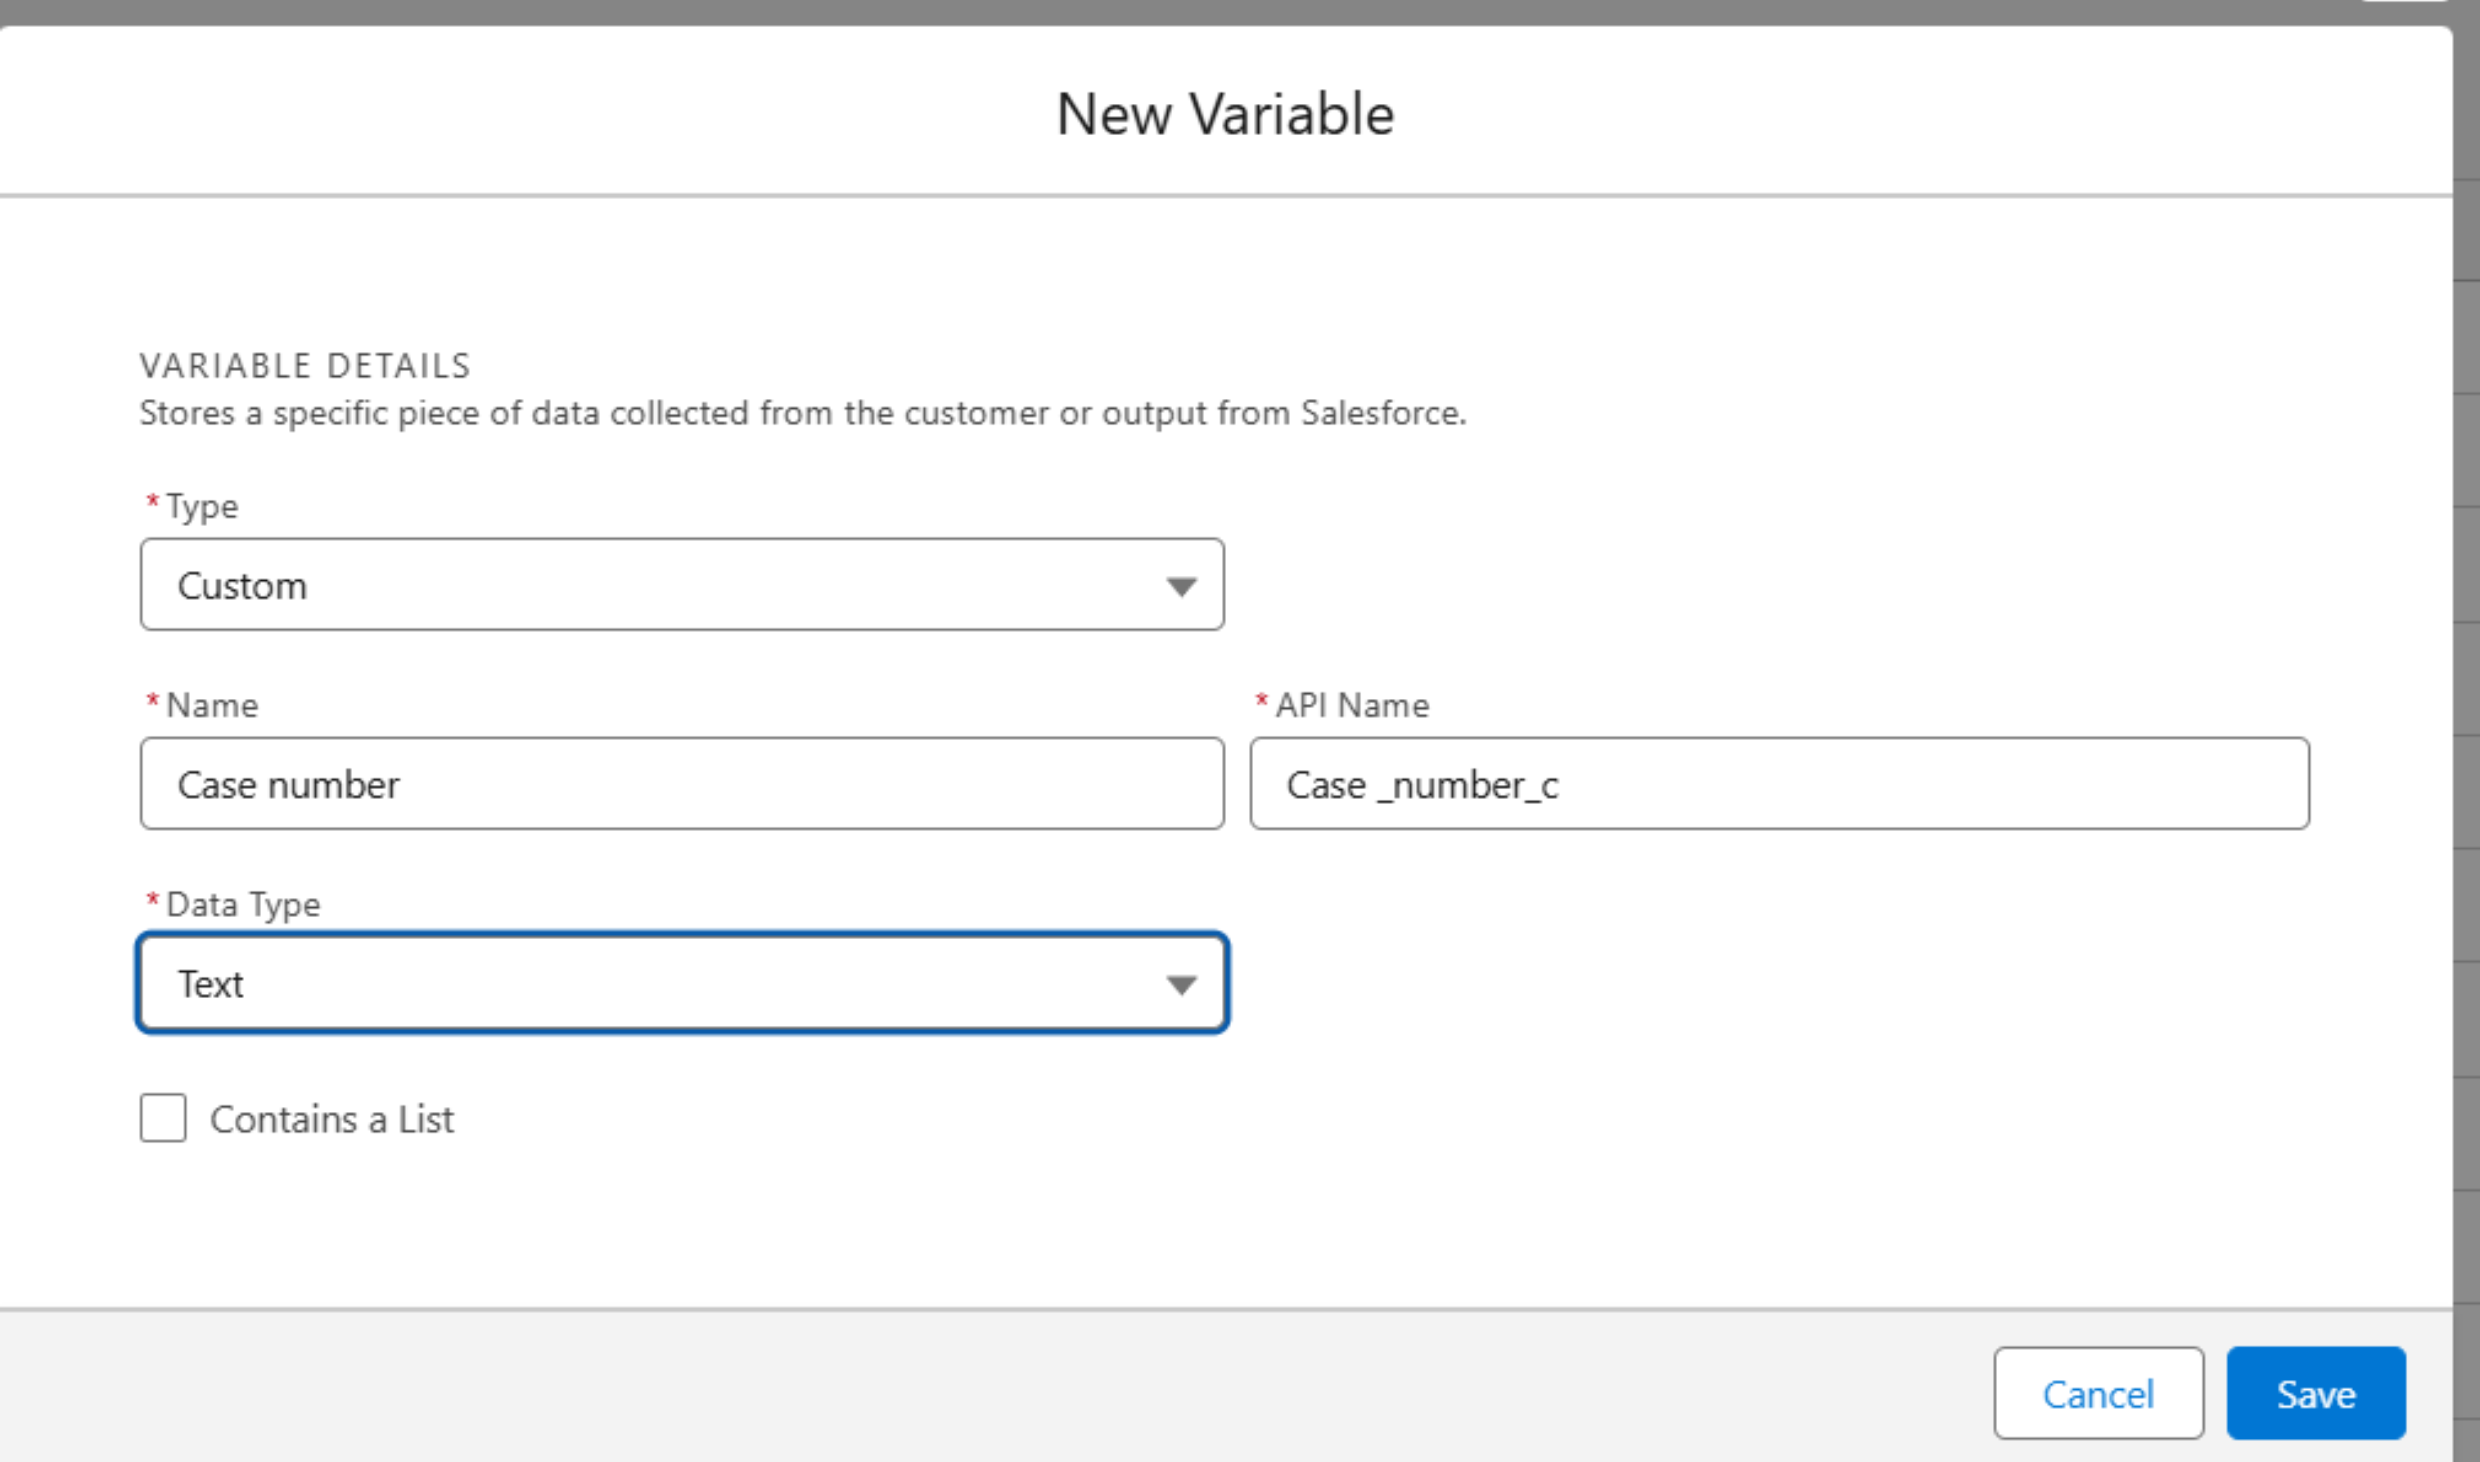
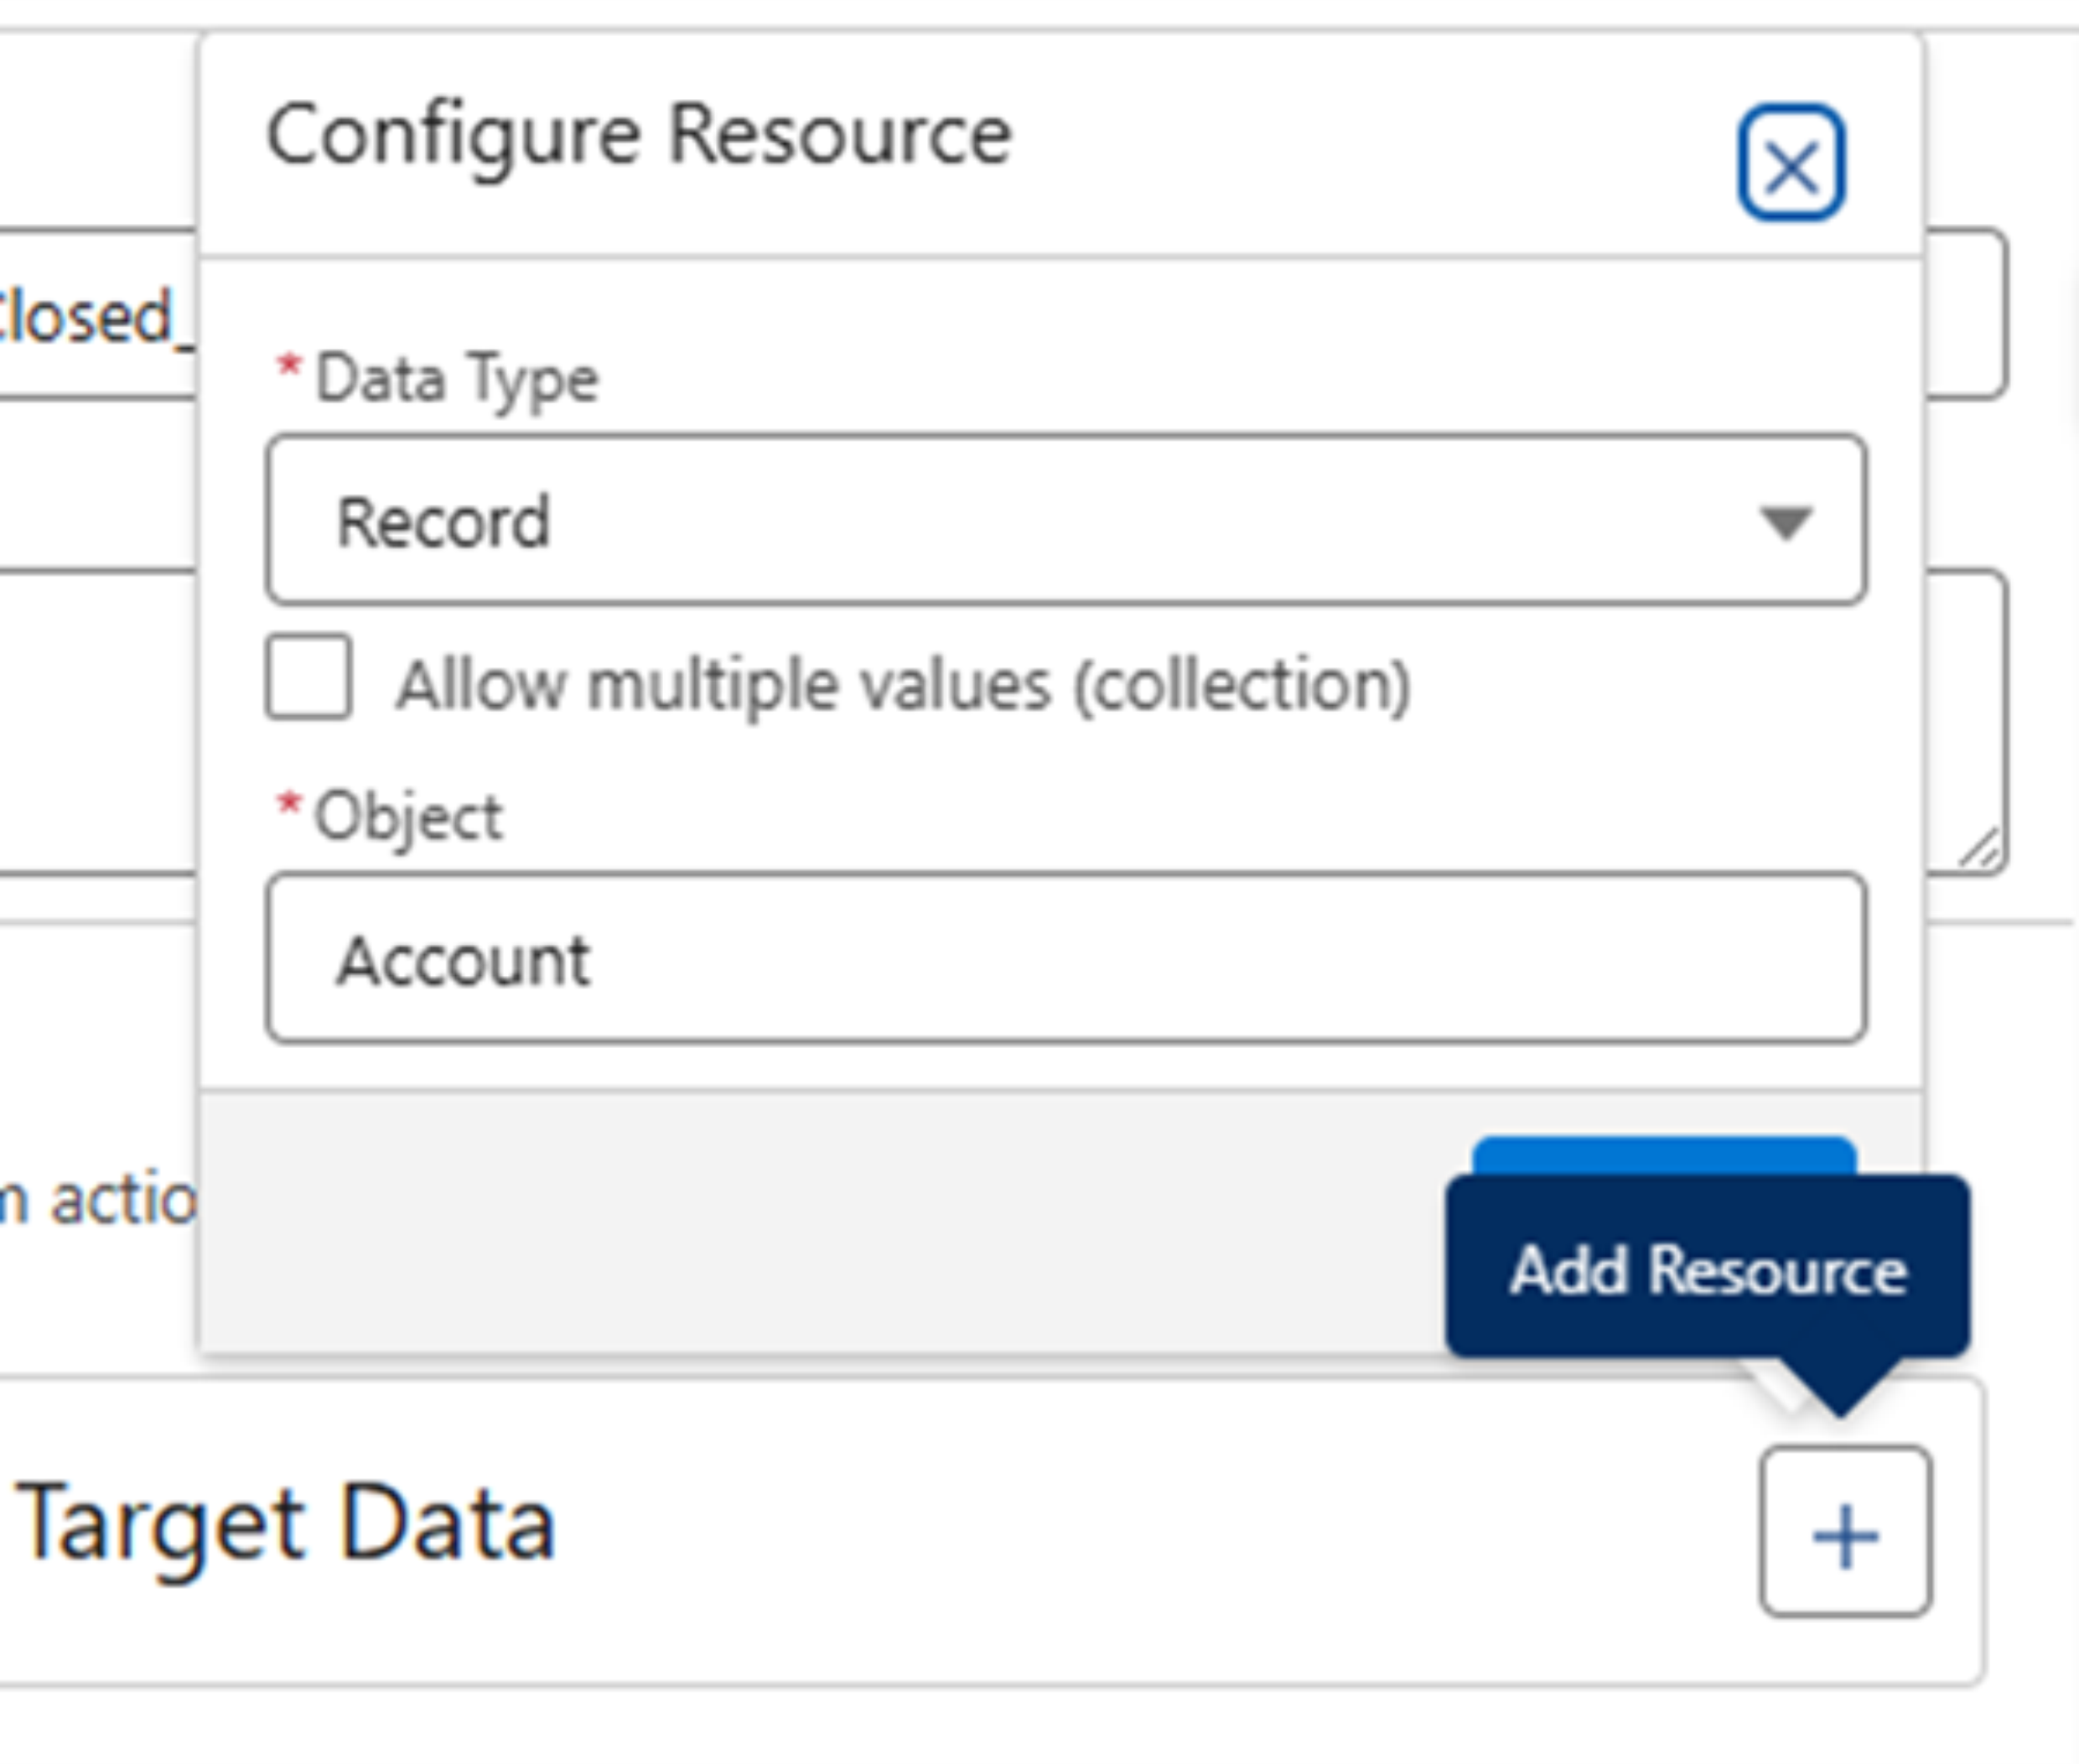
Step 5: Next, click the Target Data ( + ) icon. Choose Record as the data type and select the Account object. 

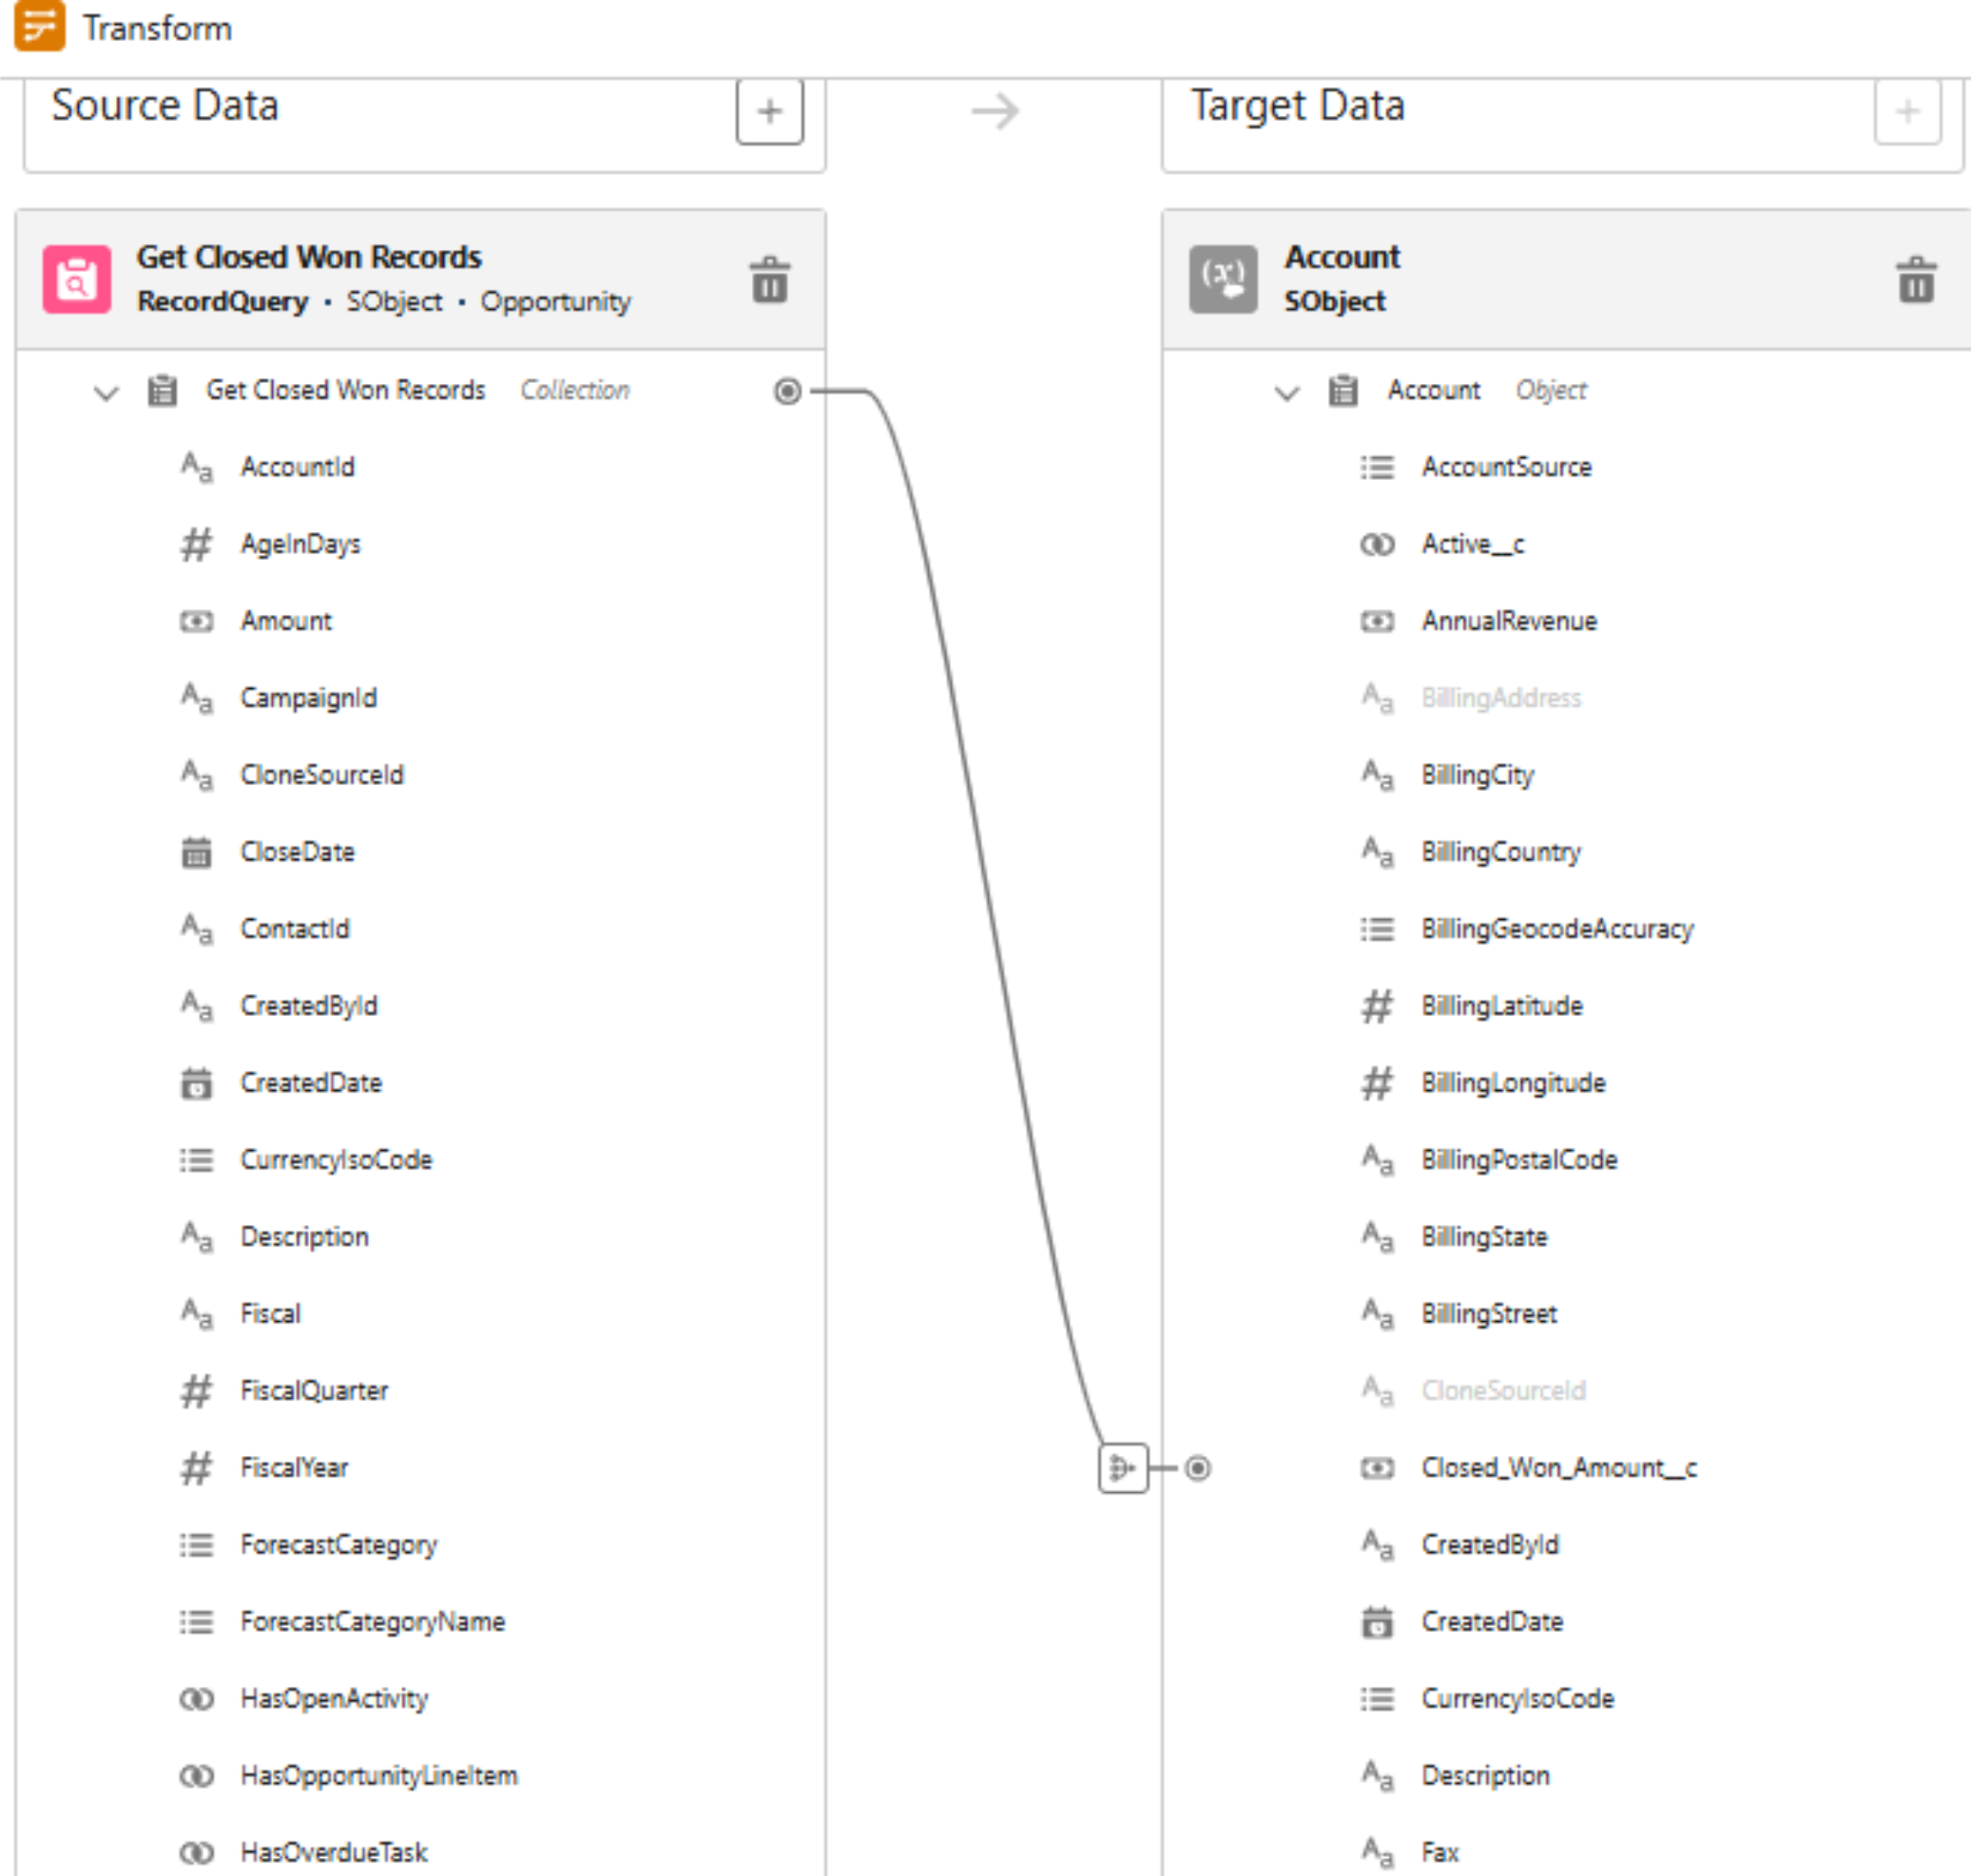
Step 6: Map the relevant source fields to the target fields. 

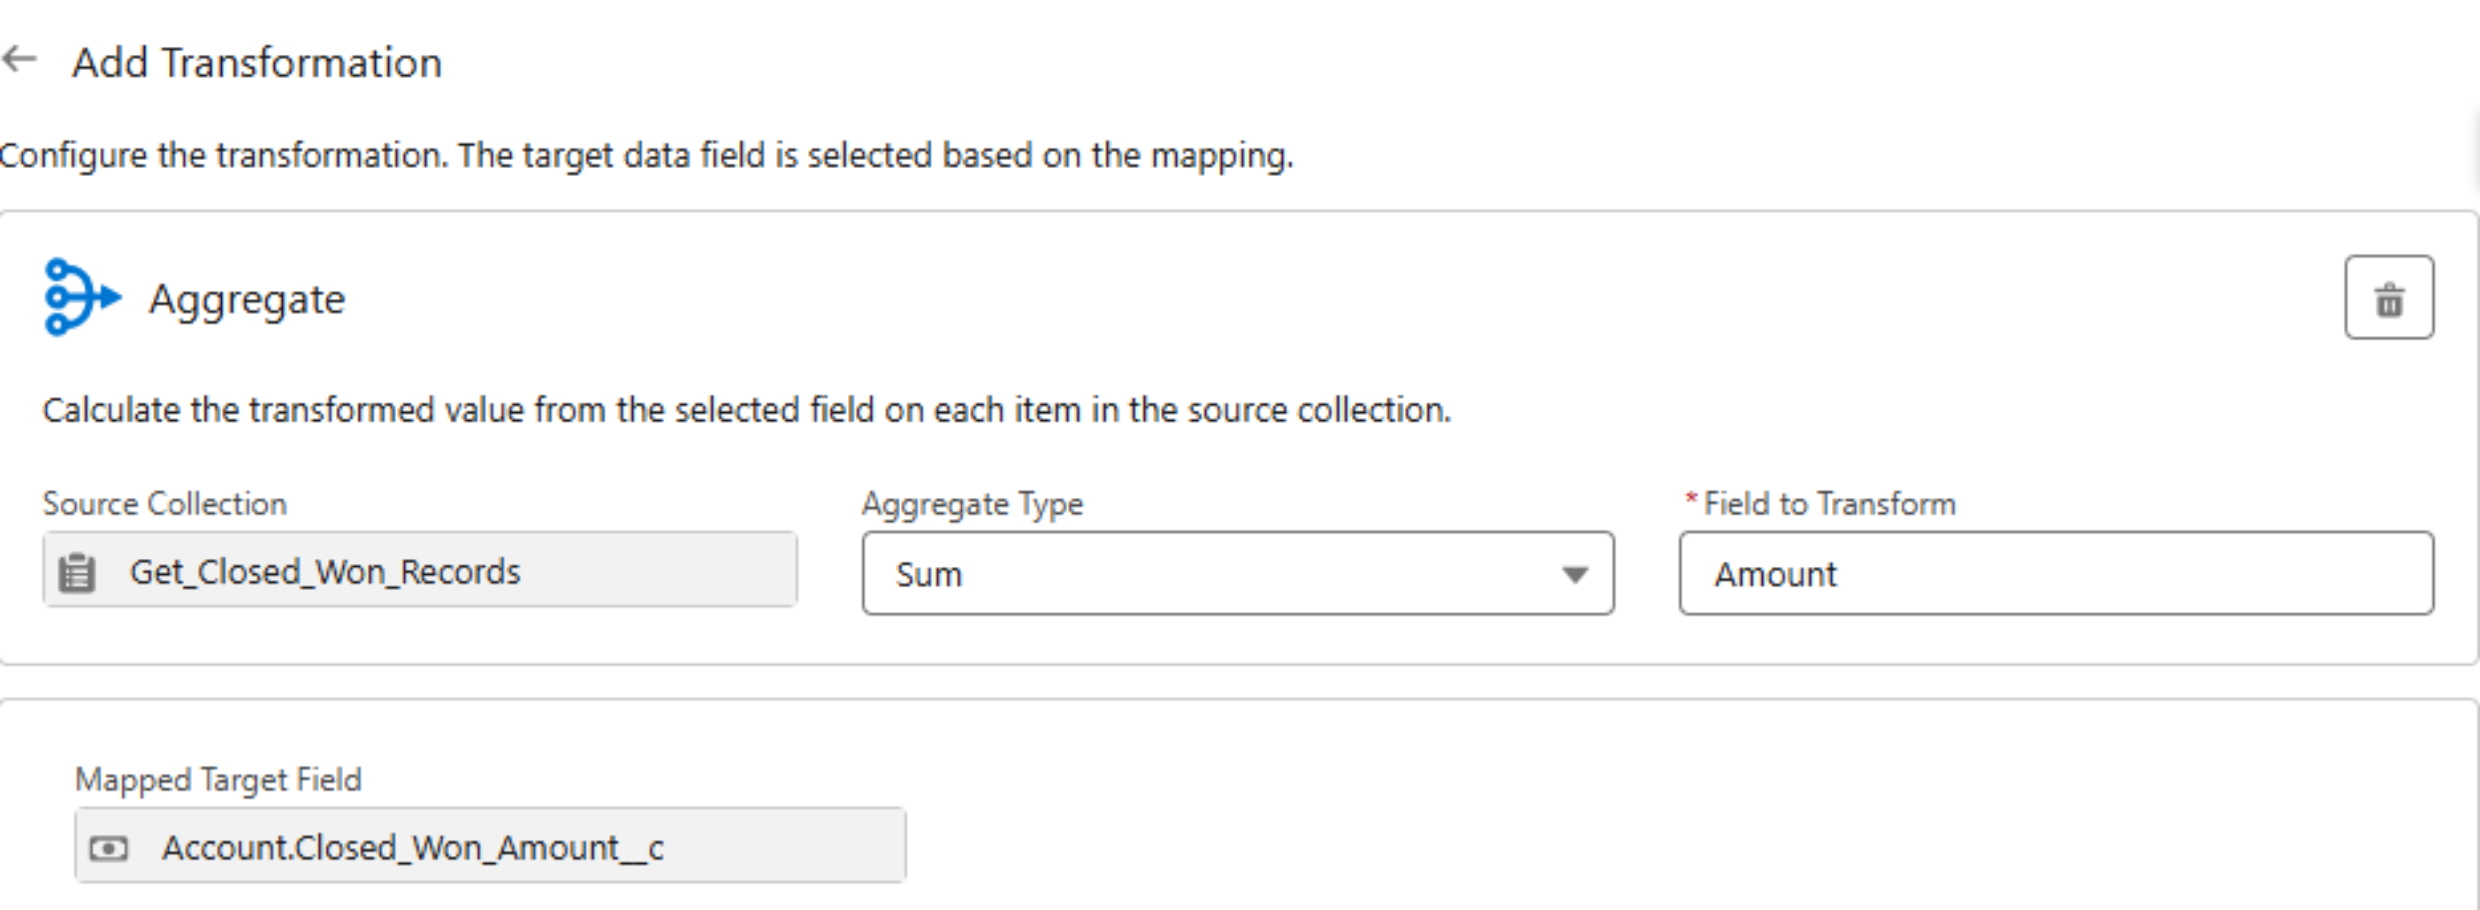
Step 7: After mapping, you’ll be taken to the Aggregation section. Set up the aggregation variables (like summing the Amount field) as shown in the screenshot. 

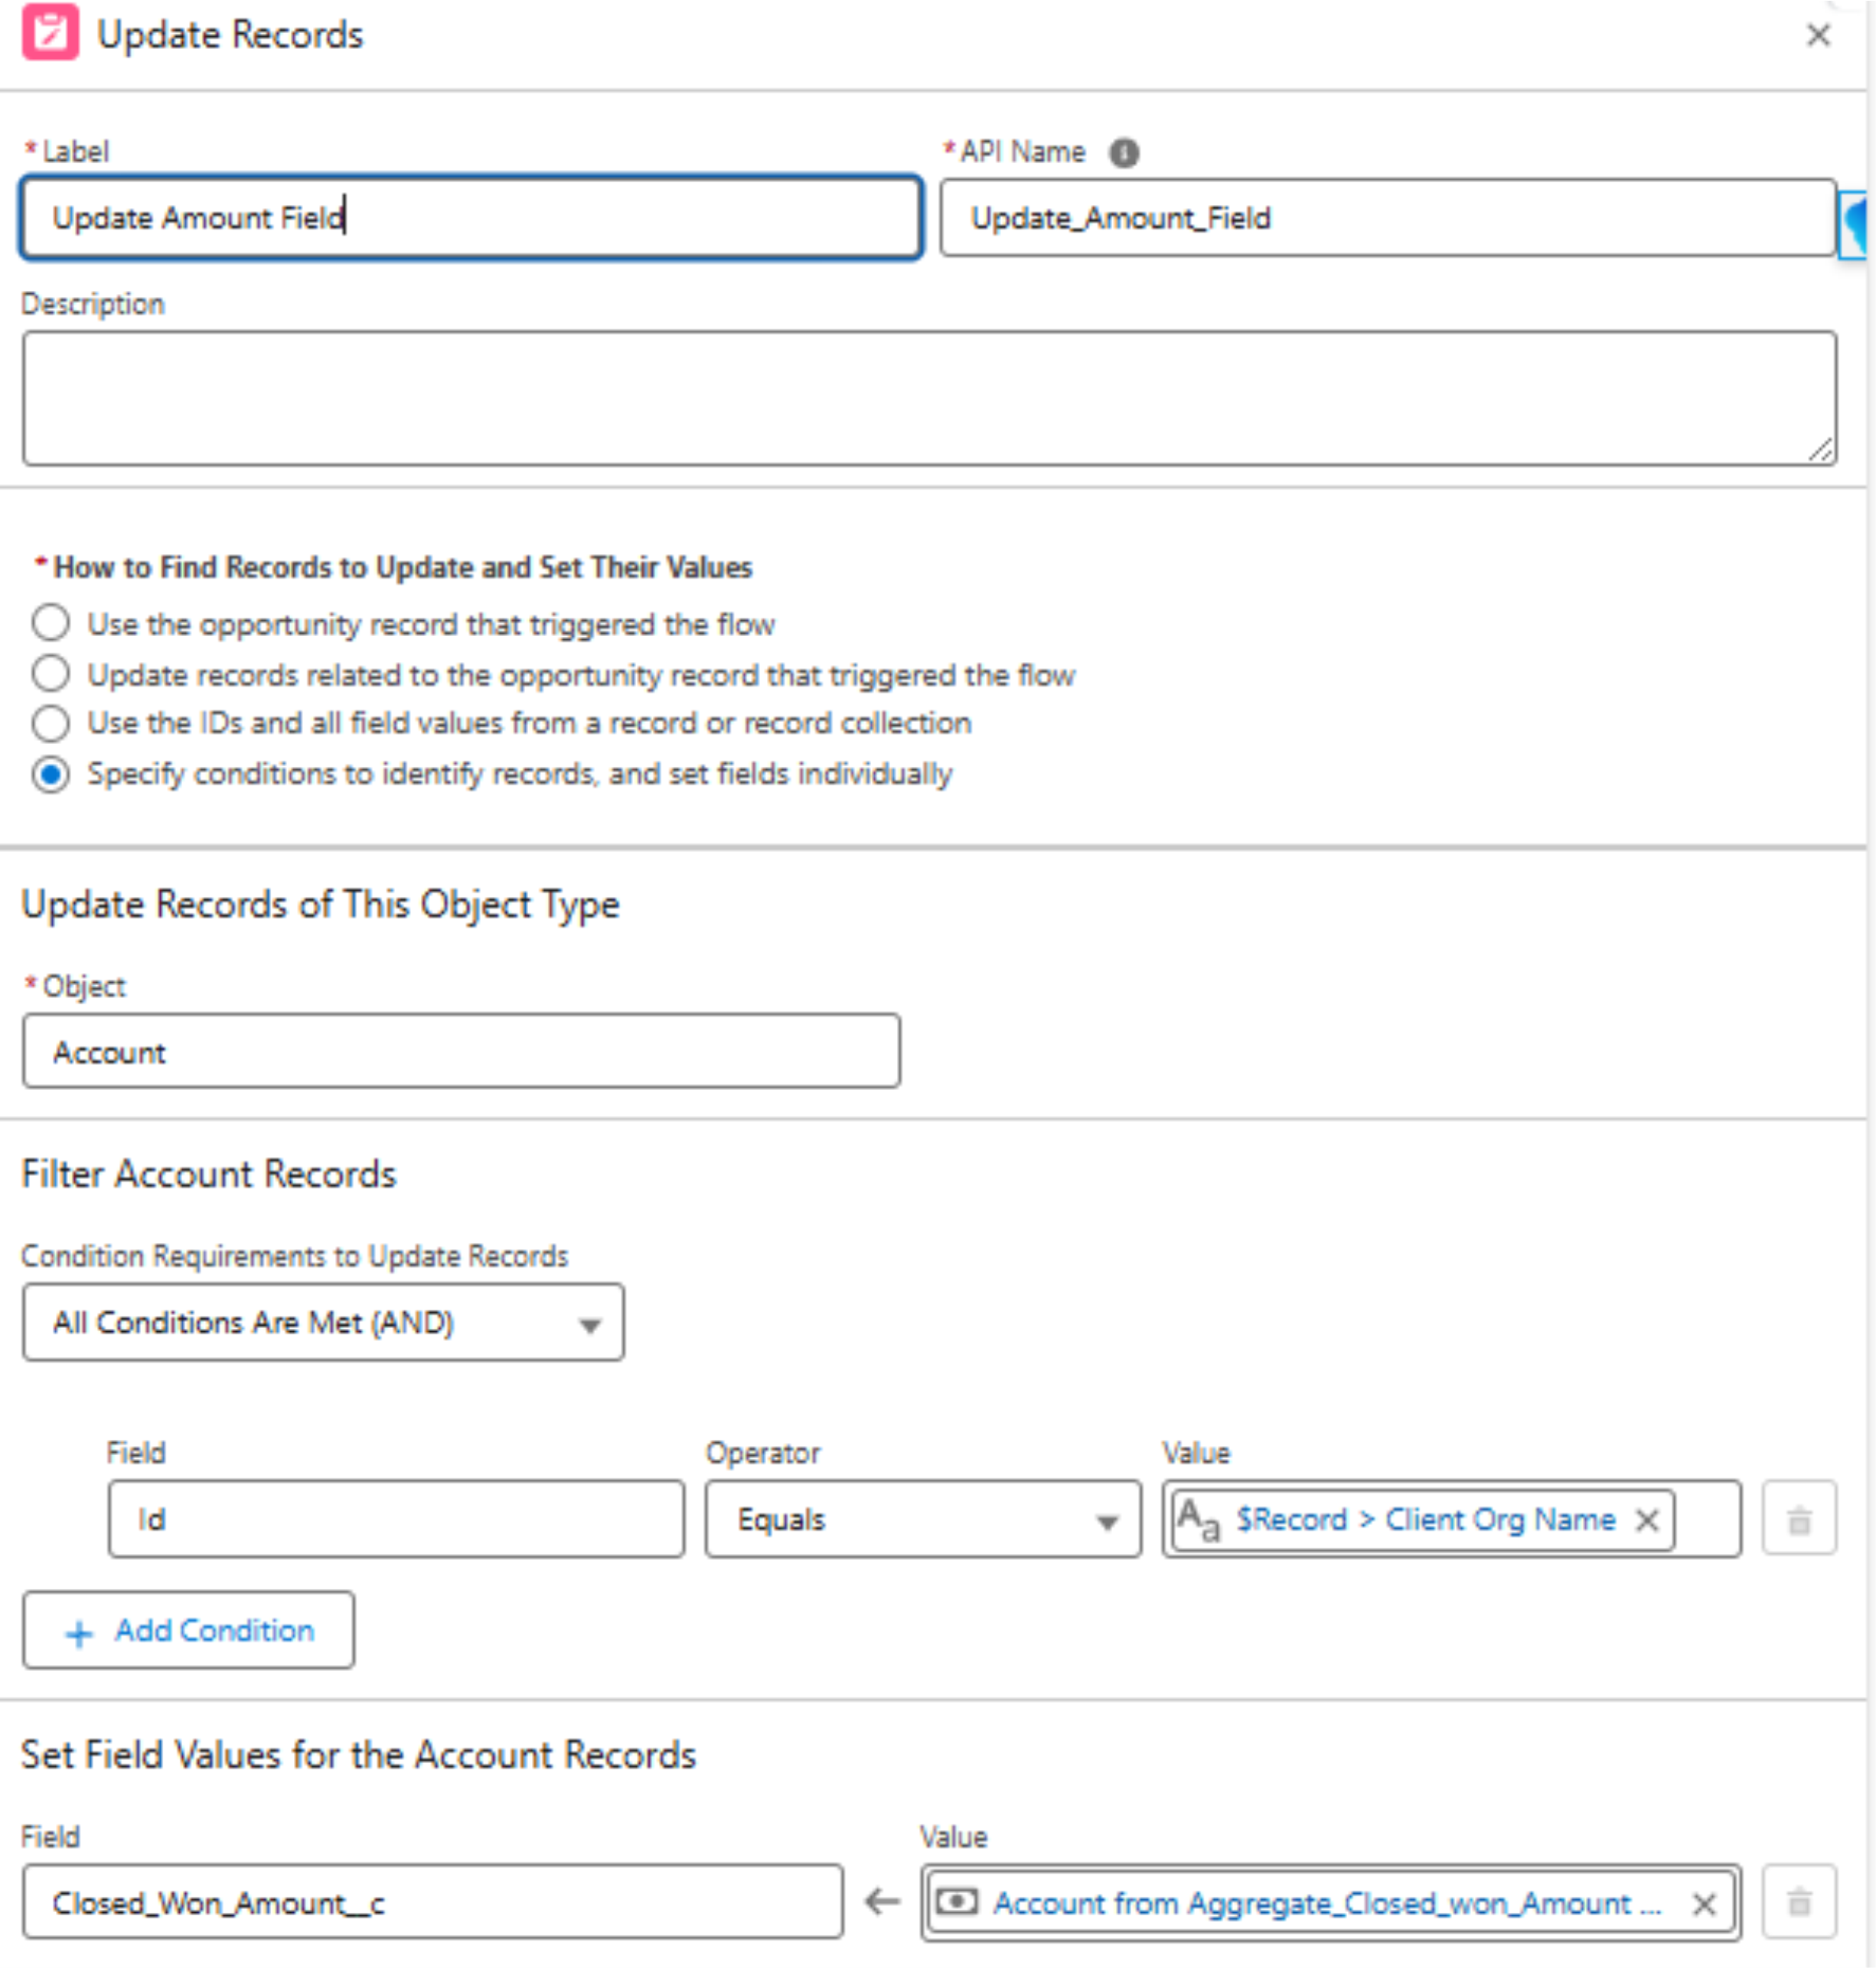
Step 8: Finally, use an Update Records element to update the Closed Won Amount field on the Account with the aggregated value. 

Best Practices 

  • Prefer Transform Over Assignments – Keeps Flows clean. 
  • Use Conditional Mapping Wisely – Filter unnecessary data early.
  • Test Before Deployment – Validate mappings to ensure accuracy.   

Final Thoughts 

The Transform element is a game-changer, making Salesforce automation more efficient. By mastering it, you can simplify data transformations and create smarter workflows. 

Categories
Blog salesforce

Einstein Bots Basics

Introduction

In today’s digital-first world, businesses need to provide quick and efficient customer service. Einstein Bots, powered by Salesforce, help companies automate customer interactions, improving response time and overall customer satisfaction. Whether you’re new to Einstein Bots or looking to understand the basics, this guide will walk you through what they are, how they work, and how they can enhance your customer service.

What Are Einstein Bots?

“Einstein Bots are AI-driven virtual assistants that streamline customer support by automating repetitive tasks, addressing common inquiries, and seamlessly integrating with Salesforce. Leveraging Natural Language Processing (NLP) and structured conversation flows, these bots enhance customer interactions while reducing the burden on human agents.”

Enabling Einstein Bots

Before using Einstein Bots, you must enable them in Salesforce:

  1. Navigate to Setup > Einstein Bots > Enable.

2. Click the New button to create a new bot

3. Select the Type of Bot that suits your business needs.

4. Enter the Bot Name and customize the Welcome Message.

Setting Up the Einstein Bot

Once the bot is created, you can configure its interactions:

  • When a customer starts a chat, they will be given two options:
    • Check the status of an existing case
    • Create a new case
  • If the customer selects existing case, the bot retrieves and provides relevant information, such as case status.
  • If they choose new case, the bot will ask a series of questions, create the case, and share the case number with the customer. 

All actions can be configured within the same chat screen. 

Adding Components 

To enhance bot interactions, you can add components:

  1. Use the Add Component feature. 

2. Choose Static Question

3. Enter a question, e.g., “Please enter your Email Address or Case Number?”

4. Select the Entity Name.

5. Store customer responses in a Variable for later use.

Additionally, you can add Actions within components to create dynamic interactions. Some examples include: 

  • API Calls: Fetch real-time data from Salesforce or external systems. 
  • Record Updates: Modify records based on user input. 
  • Conditional Navigation: Guide users to different dialogs based on their responses. 
  • Trigger Workflows: Initiate automated processes such as case escalation 

How Einstein Bots Work 

Einstein Bots operate through predefined conversational flows, guiding customers to the right information or action. Here’s a simplified breakdown: 

  1. User Initiates Conversation – A customer interacts with the bot via a website, mobile app, or social channel. 
  1. Bot Processes Input – Using NLP, the bot understands the customer’s intent.
  1. Guided Responses – The bot provides relevant information or directs the user to a human agent if needed. 
  1. Salesforce Integration – The bot can retrieve and update customer records in Salesforce. 
  1. Resolution or Escalation – The bot resolves the query or escalates it to an agent for further assistance. 

Key Components of Einstein Bots

Intents – Define the purpose of user interactions (e.g., “Check Order Status”). 

  • Entities – Extract specific details from user input (e.g., order number, date, name). 
  • Dialogs – Predefined conversation flows that guide the customer. 
  • Variables – Store and retrieve information throughout the conversation. 
  • APIs & Integrations – Connect the bot with external systems for more dynamic responses.  

Best Practices for Einstein Bots

  • Keep conversations simple and user-friendly. 
  • Use fallback messages when the bot doesn’t understand a request. 
  • Regularly update the bot’s training data for better accuracy. 
  • Provide an easy way to escalate to a human agent. 
  • Continuously test and refine your bot for optimal performance. 

Conclusion

Einstein Bots empower businesses to deliver faster, smarter, and more efficient customer service. By automating routine inquiries and integrating with Salesforce, these bots can significantly enhance customer interactions while reducing operational costs. Whether you’re just starting or looking to optimize your chatbot strategy, Einstein Bots are a game-changer for modern customer service. 

Are you ready to implement Einstein Bots in your business? Start today and revolutionize your customer experience! 

Categories
Blog salesforce

Enhancing Color Contrast in Donut and Stacked Bar Charts in Salesforce Analytics

Introduction

Clear and effective data visualization plays a crucial role in making dashboards more intuitive and insightful. One common challenge in Salesforce Analytics (CRM Analytics) is ensuring that the colors used in donut and stacked bar charts are distinct enough to differentiate data segments easily. When colors are too similar, it can make interpretation difficult, reducing the overall effectiveness of the visual representation. Enhancing color contrast helps improve readability, supports accessibility, and enhances the user experience. In this blog, we’ll discuss best practices for optimizing color contrast in these chart types.

Why Colour Contrast Matters

1. Improves Accessibility

Users may struggle with low-contrast visuals. Enhancing contrast ensures data is clearly visible to a wider audience.

2. Enhances Data Clarity

When colours in charts are too similar, it can be difficult to distinguish between different segments. Using high-contrast colours makes data easier to analyse at a glance.

Best Practices for Enhancing Colour Contrast

1. Choose Distinct Colors for Similar Data Categories

To make data categories easily distinguishable, avoid using multiple shades of the same color. Instead, select bold and contrasting colors that create a clear visual distinction between segments.

Best practice: Use contrasting colours such as blue, orange, green, and red.
Avoid: Multiple shades of the same colour, like light blue, medium blue, and dark blue.

2. Adjust Transparency & Add Borders in Stacked Bar Charts

When multiple data categories are stacked together, they can blend into one another. Adjusting transparency and adding borders can help improve clarity.

How to Adjust Transparency:

  1. Select the Stacked Bar Chart in your dashboard.
  2. Go to Chart Formatting.
  3. Lower the Transparency setting to enhance contrast.
  4. Enable Border Lines to create clear separations between segments.

3. Apply Conditional Formatting for Quick Insights

Salesforce Analytics allows you to use conditional formatting to highlight key data points with distinct colours. This makes it easier to identify trends at a glance.

Steps to Apply Conditional Formatting:

  1. Open the Lens or Dashboard.
  2. Select the Donut Chart or Stacked Bar Chart.
  3. Click on Conditional Formatting.
  4. Set rules such as:
    • Green for positive trends
    • Red for negative trends
    • Yellow for neutral or warning values
  5. Apply and save changes.

Conclusion

Enhancing colour contrast in donut charts and stacked bar charts within Salesforce Analytics ensures better readability, accessibility, and usability. By using distinct colours, adjusting transparency, and leveraging conditional formatting, you can create visually compelling dashboards that provide clear and actionable insights.

Start optimizing your Salesforce Analytics charts today and elevate your data storytelling!

Categories
Blog salesforce

Create Your First AI Agent in Salesforce

Salesforce leverages Einstein AI and Agent force to provide intelligent virtual agents that help businesses improve customer service. By automating responses and streamlining processes, these AI-driven agents assist in handling inquiries efficiently, ensuring a seamless customer experience.

1. Enable Einstein in Salesforce

Einstein AI must be activated for agent functionalities to work properly. Follow these steps:

  1. Open Setup in Salesforce.
  2. In the Setup Quick Find search bar, type Generative AI and select Einstein Setup.
  3. Click the Turn on Einstein toggle to enable AI capabilities.

2. Publish the Experience Cloud Site

Agents are deployed via Coral Cloud’s Experience Cloud site. To prepare for deployment, follow these steps:

  1. In the Setup Quick Find, search and select All Sites.
  2. Click Builder next to the coral-cloud site. If a popup appears, click OK.
  3. Click Publish in the upper-right corner.
  4. Click Publish in the confirmation window.
  5. Click Got It after successful publication.
  6. Click the Experience Builder Menu icon.
  7. Select Salesforce Setup.
  8. Refresh your browser to reload Setup. You can now close the Experience Site browser tab.

3. Create a New Agent

Now that the Experience Cloud site is ready, create your agent by following these steps:

  1. In the Setup Quick Find, search for and select Agents.
  2. Click + New Agent.
  3. Select Agentforce Service Agent as the type.
  4. Click Next.
  5. Leave all topics as added and click Next.

4. Create a Custom Topic for Your Agent

After setting up the agent, define a relevant topic for its functionality

Remove the default topic by clicking the down arrow next to MigrationDefaultTopic and selecting Remove from Agent.

  1. Click the down arrow next to Manage the topics assigned to your agent, then select New Topic.
  2. Configure the new topic with the following details:
  1. Topic Label: Customer Experience Support
  2. Classification Description: This topic addresses customer inquiries and issues related to booking experiences at Coral Cloud Resorts, including making reservations, modifying bookings, and answering queries about experience details.
  3. Scope: The agent’s role is to assist customers in managing bookings for various experiences offered by Coral Cloud Resorts, ensuring smooth service and issue resolution.
  4. Instruction: If a customer inquires about Activities or Experiences, execute the Get Experience Details action and summarize the results for improved readability. Ensure customer identification before running this action.

5. Setting Up Agent Actions

Agent actions define the tasks your AI agent can perform. These actions allow the AI to interact with Salesforce objects, retrieve data, and update records. To set up agent actions:

  1. Navigate to Agent Actions: Go to Agent Studio and click on Agent Actions.
  2. Create a New Action: Click on New Agent Action and provide a name for the action.
  3. Define Action Parameters: Specify the required inputs for the action, such as record ID, customer name, or case number.
  4. Choose Action Type:
    1. Data Retrieval: Fetch relevant data from Salesforce records (e.g., retrieving an account’s open cases).
    1. Record Creation: Create new records in Salesforce (e.g., logging a support case).
    1. Record Updates: Modify existing Salesforce records based on AI responses.
  5. Configure API Calls (if needed): If the action involves integrating with external systems, configure API calls to fetch or send data.
  6. Test the Action: Run a test to ensure that the action works as expected and returns the correct results.
  7. Save and Deploy: Once validated, save the action and assign it to the appropriate agent.

Conclusion

By following these steps, you have successfully enabled and configured an AI-powered agent in Salesforce using Einstein and Agentforce. This setup ensures seamless customer service interactions, helping businesses provide enhanced support and streamline customer inquiries efficiently.

Categories
Blog salesforce

Revolutionizing Asset-Centric Scheduling with GoMeddo & Sweet Potato Tec

SweetPotatoTec always believed in pushing the boundaries of what’s possible with Salesforce. As a trusted Salesforce Implementation Partner, it has spent years helping organizations streamline their operations by extending Salesforce into new and evolving use cases. Now, as an experienced and certified  GoMeddo implementation partner, SweetPotato is taking the next step—bringing intelligent scheduling to asset-centric industries, ensuring that businesses can efficiently manage bookings for vehicles, equipment, and other high-value assets.

A Partnership Built for the Future

GoMeddo has already proven itself in event scheduling, appointment booking, and resource management. However, its potential extends far beyond that. By partnering with SweetPotato, GoMeddo is now poised to revolutionize how organizations schedule and allocate assets across multiple locations, time zones, and users.

The combination of SweetPotato’s deep Salesforce expertise and GoMeddo’s flexible, 100% Salesforce native, scheduling technology creates a powerful solution for businesses that rely on shared assets. Whether it’s a global automotive company managing a fleet of test-drive vehicles or a medical device provider scheduling equipment rentals across hospitals, this partnership delivers a seamless and efficient scheduling experience.

Sweet Potato is now a certified GoMeddo partner, bringing their deep Salesforce and subject matter expertise to asset-centric scheduling projects. With this certification, they are equipped to implement and optimize GoMeddo solutions, ensuring businesses can seamlessly manage fleet availability, resource allocation, and scheduling within Salesforce. This partnership strengthens our shared commitment to delivering intelligent, efficient booking solutions tailored to industry-specific needs.

Why Asset-Centric Scheduling Matters

For industries where shared resources are essential, inefficient scheduling can lead to operational challenges. Businesses frequently struggle with double bookings, underutilized assets, and manual scheduling processes that create unnecessary bottlenecks. Without a centralized system, coordinating bookings across multiple users and locations quickly becomes complex and time-consuming.

GoMeddo addresses these challenges with a 100% native Salesforce integration, provides real-time visibility into asset availability and automates the scheduling process. This means that companies no longer have to rely on spreadsheets or disconnected systems to manage bookings. Instead, they gain a centralized, intelligent platform that ensures every asset is used to its full potential.

How GoMeddo and SweetPotato Complement Each Other

SweetPotato’s expertise in service type of industries and Salesforce implementation and process automation makes it the ideal partner to bring GoMeddo’s scheduling capabilities into asset-heavy industries. Together, we offer a solution that provides real-time insights, streamlines resource allocation, and eliminates inefficiencies.

This partnership is particularly relevant for industries that depend on high-value assets. In automotive, test-drive vehicles need to be available for multiple sales people throughout the day, month, and year. In the medical field, equipment must be scheduled accurately to ensure availability for training and patient care. Rental companies need insights in fleet availability; whilst in the meantime being able to provide self service for customers.

GoMeddo makes this possible by giving organizations complete transparency over their fleet, increasing the utilization of assets, optimizing fleet sizes, and offering a self-service portal that allows users to book what they need with ease.

What’s Next?

The future of scheduling lies in intelligent automation, and GoMeddo and SweetPotato are leading the way. As we explore new opportunities in AI-driven scheduling with Salesforce’s Agentforce (GoMeddo is one of the first ISVs globally to have an Agentforce appexchange listing), we are excited to help organizations transform how they manage their assets.

If you’re looking for a smarter way to handle scheduling and resource management within Salesforce, now is the time to explore what this partnership can do for you. Let’s start the conversation.

Categories
Blog salesforce

Enabling Revenue Intelligence in Salesforce

Introduction

Revenue Intelligence in Salesforce empowers businesses to enhance their sales processes by utilizing AI-driven forecasting, data-backed insights, and automated account management. To maximize its potential, organizations need to set up essential features such as Pipeline Inspection, Collaborative Forecasts, and Revenue Insights.

In this blog, we will walk through the essential steps to enable Revenue Intelligence in Salesforce.

1. Permissions Setup
Before enabling Revenue Intelligence features, users must have the appropriate permissions. Without these permissions, accessing or modifying revenue-related insights will not be possible. The two key permissions required are:

  • Revenue Intelligence Permissions – This grants access to Revenue Intelligence features, allowing users to analyze sales performance, pipeline trends, and revenue forecasts.
  • Collaborative Forecasts Permissions – This allows users to view and manage forecast data, ensuring that sales teams can track revenue goals effectively.

Once these permissions are assigned to the relevant users or profiles, the next step is to configure Pipeline Inspection.

2. Pipeline Inspection Configuration

Pipeline Inspection provides visibility into opportunity changes over time, allowing sales teams to monitor deal progress, identify risks, and improve forecasting accuracy. To enable this feature:

  • Enable Historical Trending for the Opportunity Object – This helps track changes in opportunity stages, values, and close dates, making it easier to analyze sales trends.
  • Set Up Pipeline Metrics – Define key performance indicators (KPIs) such as win rates, deal velocity, and pipeline health to ensure that sales teams can track performance effectively.

With Pipeline Inspection enabled, businesses can gain deeper insights into their sales pipeline and improve deal conversions.

3. Collaborative Forecasts Setup

Collaborative Forecasts provide structured revenue predictions by analyzing opportunities and expected sales performance. To set up this feature:

  • Create Forecasts Hierarchy – Define the reporting relationships among sales representatives, managers, and executives to ensure accurate forecasting.
  • Create Quotes – Allow sales teams to generate quotes within Salesforce, making it easier to track potential revenue from active deals.

By configuring Collaborative Forecasts, businesses can align sales strategies with revenue goals and improve predictability.

4. Revenue Insights Activation

Revenue Insights provides a historical view of sales performance, helping organizations refine their forecasting and sales strategies. To enable this feature, follow these steps:

  1. Access the Setup Page – Navigate to the Revenue Insights Setup page in Salesforce.
  2. Verify Configuration – Refresh the page to check if the Configure Collaborative Forecasts checkboxes appear in green.
  3. Run System Checks – The wizard will assess whether your org meets the required settings. If the test is successful, click Next. If issues are found, review the feedback and make necessary adjustments.
  4. Select Forecast Types – The wizard will display available forecast types. Ensure that the Get Cloudy Sales Forecast type, which you previously configured, is selected.

By enabling Revenue Insights, organizations gain a clearer understanding of revenue patterns, anticipate risks, and make informed business decisions to drive consistent sales growth.

Conclusion

Enabling Revenue Intelligence in Salesforce is a multi-step process that involves setting up permissions, configuring historical tracking, activating forecasting tools, and leveraging AI-powered insights. By following these steps, businesses can optimize their sales strategies, improve forecasting accuracy, and maximize revenue growth.

By implementing Revenue Intelligence, organizations can gain a competitive edge, enhance sales productivity, and make data-driven decisions that drive long-term success in a dynamic business landscape.

Are you ready to unlock the full potential of Revenue Intelligence in Salesforce? Start enabling these features today and transform your sales performance!

Categories
Blog salesforce

The Future of AI in Salesforce: What to Expect in 2025 & Beyond

Artificial Intelligence (AI) is transforming the Salesforce ecosystem, redefining how businesses interact with customers, automate processes, and drive revenue. As we move into 2025 and beyond, AI in Salesforce will become more intelligent, predictive, and deeply embedded across the platform. Let’s explore the key advancements shaping the future of AI in Salesforce.

1. Einstein AI: The Next Generation of CRM Intelligence

Salesforce Einstein has evolved into a powerful AI assistant, enabling businesses to harness data-driven insights. In 2025, we can expect:

  • Einstein GPT & Generative AI: AI-powered chat, email drafting, and content generation for sales, service, and marketing teams.
  • Einstein Copilot: A conversational AI assistant that guides users through workflows, provides real-time insights, and automates repetitive tasks.
  • Advanced Predictive Modeling: More accurate forecasting and opportunity scoring using machine learning algorithms.

2. AI-Powered Revenue Intelligence & Forecasting

AI will be instrumental in revenue intelligence, empowering sales teams to make data-driven decisions.Key improvements include:

  • AI-driven pipeline management: Real-time insights into deal progression and risk identification.
  • Prescriptive sales recommendations: AI suggesting optimal actions to close deals faster.
  • Automated lead scoring: Prioritizing high-value prospects based on engagement and intent signals.

3. Enhanced Automation in Sales & Service

With AI-driven automation, businesses can reduce manual efforts and improve efficiency. In 2025, we can expect:

  • AI-driven workflows: Automating follow-ups, opportunity updates, and customer interactions.
  • Conversational AI: Enhanced chatbots and voice assistants for sales and service engagements.
  • AI-powered case routing: Intelligent ticket assignment based on urgency and complexity.

4. Personalization at Scale with AI & Data Cloud

Salesforce Data Cloud will integrate AI to deliver hyper-personalized experiences:

  • Real-time customer insights: AI analyzing behavior patterns for tailored marketing campaigns.
  • Next-best action recommendations: AI-driven suggestions for sales reps to enhance engagement.
  • AI-powered segmentation: Smarter audience targeting based on dynamic customer data.

5. AI-Driven Lead Generation & Marketing Automation

AI will continue to optimize lead generation and marketing efforts with:

  • Predictive lead scoring: Identifying high-converting leads with greater accuracy.
  • Automated content creation: AI generating personalized emails, ads, and social media posts.
  • AI-driven customer journey mapping: Predicting and optimizing the customer lifecycle.

6. AI & Low-Code/No-Code Advancements

Salesforce is making AI more accessible with low-code and no-code solutions:

  • Declarative AI tools: Integrating AI into Flow and Process Builder for smarter automation.
  • AI-assisted development: Using AI to suggest and write Apex code for developers.
  • Enhanced chatbot builders: No-code tools to create AI-driven conversational experiences.

7. Trust & AI Governance: Ethical AI in Salesforce

Salesforce is committed to ensuring AI remains trustworthy, ethical, and unbiased:

  • Explainable AI: Transparency in how AI makes predictions and decisions.
  • Bias-free AI models: Continuous refinement to remove bias from AI-driven recommendations.
  • Stronger data privacy measures: Compliance with global data regulations to protect customer information.

Conclusion:

As AI integrates more deeply into every Salesforce cloud, businesses will experience faster automation, smarter decision-making, and highly personalized customer experiences. From AI-driven sales forecasting to generative AI-powered content creation, the future of Salesforce AI promises to redefine CRM strategies in 2025 and beyond.

Categories
Blog salesforce

The Democratization of Salesforce Development: Empowering Non-Technical Users Through Low-Code/No-Code

Imagine This: A marketing manager needs to launch a targeted campaign—fast. Traditionally, this would mean submitting a request to IT, waiting for development resources, and dealing with a long process. But what if that manager could build their own campaign dashboard without writing a single line of code?

This is no longer just a ‘what if.’ It’s the reality of the evolving Salesforce ecosystem. Low-code and no-code (LCNC) tools are empowering non-technical users to create solutions, automate processes, and drive innovation. This quiet revolution is reshaping how businesses harness Salesforce’s power.

The Rise of Citizen Developers

Salesforce has been steadily building tools to democratize development, enabling business users to translate their ideas into real-world solutions without coding. Tools like Flows, Lightning App Builder, Dynamic Forms, and Experience Cloud are designed to bridge the gap between business needs and technical execution.

A sales manager can now automate lead assignment using Flow Orchestration, while a customer service rep can build a self-service portal with Experience Cloud—all without IT intervention. The power is shifting from traditional developers to business users, fostering a new wave of “citizen developers.”

Real-World Success Stories

  • Manufacturing Efficiency: A mid-sized manufacturer used Flows to automate inventory tracking, reducing stock discrepancies by 25% and improving order fulfillment times.
  • Non-Profit Engagement: A non-profit leveraged Experience Cloud to create a volunteer management portal, increasing participation by 40% through improved onboarding and communication.
  • Retail Personalization: A retail business built a customer feedback analysis dashboard with Lightning App Builder, enabling them to personalize marketing campaigns and boost retention by 15%.

The Tangible Benefits for Businesses

The implications of this shift are significant.

  • Agility and Speed: Businesses can respond to market shifts instantly, reducing development cycles.
  • Cost Efficiency: Less reliance on IT means lower costs and better resource allocation.
  • Enhanced Collaboration: Business and IT teams work together more effectively, reducing delays.
  • Increased Innovation: Business users can experiment and iterate solutions without waiting for developers.

The Evolving Role of the Salesforce Professional

This doesn’t mean the role of the Salesforce professional is becoming obsolete. Rather, it’s evolving. The focus is shifting from writing code to enabling others.

  • Enablement and Training: Salesforce professionals are becoming educators, providing training and support to empower citizen developers.
  • Governance and Security: They play a crucial role in establishing and maintaining governance frameworks to ensure security and compliance.
  • Strategic Guidance: They provide strategic guidance on how to leverage low-code/no-code tools to achieve business objectives.

Tips for Successful Implementation

  • Establish a Center of Excellence: Create a dedicated team to provide training, support, and governance.
  • Build a Reusable Component Library: Develop templates and components to accelerate development.
  • Implement Robust Testing and Deployment: Ensure quality and stability through rigorous testing.
  • Create a Clear Governance Plan: Define guidelines for security, compliance, and data integrity.
  • Foster Collaboration: Encourage communication and collaboration between IT and business users.

Addressing the Skill Gap and Training

Salesforce Trailhead is an excellent platform for developing low-code and no-code skills Investing in training programs is crucial for empowering citizen developers. Continuous learning is important to stay updated.

The Future of Automation and AI Integration

AI-powered features like Salesforce Einstein are further enhancing low-code/no-code capabilities. Imagine AI automating the creation of Flows or providing intelligent recommendations for building custom apps. This will continue to blur the lines between technical and non-technical development.

Measuring Success

  • Time-to-Market: Track the time it takes to deploy new solutions.
  • Cost Reduction: Measure the decrease in development costs.
  • User Adoption: Monitor the number of users adopting low-code/no-code solutions.
  • Process Efficiency: Evaluate improvements in business process efficiency.

Conclusion

The democratization of Salesforce development is not just a trend; it’s a fundamental shift. It’s about empowering individuals, fostering innovation, and transforming the way businesses operate. By embracing this change, businesses can unlock the full potential of Salesforce and drive sustainable growth.

Categories
Blog salesforce

From Booked to Recognized: Fixing Revenue Reporting Gaps in Salesforce | Revenue Recognition for CROs & RevOps

Note: This is not intended as financial or GAAP-compliant reporting but rather a revenue recognition tracking approach for operational visibility within Salesforce.

For Chief Revenue Officers (CROs), VPs of Sales, Sales Operations, and Revenue Operations leaders, ensuring accurate revenue recognition reporting in Salesforce is crucial. Booking a deal is only half the story—tracking when and how revenue is delivered is key to accurate forecasting, financial transparency, and strategic decision-making.

The Revenue Recognition Reporting Challenge

Revenue recognition varies across different business models, making it a complex process for many organizations. Here are some common scenarios:

  • Media Products – A digital advertising campaign might be booked today but delivered over 12 months, requiring incremental revenue recognition each month.
  • Event Products – Conference sponsorships and event packages are delivered within a short timeframe, so revenue must be recognized at the time of the event.
  • Subscription Products – SaaS platforms involve recurring revenue with recognition happening on a monthly or annual basis, depending on contract terms.
  • Usage-Based Products – Cloud storage or API consumption models are recognized based on actual usage, which fluctuates monthly, requiring dynamic reporting updates.

Without structured revenue recognition processes in Salesforce, companies struggle with inaccurate reporting, leading to forecasting issues and financial misalignment.

How Sweet Potato Tec Solves This with Salesforce

At Sweet Potato Tec, we built a scalable Salesforce revenue recognition reporting solution using Line Item Schedules and Flow automation. While Salesforce allows manual creation of schedules, it lacks real-time automation, making revenue tracking inefficient.

Our Approach:

Leveraging Standard Line Item Schedules – Salesforce provides a built-in way to schedule revenue, but it requires manual configuration.

Extending with Flow Automation – We built Salesforce Flow automation to dynamically create and update revenue schedules based on the product type and delivery timeline.

Custom Revenue Dashboards – Integrated with CRM Analytics (formerly Tableau CRM) to offer a real-time view of revenue being recognized month over month.

Alignment with Finance Teams – Ensures revenue reports match finance expectations, reducing discrepancies between booked and recognized revenue.

Watch Outs: Key Considerations When Implementing Revenue Recognition Reporting

While implementing revenue recognition in Salesforce, here are some critical challenges and solutions:

  • Event Products (e.g., Conference Sponsorships, One-Time Workshops) – Requires a single line item schedule on the service start date for accurate revenue tracking.
  • Flat Pricing Products (e.g., Fixed Monthly Software Licenses) – Revenue is charged at a fixed rate per period, but quantity is not split in the line item schedules.
  • Quantity-Based Products (e.g., Digital Ads, Print Media Placements) – Both revenue and quantity are split equally over the contract term. Example: A campaign with 120 ad units would be recognized as 10 units per month.
  • Usage-Based Products (e.g., API Calls, Cloud Storage)Revenue fluctuates monthly based on actual consumption, requiring automated updates in Salesforce.
  • Standard vs. Custom Reporting Gaps – If no line item schedule exists, standard Salesforce reports pick up the total price or opportunity amount as a proxy. However, custom reports may not work the same way.
  • Rounding Errors – Splitting revenue can cause decimal-based rounding discrepancies, which need accurate handling.
  • Editing Challenges – Once line item schedules are created, you cannot edit the price at the opportunity product level. To make changes, schedules must be deleted and recreated.
  • Total Price Management – It is essential to store the original total price for accurate revenue tracking.

High-Level Automation Logic

Our Salesforce Flow automation standardizes revenue recognition with three key logic blocks:

Event-Based Revenue – A single line item schedule is created per product to reflect revenue recognition at the time of service.

Flat Pricing Revenue – Revenue is charged on a flat monthly basis, but quantity is not split in the schedule.

Quantity-Based Revenue – Both revenue and quantity are split according to predefined contract rules.

Additionally, product setup plays a crucial role. Initially, we did not create line item schedules for event products, but we later realized that maintaining consistency in reporting was key to accuracy and tracking.

Why This Matters for Revenue Leaders

Accurate Revenue Forecasting – Sales and finance teams can see how much revenue is being realized in real time.

Clear Revenue Attribution – Understand exactly which deals contribute to recognized revenue at any moment.

Automated, Scalable Solution – Eliminates manual data entry, reducing errors and inefficiencies.

Let’s Talk – Improve Your Salesforce Revenue Recognition Today

If you’re struggling with revenue recognition in Salesforce or finding it difficult to track booked vs. delivered revenue, we can help.

📩 Get in touch with Sweet Potato Tec today to discuss a customized Salesforce revenue recognition solution that fits your business model.

🚀 Let’s streamline your revenue reporting together!

Categories
Blog salesforce

How to Configure and Customize CRMA Dashboard Notifications

CRMA dashboards are essential tools within CRM platforms designed to provide detailed and interactive visualizations of customer data. These dashboards aggregate, analyze, and display key metrics, enabling businesses to track and manage customer relationships, monitor sales activities, and evaluate overall performance.

Notifications

Setting up notifications within CRMA dashboards allows your team to be instantly alerted to significant changes in data. This real-time alert system ensures that your team can quickly respond to critical events or shifts, making informed decisions that drive business outcomes.

Here’s a step-by-step guide on how to configure and set up notifications in your CRMA dashboard:

Step 1: Define the Conditions for Notifications

The first step in setting up CRMA dashboard notifications is to define the condition that will trigger the alert. This could be any specific change or event in your data that requires attention. Common examples include:

  • Opportunity value exceeding a threshold (e.g., opportunity amount > 75k)
  • Lead stage change (e.g., lead moves to “Qualified”)
  • Customer engagement (e.g., email opens or webinar registrations)
  • Case escalation (e.g., support case moved to “Critical”)

How to Set the Condition:

  • Navigate to your CRMA dashboard.
  • Select the type of data or metric you want to monitor.
  • Set the criteria that will trigger the notification (e.g., a sales opportunity exceeds a specific dollar amount).

Step 2: Select the Notification Recipients

Next, determine who should be notified when the condition is met. This might include specific individuals, roles, or groups within your organization, such as:

  • Sales leaders or account managers when an opportunity exceeds a set value.
  • Marketing teams when a lead reaches a specific level of engagement.
  • Customer support managers when a critical case is logged.
How to Choose Recipients:

• Identify key stakeholders for the specific condition (e.g., sales leadership for opportunity alerts, marketing team for engagement alerts).
• Specify the recipients by selecting users or roles within your CRM system or dashboard settings.

Step 3: Configure the Notification Format and Delivery Method

  • Once you have defined the condition and the recipients, the next step is to configure the notification’s format and delivery method. Notifications can typically be delivered through several channels such as:Email, In-app pop-up messages, push notifications (on mobile), SMS (if supported)
How to Configure Delivery:
  • Choose the preferred delivery method for each type of notification.
  • Specify the message format, including essential details like record names, values, and links to relevant pages (e.g., opportunity ID, lead status).
  • Set the frequency of notifications—whether you want them to be sent immediately when triggered or in digest form (e.g., daily or weekly summaries).

Step 4: Set Notification Frequency and Timing

  • Notification frequency is an important factor in preventing overload while ensuring that critical events are addressed promptly. You can set up notifications to be sent based on specific schedules or triggered events, such as
  • Instant Notifications: Sent immediately when the condition is met.
  • Scheduled Summaries: Sent at regular intervals, such as daily or weekly, summarizing all relevant notifications.
How to Set Frequency:
  • Determine how often notifications should be sent (e.g., immediately, daily digest).
  • Set the specific times or intervals for recurring notifications (e.g., once a day at 9 AM for case escalations).
  • Ensure that the frequency aligns with the urgency of the events you are monitoring.

Step 5: Test the Notification Setup

Before finalizing the notification configuration, it’s important to test it to make sure it works as expected. Trigger the condition manually (if possible) or wait for an event to occur naturally and check if the notification is received by the correct recipients.

How to Test:
  • Create a test scenario that matches the conditions you’ve set (e.g., create a small opportunity that exceeds the set threshold).
  • Confirm that the notification is delivered to the selected recipients in the correct format and with the correct message.

Step 6: Monitor and Adjust Notification Settings

Once your notifications are live, it’s essential to regularly review them to ensure they stay relevant and effective. As your business needs evolve or based on feedback from recipients, you may need to adjust the conditions, recipients, or frequency accordingly.

How to Adjust Notifications:

  • Review the performance of notifications regularly by checking activity logs or user feedback.
  • Adjust conditions, update recipients, or modify notification frequency as necessary to improve effectiveness.

Best Practices for Setting Up CRMA Dashboard Notifications

  • Avoid Overloading Recipients: Too many notifications can lead to alert fatigue. Be selective about which conditions trigger notifications, focusing on the most important events.
  • Be Specific with Conditions: Narrow your conditions to focus on significant events (e.g., sales opportunities over $50k) to avoid sending alerts for minor changes.
  • Personalize the Message: Make sure the notification message includes key details (e.g., opportunity ID, amount, and the stage) so that recipients can quickly understand the context.
  • Integrate Notifications with Workflow: Consider setting up follow-up tasks or automated actions that are triggered by notifications, ensuring a seamless workflow and fast response times.
Conclusion

By setting up CRMA dashboard notifications effectively, you can ensure that your team remains responsive to key changes in real-time, driving more efficient decision-making and helping your business stay agile. Whether you’re tracking high-value opportunities, customer engagement, or support cases, notifications ensure that no important event goes unnoticed. Follow this step-by-step guide to maximize the impact of your CRMA dashboard and keep your team ahead of the curve.