Sweet Potato

Categories
Blog

Elevate Your Business Operations with Salesforce Standard App Consoles

In today’s fast-paced business environment, efficiency and agility are key to staying competitive and meeting customer expectations. Salesforce, the world’s leading CRM platform, offers a suite of powerful tools and features designed to streamline business operations and enhance productivity. Among these tools, Salesforce Standard App Consoles stand out as versatile solutions that empower organizations to optimize workflows, drive collaboration, and deliver exceptional customer experiences. Let’s explore how Salesforce Standard App Consoles can elevate your business operations:

What Are Salesforce Standard App Consoles?

Salesforce Standard App Consoles are pre-built, customizable applications tailored to specific business functions or industries. These consoles provide a unified, intuitive interface that consolidates relevant data, tools, and processes, allowing users to perform their tasks more efficiently and effectively. Whether you’re managing sales leads, providing customer support, or overseeing marketing campaigns, Salesforce Standard App Consoles offer a seamless and cohesive experience.

Key Benefits of Salesforce Standard App Consoles:

1. Streamlined Workflows:

Standard App Consoles are designed to streamline common business processes, enabling users to complete tasks more efficiently. By consolidating relevant information and tools within a single interface, these consoles minimize the need for navigating between multiple applications or screens, saving time and reducing complexity.

2. Enhanced Collaboration:

With Salesforce Standard App Consoles, collaboration among team members is seamless and intuitive. Features such as Chatter, Salesforce’s built-in collaboration platform, allow users to communicate, share insights, and collaborate on projects in real time, fostering a culture of teamwork and innovation.

3. Customization and Flexibility:

While Salesforce Standard App Consoles come with pre-configured layouts and functionalities, they are highly customizable to meet the unique needs of your business. Administrators can easily modify page layouts, add custom fields, and integrate third-party applications to tailor the console to specific workflows and requirements.

4. Real-Time Insights and Analytics:

Standard App Consoles provide users with access to real-time data and analytics, empowering them to make informed decisions and take timely action. Dashboards and reports offer valuable insights into key performance metrics, sales forecasts, and customer trends, enabling organizations to identify opportunities and address challenges proactively.

5. Mobile Accessibility:

Salesforce Standard App Consoles are accessible on any device, including desktops, laptops, tablets, and smartphones. This mobile accessibility ensures that users can stay connected and productive whether they’re in the office, on the go, or working remotely, enabling business continuity and flexibility.

Examples of Salesforce Standard App Consoles:

1. Sales Console:

The Sales Console is tailored to sales professionals and provides a unified view of leads, opportunities, accounts, and contacts. It streamlines the sales process from lead generation to deal closure, enabling sales teams to prioritize leads, track progress, and collaborate effectively.

2. Service Console:

The Service Console is designed for customer support teams and offers a comprehensive view of cases, customer interactions, and knowledge articles. It enables support agents to resolve customer issues quickly, deliver personalized service, and maintain high levels of customer satisfaction.

3. Marketing Console:

The Marketing Console is geared towards marketing professionals and provides insights into campaigns, leads, and marketing performance. It enables marketers to create, execute, and analyze marketing campaigns, track ROI, and optimize marketing efforts to drive business growth.

Conclusion:

Salesforce Standard App Consoles are powerful tools that enable organizations to optimize workflows, enhance collaboration, and deliver exceptional customer experiences. By leveraging the capabilities of these consoles, businesses can streamline operations, drive productivity, and achieve their strategic objectives with confidence. Whether you’re in sales, customer service, marketing, or any other role, Salesforce Standard App Consoles empower you to work smarter, faster, and more efficiently, driving success in the digital age.achieve our business goals, and stay ahead of the competition in today’s dynamic marketplace.

Categories
Blog

Flow Features in the Spring 24 release

Introduction

In this blog post, we will delve into the updates to Salesforce Flow introduced in the Spring ’24 release.

A Salesforce release encompasses regular changes and fixes, introducing new features and security updates. Salesforce typically delivers three releases annually, known as the Spring, Summer, and Winter releases.

1. Transform Element Aggregation

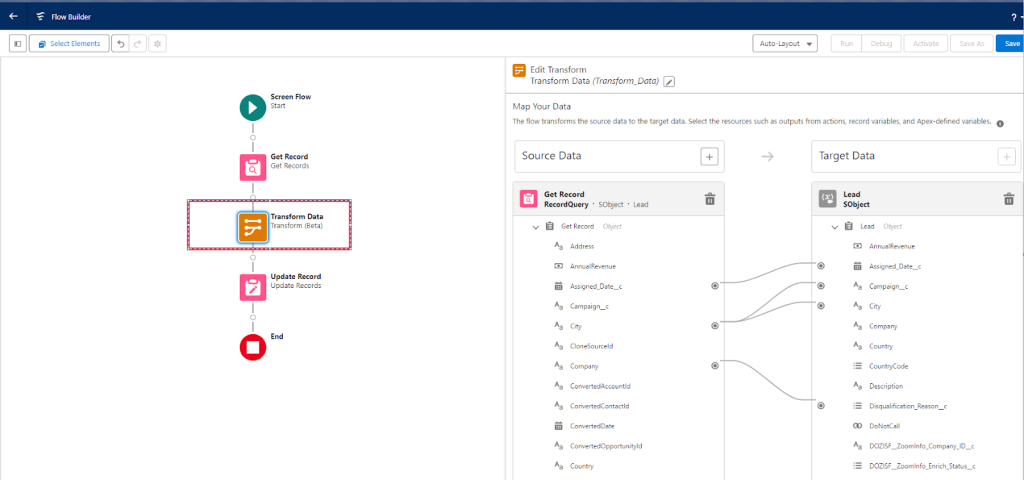
The Transform element facilitates the aggregation of amount, customer ID, and status fields from the source data into the fields for the target data. It automatically establishes mappings between collections containing the specified fields, enhancing visibility into resource data structures. Each item in the source collection must correspond to an item in the target collection, maintaining alignment within their respective hierarchical locations.

2. Repeater Component for Screen Flows

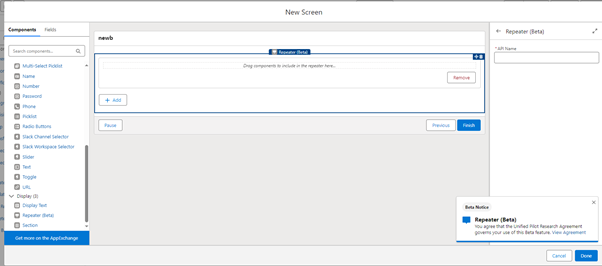
Eliminate the hassle of repeatedly filling in information across multiple screens with the new Repeater (Beta) component for Screen Flows. This component empowers Flow builders to capture and repeat data input seamlessly within a single screen.

3. Enhancements to Auto-Saved Flows

Building on the auto-save functionality introduced in Winter ’24, Spring ’24 expands its scope by enabling auto-save for all elements except Screens and Actions. Say goodbye to manual saving and seamlessly save your progress as you navigate through your Flow configuration.

4. Platform Event Run-As Enhancements

In the Spring ’24 release, Platform Events now offer the option to execute them using the default workflow user. This feature provides flexibility in assigning actions to the default user rather than the triggering user. To activate this functionality, select the Default process User as the assigned user for executing the process by going to the Advanced Settings menu on the Start element. 

5. Reacting to changes on the same screen using text templates

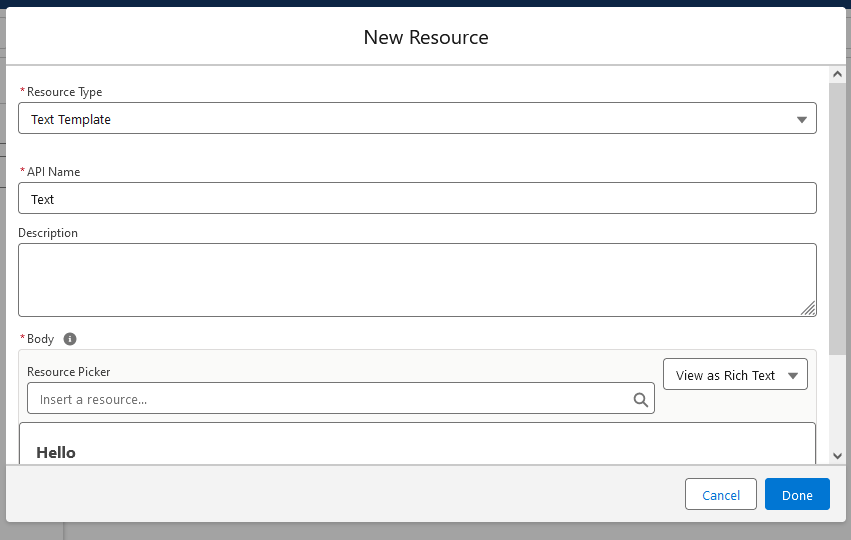
Text Template resources now have the capability to dynamically react to changes in component outputs within the same screen. For instance, a Text Template referencing the output of a Name component on the screen will update in real-time as the user modifies the Name component during runtime.

6. Flow Management Streamlining

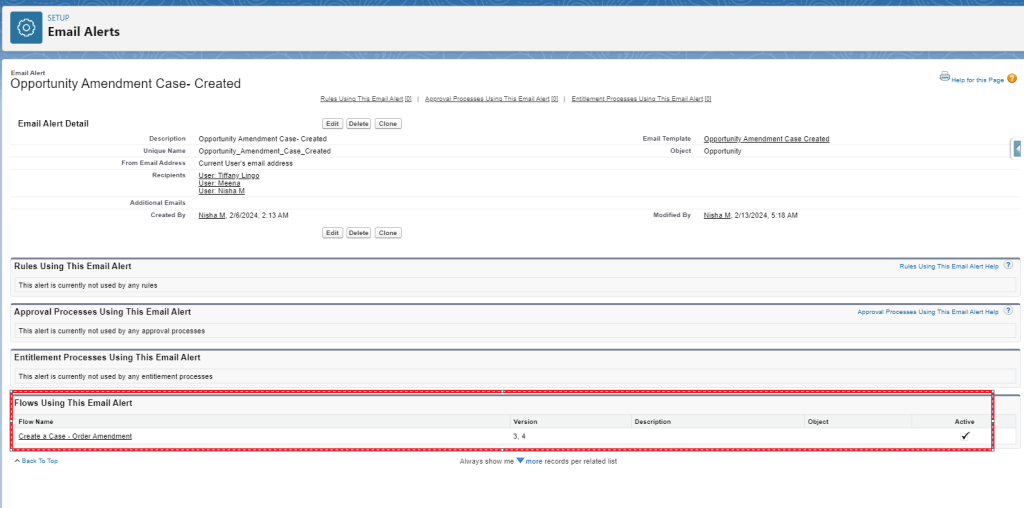
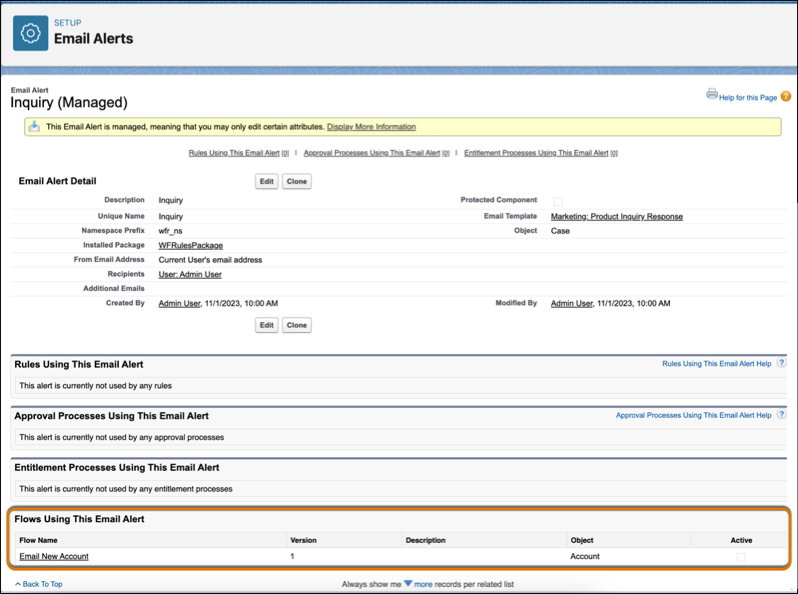
Efficiency in flow management is significantly enhanced with the new found capability to identify flows utilizing specific email alerts effortlessly. This enhancement enhances visibility into the usage of email alerts, thus facilitating more streamlined management practices. 

Summary

In Spring ’24, Salesforce Flow underwent a symphony of significant enhancements, enriching our beloved tool. Once again, a balanced blend of minor enhancements and quality improvements accompanies the more impactful new features and functionality. These additions promise to greatly ease and streamline the tasks of admins, developers, and business users once integrated across your organization.

Categories
Blog

Multi-Factor Authentication (MFA)

What is MFA?

Multi-Factor Authentication (MFA) is a security measure that requires users to provide multiple forms of identification before granting access to a system or account. Instead of relying solely on a password, MFA adds an extra layer of protection by combining two or more authentication factors.

Types of Authentication Factors

  1. Something You Know: Passwords or PINs.
  2. Something You Have: Security tokens, smart cards, or mobile devices.
  3. Something You Are: Biometric data like fingerprints, facial recognition, or retina scans.

Importance of MFA

  • Mitigating Password Vulnerabilities

Passwords, no matter how complex, can be compromised. MFA mitigates this risk by adding an additional layer of authentication beyond just what the user knows.

  • Protecting Against Phishing

MFA helps guard against phishing attacks where malicious actors attempt to trick users into revealing their credentials. Even if a password is phished, the second factor provides an additional barrier.

  • Compliance and Regulation

Many industries and regulatory bodies now mandate the use of MFA to enhance data protection. Adhering to these standards not only strengthens security but also ensures compliance with legal requirements.

Implementing MFA

Choosing the Right Factors

Selecting appropriate authentication factors depends on the level of security required and the usability for end-users. Striking the right balance is crucial for effective implementation.

Using Salesforce Authenticator

1. Enable MFA in Salesforce

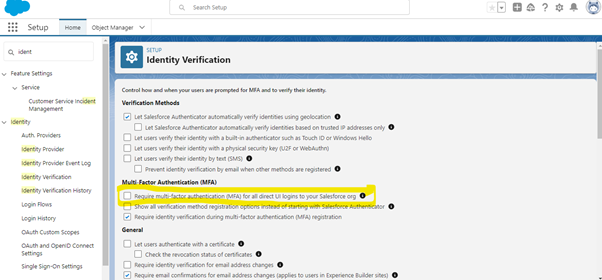
Step 1 : Enable permission in the Identity Verification

MFA auto-enable enables the ‘Require Multi-Factor Authentication (MFA) for all direct UI access to the Salesforce organization’ configuration when a version update occurs.

This configuration requires all users to log in directly to Salesforce to provide their username and password with additional MFA authentication methods.

Step 2 : Create a license with the following permissions
  1. Go to “permission settings.”
  2. Click on the “New” button.
  3. Enter a label like “Multi-Factor Authentication”
  4. Save your changes.
  5. Click “System Permissions”.
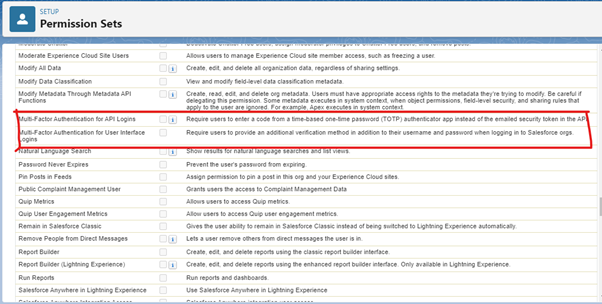
  6. Select the following checkboxes:
    • Multi-factor authentication for UI logins
    • Multi-factor authentication for API logins

7. Save Changes. 

Step 3 : Grant permissions to users
  1. Go to Settings and find “Users”.
  2. Click on the user you want to update.
  3. In the Permission Set Assignments section, select Edit Assignments. 
  4. From the “Available Permission Sets” list, click the permission set you want to add, and then select “Add.”
  5. Save Changes.  
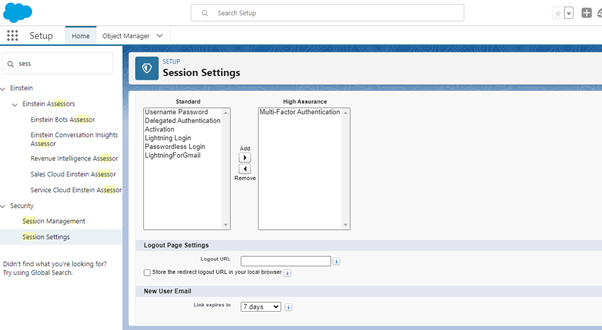
  6. To enable MFA with Session security level, make sure to add more authentication in the Discard category Respect.

2. Configure Multi-Factor Authentication Settings

  • Under Multi-Factor Authentication, configure the settings according to your organization’s security policies.
  • Set the policies for factors such as session length, IP ranges, and login hours.

3. Download and Install Salesforce Authenticator

  • Instruct users to download and install the Salesforce Authenticator app on their mobile devices (available on major app stores).

4. User Enrollment

  • Users need to enroll in MFA through the Salesforce setup page.
  • During the enrollment process, they will connect their Salesforce account to the Authenticator app.

5. Verification Methods

  • Salesforce Authenticator supports various verification methods, including push notifications, one-time passcodes (TOTPs), and SMS.
  • Users can choose their preferred method during the enrollment process.

6. Login with MFA

  • After enabling MFA, users will need to complete the MFA process during login.
  • They will receive a push notification or generate a one-time code in the Authenticator app.

User Education

Educating users about the importance of MFA and guiding them through the setup process is essential. This helps ensure a smooth transition and encourages widespread adoption.

Conclusion

Multi-Factor Authentication is a powerful tool in the fight against cyber threats, providing an additional layer of defense that goes beyond traditional password protection. As technology continues to advance, so too will the methods of authentication. Embracing MFA today is not just a security measure but a proactive step towards safeguarding our digital future.

Categories
Blog

Salesforce Project Deployment Best Practices: Ensuring a Seamless Transition

Introduction:

When it comes to managing your Salesforce environment, ensuring smooth and seamless deployments is crucial. Whether you’re implementing new features, making changes to existing configurations, or updating data, following best practices can help you avoid service interruptions and maintain the integrity of your CRM system. In this blog, we’ll explore the top Salesforce deployment best practices that enable you to make changes without causing downtime or disruption. We will delve into the seamless and efficient deployment processes achieved through the strategic use of change sets in our Salesforce projects, highlighting the key advantages and best practices that have proven instrumental in delivering successful implementations.

1. Extensive Testing in Sandboxes:

One of the fundamental best practices for Salesforce deployment is to thoroughly test changes in sandbox environments. Salesforce offers different types of sandboxes, including Developer, Developer Pro, Partial, and Full, which allow you to replicate your production environment for testing. This is your first line of defence against errors and issues.

2. Change Sets for Controlled Deployment:

Salesforce Change Sets provide a controlled and efficient way to bundle configuration changes and deploy them from one environment to another, such as from sandbox to production. Ensure that your changes are bundled logically, and use validation steps to check for errors before deployment.

3. Plan for Off-Peak Hours:

Schedule deployments during off-peak hours to minimize the impact on users. Even though Salesforce is known for its availability, deploying during low-traffic times reduces the chances of service interruptions.

4. Robust Rollback Strategy:

Always have a well-defined rollback plan in place. While you aim for successful deployments, preparedness for potential issues is critical. A rollback strategy helps you quickly revert to the previous system state if needed.
5. Communication and Stakeholder Involvement:

Proactive communication with stakeholders and end-users is vital. Clearly communicate the purpose of the deployment, expected timelines, and instructions for reporting issues.

6. Data Backups:

Back up your data before deploying changes. Data loss can be catastrophic, so having a secure backup ensures you can recover if the need arises.

7. Performance Testing:

Perform load and performance testing in your sandbox to evaluate how changes will impact system performance and to ensure that the system can handle new configurations without degradation.

8. Monitor During Deployment:

Throughout the deployment process, keep a close eye on the system. A dedicated team should be ready to address any issues that may arise in real-time. Monitoring tools can help you identify and resolve problems quickly.

9. User Training and Adoption:

If the deployment involves changes in user processes, offer training and guidance to users ahead of time. Educated users are more likely to embrace new features and processes.

10. Post-Deployment Validation:

After the deployment is complete, validate that the changes have been applied correctly and that the system is functioning as expected. This final check ensures the success of the deployment.

Conclusion:

Salesforce deployments are an essential part of managing your CRM system effectively. By following these best practices, you can ensure that your Salesforce deployments are executed smoothly, with minimal service interruption, and a high level of user satisfaction. Planning, testing, and communication are key elements in achieving a seamless transition during deployments.
Incorporating these best practices into your Salesforce deployment strategy will help you maintain data integrity, improve user adoption, and ensure the continuous success of your Salesforce implementation.

Categories
Blog

How ‘Learn and Stand’ Shapes Personal and Professional Triumph

Learn, what is to be learnt, with no flaws; once learnt,
Stand by what you learned – Thiruvalluvar

In a world characterized by rapid change and constant innovation, the adage “Learn and Stand” serves as a guiding principle for those seeking personal and professional excellence. This blog delves into the virtues of embracing a mindset of continuous learning and the transformative impact it can have on individual growth.
Knowledge Empowers Growth:

  • Learning provides individuals with the necessary tools to navigate life’s complexities, empowering them with knowledge to make informed decisions and cultivate a sense of autonomy
  • Standing confidently in any situation becomes a natural outcome when armed with the power of continuous learning.

Adopting a Growth Mindset:

  • The concept of “Learn and Stand” embodies a growth mindset, where challenges are seen as opportunities for advancement rather than insurmountable barriers
  • Welcoming the learning journey fosters resilience, perseverance, and a readiness to tackle challenges directly. As the saying goes, Efforts never go in vain.

Professional Distinction:

  • In professional settings, ongoing learning distinguishes individuals. Employers highly regard those who actively strive to improve their skills and expand their knowledge base.
  • Regardless of whether it’s through formal education, workshops, or on-the-job experiences, dedicating oneself to learning positions individuals as dynamic contributors to their fields

Cultivating Adaptability:

  • Continuous learners are naturally more adaptable. They welcome change, seeing it as a chance to evolve rather than a threat to stability.
  • Standing firm in the face of uncertainty becomes second nature, as the ability to adapt becomes a core component of their character.

Inspiring Others:

  • Those who embody the “Learn and Stand” philosophy become beacons of inspiration for others. By showcasing the benefits of continuous learning, they motivate peers and colleagues to embark on their own educational journeys.
  • The collective commitment to learning creates a culture of growth and excellence within communities and organizations.
Wrap-up:

The ethos of “Learn and Stand” encapsulates a mindset that surpasses conventional limits, opening avenues to personal satisfaction and professional achievement. By fostering a hunger for knowledge and embracing the trials of perpetual learning, individuals not only empower themselves but also ignite inspiration in others. In a world where distinction often correlates with constant growth, the voyage of learning emerges as a catalyzing influence, propelling individuals toward boundless prospects

Categories
Blog

Enable Email-to-Salesforce

Introduction

Email-to-Salesforce is a feature that allows you to associate emails with Salesforce records, enabling seamless integration of your email communication with the CRM platform. This feature enhances collaboration and ensures that relevant correspondence is centralized within Salesforce records, providing a comprehensive view of interactions.

Here’s a step-by-step guide on how to set up and use Email-to-Salesforce:

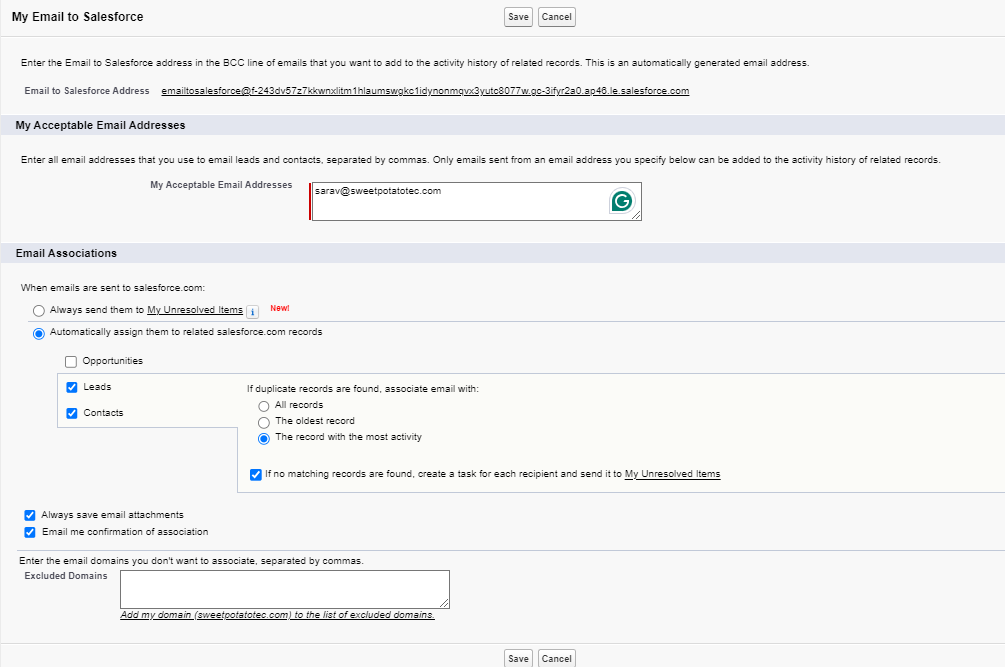
1. Enable Email-to-Salesforce:

a. In Salesforce, go to Personal Setting.
b. In the Quick Find box, type “Email-to-Salesforce.”
c. Select “Email-to-Salesforce” from the search results.
d. Enable the feature by checking the “Enable Email-to-Salesforce” checkbox.

Please see the below image,

2. Forwarding Emails:

After enabling Email-to-Salesforce, you will be provided with a unique email address specific to your organization.

Forward emails you want to associate with Salesforce records to this unique email address by adding them in the BCC of your email.

3. Verification:

Salesforce automatically associates the forwarded email with the specified record based on the email address.

Verify the association by checking the “Emails” related list on the corresponding record in Salesforce.

If there are no records with the email address then it will be landed into ‘My Unresolved Items’ and then from there you can attach it to the records.

4. Customizing Email-to-Salesforce:

Adjust settings such as the allowed email domains and other parameters in the Email-to-Salesforce settings based on your organization’s needs.

Tips and Best Practices:

Email Content and Attachments:

The entire content of the forwarded email, including attachments, is associated with the Salesforce record.

Security and Permissions:

Ensure that users forwarding emails have the necessary permissions to associate emails with Salesforce records.

Error Handling:

Monitor any error notifications or bounce-back emails from Salesforce, as they may indicate issues with the association process.
By using Email-to-Salesforce, you streamline communication tracking and ensure that valuable correspondence is linked directly to the relevant records in your Salesforce instance. This integration enhances collaboration and provides a comprehensive view of interactions, contributing to a more efficient and organized workflow.

Conclusion:

In conclusion, the Email-to-Salesforce integration is poised to be a catalyst for positive change in our customer relationship management practices. Its potential to drive operational efficiency, improve collaboration, and deepen our understanding of customer interactions positions it as a strategic asset for our organization.

Categories
Blog

Automating File Attachments from Opportunities to Accounts in Salesforce Using Flows

Introduction:

In the dynamic world of Salesforce, automation plays a crucial role in enhancing productivity and efficiency. One common requirement for sales teams is the seamless transfer of files and documents associated with opportunities to their corresponding accounts. In this blog post, we’ll explore how you can achieve this using the power of Salesforce Flows.

Understanding the Challenge:

In Salesforce, opportunities and accounts are often interlinked, and it’s common for sales professionals to work with various documents and files throughout the sales process. Manually attaching these files from opportunities to their respective accounts can be time-consuming and prone to errors. Automation provides a solution to this challenge, allowing you to streamline the process and ensure accuracy.

Create a Flow:

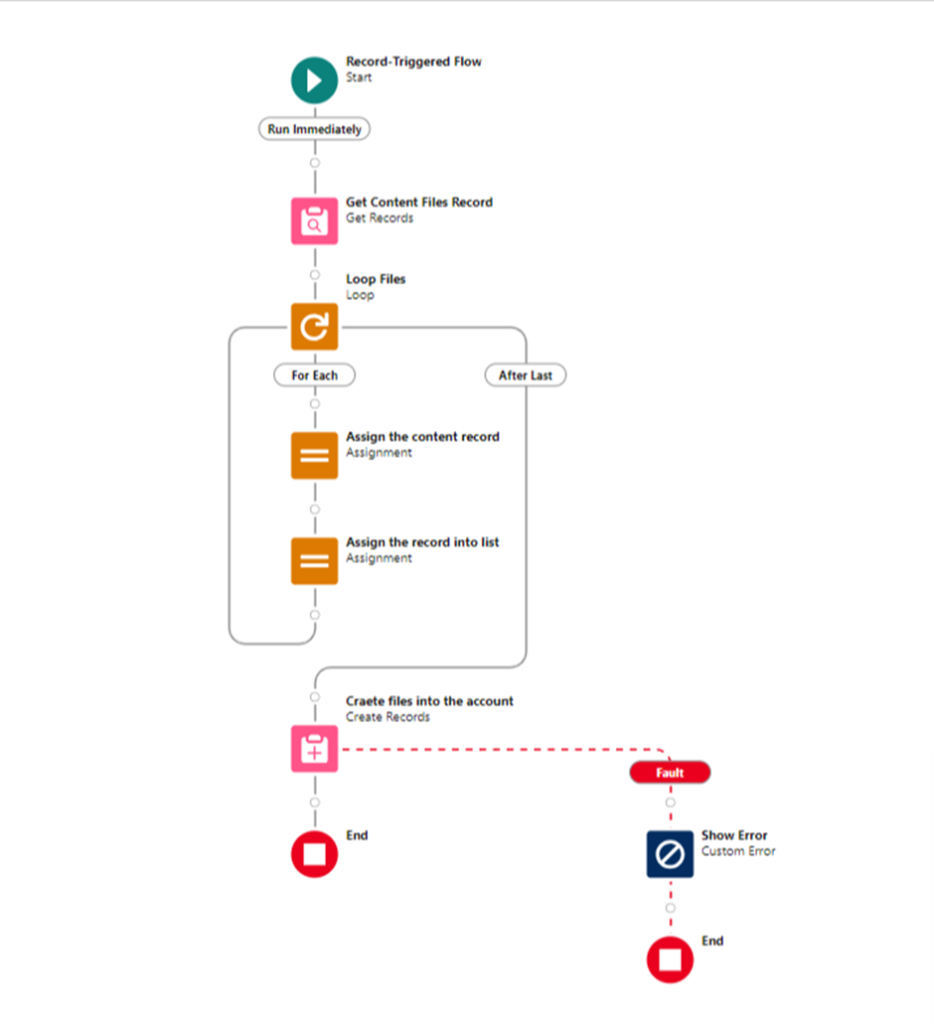
Build a flow that captures the necessary information and performs the file attachment. Use the ‘Record Trigger’ element to initiate the flow when the specified conditions are met.

1. Start – Record Triggered Flow:

Begin the automation process by setting up a record-triggered flow. Specify the condition for triggering the flow, such as when the opportunity status is marked as “Closed-Won.” This ensures that the flow initiates at the right point in the sales process.

2. Get Records – Retrieve Content Document Files:

Utilize the ‘Get Records’ element within the flow to retrieve content document files associated with the triggered opportunity record. This step ensures that the relevant files are identified and ready for further processing.

3. Loop – Iterate Through Retrieved Files:

Implement a loop within the flow to iterate through each file obtained from the ‘Get Records’ step. This looping mechanism allows for the systematic handling of multiple files associated with the closed-won opportunity.

4. Note: Define Variables:

Establish two essential variables to facilitate efficient record handling:
a. Content Record (CR):
A single-record variable designed to hold information for each content file.

b. Content Record List (CRL):
A list variable that accumulates multiple content records. This list serves as a container for all files associated with the opportunity.

5. Assignment 1 – Assign Retrieved Records to CR Variable:

Within the flow, Create the ‘Assignment’ element to assign the content records obtained in the loop to the Content Record (CR) variable. This step ensures that each file’s information is stored in a structured manner.

6. Assignment 2 – Assign CR Variable to CRL:

Utilize another ‘Assignment’ element to transfer the single Content Record (CR) into the Content Record List (CRL). This transformation allows for the consolidation of information from individual files into a comprehensive list.

7. Create Records – Attach Multiple Records:

Leverage the ‘Create Records’ element within the flow, utilizing the resource from the Content Record List (CRL). This step efficiently creates multiple records, attaching the content of each file to the associated account. It ensures that the entire process is automated, saving time and reducing the risk of errors.

8. Add Fault Path Element for Error Handling:

Enhance the robustness of your flow by adding a fault path element to the ‘Create Records’ element. In the event of an error during the file attachment process, this fault path allows users to view and understand the specific error details.
Configure the fault path to capture any potential errors that might occur, such as missing data or issues with the file attachment process. This ensures that even if an error occurs, it is captured and users are notified to take appropriate action.

Conclusion

Automating file attachments in Salesforce not only saves valuable time for sales teams but also minimizes the risk of errors associated with manual processes. The streamlined workflow empowers sales professionals to focus on core tasks, ultimately contributing to a more efficient and productive sales cycle. As your organization embraces automation, the benefits extend beyond time-saving to improved data accuracy, reduced administrative burden and enhanced overall Salesforce user experience. By staying at the forefront of Salesforce innovation, your business is better positioned to adapt and thrive in today’s competitive landscape.

Categories
Blog

Maximizing Efficiency with Salesforce Data Loader: Leveraging ContentNote and ContentDocumentLink

Introduction:

In today’s fast-paced business environment, managing and organizing content efficiently is crucial for any successful organization. Salesforce, as a leading Customer Relationship Management (CRM) platform, provides powerful tools like Data Loader to facilitate seamless data management. In this blog post, we’ll delve into the nuances of utilizing Salesforce Data Loader to upload and link Content Notes via ContentNote and ContentDocumentLink objects.

What are ContentNote and ContentDocumentLink?

ContentNote represents a text-based note in Salesforce, allowing users to store important information directly in the platform. On the other hand, ContentDocumentLink establishes a relationship between Salesforce records and files (ContentNote or ContentVersion). This allows for easy access to files from relevant records.

Prerequisites for Uploading Content Note

Before diving into the Data Loader process, ensure you have the following:

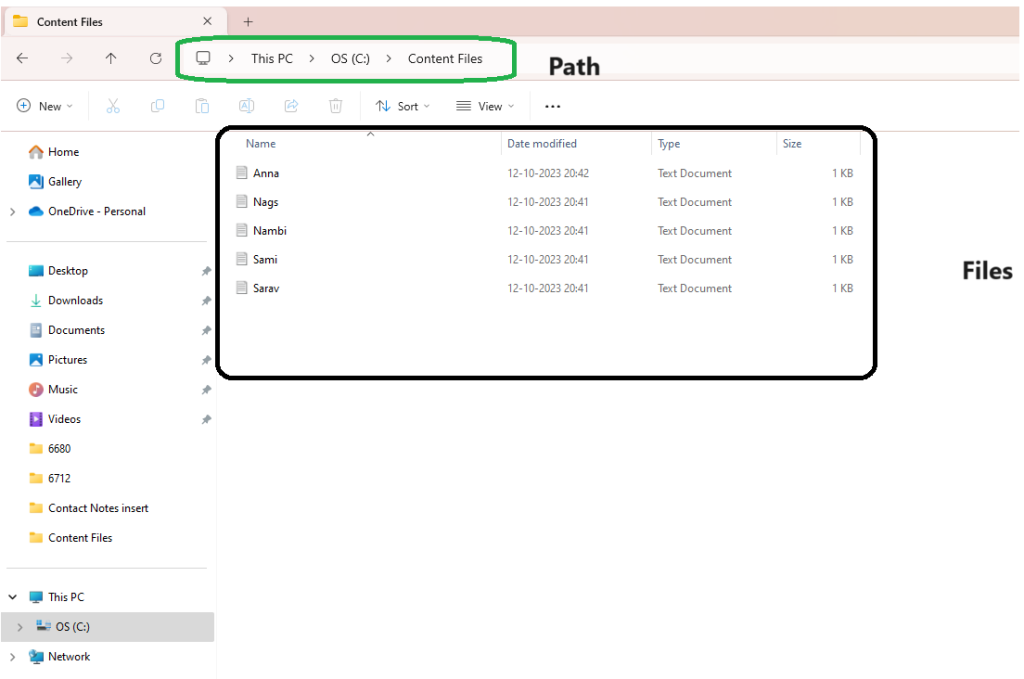
  1. Text File on Your Local Desktop: The content you wish to upload should be stored in a text file on your local desktop. This file will be referenced in the Excel sheet.

2. Excel File with Content Path Column: Create an Excel file containing a column named Content that specifies the file path of the notes. This will be used as a reference point for Data Loader.

Steps to Upload Content Note using Data Loader

  1. Login to Salesforce: Open Salesforce and log in to your account.
  2. Open Data Loader: Launch the Salesforce Data Loader.
  3. Select Operation: Choose the operation you want to perform. In this case, it will be Insert.
  4. Select Object Type: Pick ContentNote from the list of available objects.
  5. Browse for CSV File: Locate and select the Excel file containing the Content column.
  6. Mapping Fields: Map the Content in your CSV file to the appropriate field in Salesforce.

7. Start the Insert Operation: Click on the ‘Create or Edit a Map’ button. This will start the insertion process.
8. Monitor Progress: Keep an eye on the progress bar to ensure successful insertion.
9. Review Results: After completion, review the results to confirm that the Content Notes have been uploaded successfully.

Establishing Links with ContentDocumentLink

Now that we have uploaded Content Notes, let’s proceed to link them with relevant records.

  1. Data Loader Steps: Follow the above steps to insert the ContentDocumentLink.
  2. Browse for CSV File: Locate and select the Excel file or your success file from the previous insert notes, ensuring it contains a column with the Salesforce record IDs to be linked.

3. Mapping Fields: Map the `LinkedEntityId` (representing the Salesforce record) and `ContentDocumentId` (representing the Content Note) columns appropriately.

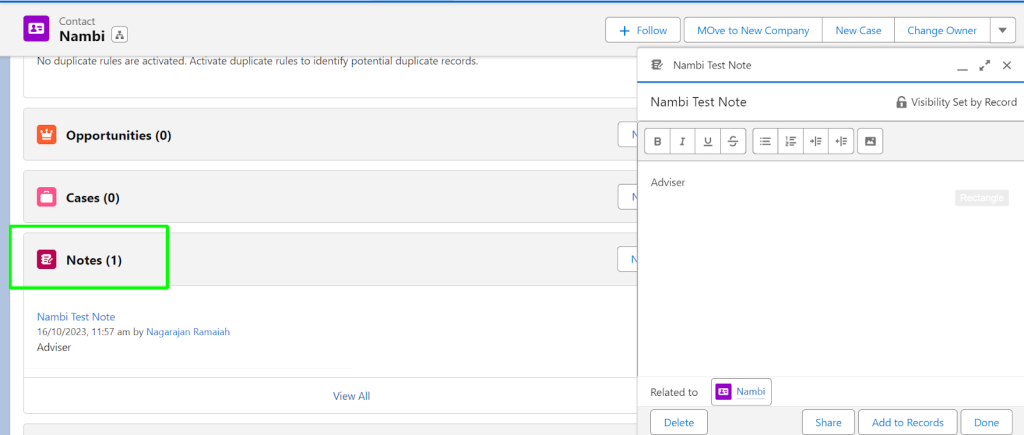
We have successfully uploaded a comprehensive list of notes associated with the contact records. You can conveniently access the contact record-related list, and effortlessly review the uploaded notes.

Conclusion

Effectively utilizing Salesforce Data Loader to upload and link Content Notes via ContentNote and ContentDocumentLink objects can significantly enhance your data management capabilities. By following these steps and ensuring the necessary prerequisites, you’ll be well on your way to optimizing your Salesforce experience.

Remember, a well-organized database with accessible content can streamline your workflow and lead to more informed decision-making. So, start leveraging these powerful Salesforce features today!

Categories
Blog

Exploring Salesforce Spring ’24 Transformative Feature Highlights

Introduction:

Welcome to the Spring ’24 feature highlights! Discover the latest advancements,from Lightning report upgrades to dynamic forms and dashboard refinements, this release promises to redefine your user experience.

1) Effortlessly Modify Lightning Report Filters:

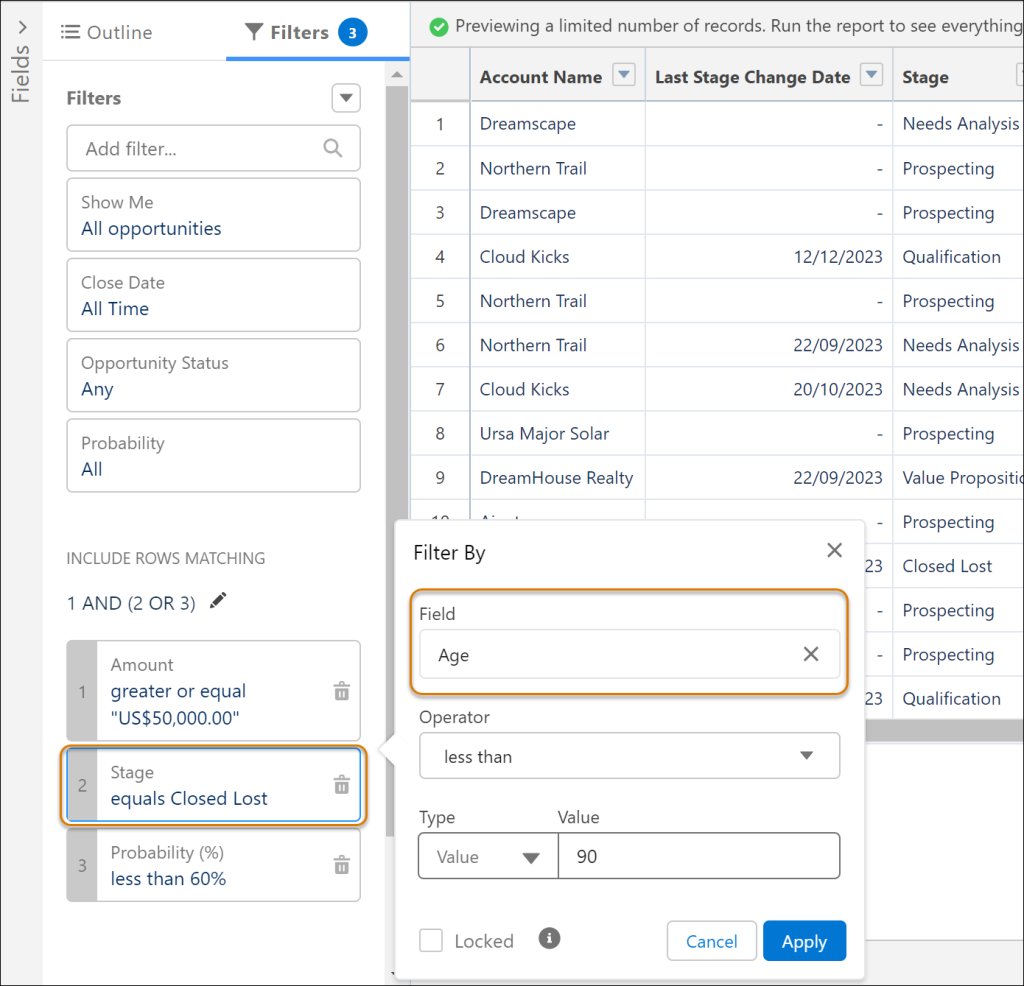
Efficiently update Lightning report filters by changing fields without deleting and recreating filters. Easily transition from, say, Stage to Age in an opportunity report without reconfiguring the filter. Unlike earlier releases, now modify the field, operator, and value seamlessly. This feature, initially in Salesforce Classic, is now available in Lightning.

2) Customize Field Visibility Based on Device in Dynamic Forms:

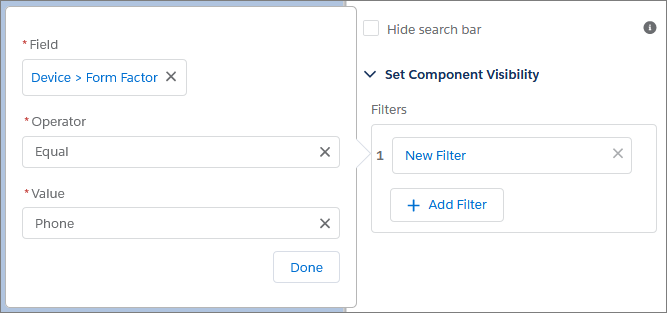
Previously, visibility rules for device form factors applied to sections and components, not individual fields. Now, gain finer control over desktop and mobile Lightning record pages, restricting field visibility based on form factors like desktop or phone

3) Enhance Dynamic Forms Pages with Related Object Fields:

Access and display data from related objects by dragging cross-object fields onto your record page in the Lightning App Builder.

4) Enable Permission Set Groups Across All Editions:

Permission Sets Groups are now accessible in all editions of Salesforce.

5) Receive Alerts Prior to Deleting Permission Sets Assigned to Users:

Deleting a permission set within an assigned permission set group now triggers an error, ensuring users are not assigned to empty groups. Previously, this action was unrestricted, leading to assignments without enabled permissions.

6) Updated Migrate to Flow Tool:

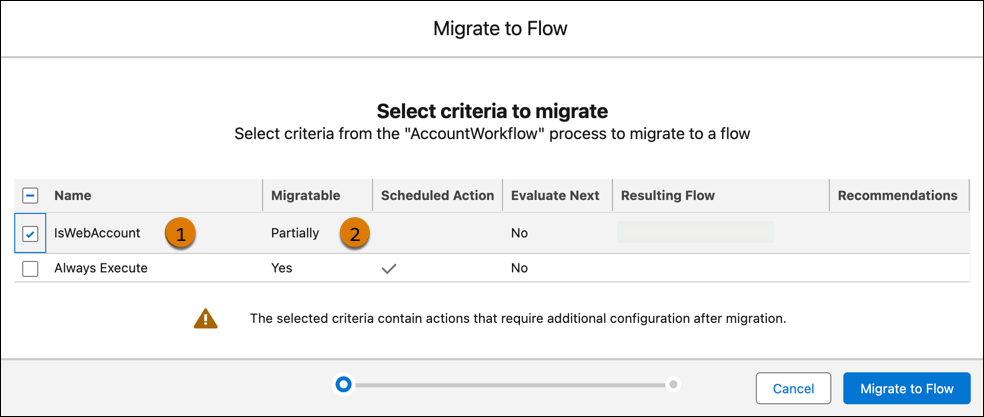
The Migrate to Flow tool enables partial migration for most actions, except invocable ones. The migration results specify actions requiring additional configuration in Flow Builder to finalize the migration.

7) Einstein Search Enabled by Default:

Einstein Search is now enabled in all Salesforce orgs unless the DoNotAutoEnable flag is active. Opt-out via the Search settings page. Previously, orgs lacking MySearchPilot and SearchAssistant permissions couldn’t access Einstein Search

8) Transfer Lightning Dashboard Ownership:

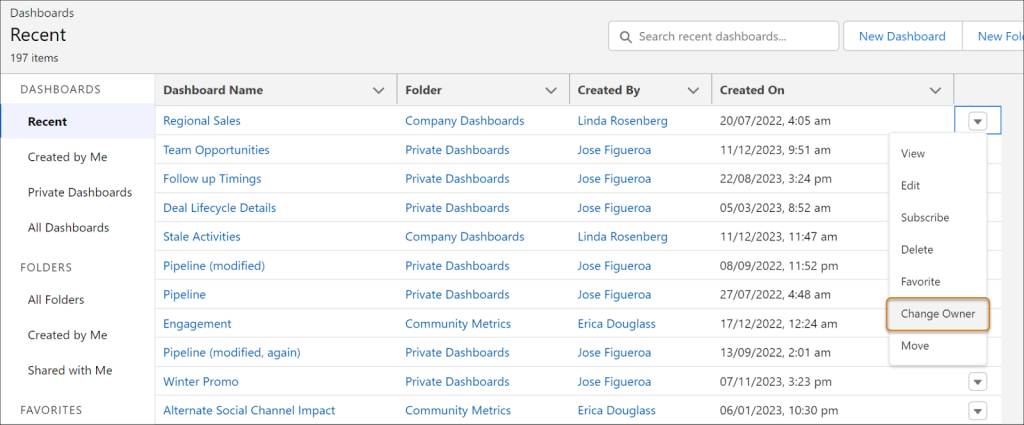
Simplify Lightning dashboard ownership transfer for role changes or when an owner departs. Now, efficiently update ownership for multiple dashboards in one go, including sending email notifications to the new owner. In the past, granting access to a new owner involved cloning or recreating the dashboard.

9) Optimize Data Viewing with More Dashboard Filters:

In all Salesforce editions, users can now use up to five filters on Lightning dashboards to refine and target data. This allows the reuse of the same dashboard for different teams, saving time and effort, and eliminating the need to clone dashboards for various business units.

10) Find Flows Utilizing Email Alerts:

This update introduces a new category in Email Alerts Setup, allowing you to identify flows utilizing email alerts.

Conclusion:

With Spring ’24, Salesforce introduces transformative features, promising enhanced user adaptability and streamlined administrative control. Explore these new features to unlock the full potential of your Salesforce platform.